I recently audited a friend’s site and realized their Google Ads tracking was firing the moment the page loaded, long before I even clicked the consent banner. It was a stark reminder that simply having a banner displayed doesn’t guarantee you aren’t breaking privacy laws.
Google Ads scripts are designed to start tracking and collecting data immediately to help optimize your campaigns. However, under strict regulations like the GDPR, CCPA, ePrivacy Directive, and more, loading these tracking scripts before a visitor explicitly opts in is a compliance violation that can lead to significant fines.
The good news is that blocking these scripts does not mean losing your valuable advertising data. By utilizing Google Consent Mode, you can strictly comply with privacy laws while still preserving your conversion measurement. You just need a tool to ensure the scripts wait for permission.
In this tutorial, I will show you how to block Google Ads scripts until consent using WPConsent. You can simply click the links below to navigate through this guide.
What Google Ads Scripts Are and Why They Need Consent
Before jumping into the tutorial, it helps to understand exactly what you’re dealing with. When you install Google Ads tracking on your WordPress site, several scripts run in the background and set cookies on your visitors’ browsers.
These are not just harmless bits of data. Under GDPR and other privacy laws, they are classified as non-essential cookies that require explicit opt-in consent before they can load.
Here is a breakdown of the most common Google Ads cookies you will find on your site:
| Cookie Name | Purpose | Duration | Category |
|---|---|---|---|
_gcl_au | Google Ads conversion linker stores experiment data and click info | 90 days | Marketing |
_gcl_aw | Stores Google Ads click identifier (gclid) after an ad click | 90 days | Marketing |
_gcl_dc | Used by DoubleClick for conversion tracking | 90 days | Marketing |
IDE | Used by DoubleClick to register and report user actions after viewing or clicking ads | 13 months | Marketing |
ANID | Used for ad personalization on non-Google sites | 13 months | Marketing |
Every one of these cookies gets set the moment your Google Ads scripts execute, which under a default WordPress setup happens as soon as the page loads. That means every visitor, whether they are from Berlin, London, or Los Angeles, gets tracked before they have any say in the matter.
The legal landscape makes this a serious problem. Under the GDPR, you must block Google Ads cookies before they load or face fines of up to EUR 20 million or 4% of your global annual revenue.
The Digital Markets Act designates Google as a gatekeeper, requiring Consent Mode v2 for all EEA advertisers. California’s CCPA and CPRA also have requirements around tracking and data sharing. And the ePrivacy Directive reinforces cookie consent requirements across EU member states.
The good news is that you can stop Google Ads tracking before consent is given without losing your advertising data entirely. That said, let’s look at the steps for setting up Google Ads script blocking.
Blocking Google Ads Scripts Before Consent
The easiest way to set up Google Ads consent in WordPress is by using WPConsent.
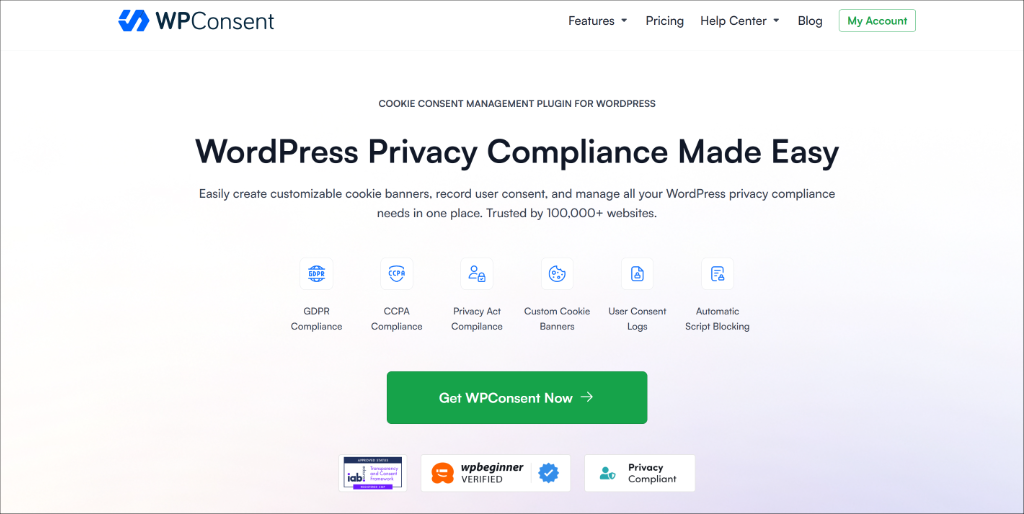
It is the best cookie consent plugin for WordPress that helps you manage cookies without editing code or requiring technical knowledge.
WPConsent offers powerful features that allow you to automatically scan Google Ads cookies and block them. You also get prebuilt cookie banner templates, geolocation rules for popular privacy laws (CCPA, GDPR, LGPD), AI-powered auto translations, custom script and iframe blocking, and much more.
Besides that, here’s why I recommend WPConsent for Google Ads compliance:
- Automatic script blocking with a maintained database of known tracking scripts
- Built-in Google Consent Mode v2 support (one-toggle setup)
- IAB TCF verified and recognized by Google and major ad networks
- 100% self-hosted, so your consent data stays on your server
- Built by the WPBeginner team, trusted by millions of WordPress users
What You Will Need Before Getting Started
Before I dive in, let’s make sure you have everything in place. This tutorial assumes you already have Google Ads tracking installed on your WordPress site, whether through the Google tag (gtag.js), Google Tag Manager, or a plugin like MonsterInsights.
Here is what you need:
- A self-hosted WordPress website (WordPress.org, not WordPress.com)
- Google Ads conversion tracking or remarketing tags are already installed on your site
- Admin access to your WordPress dashboard
- The WPConsent plugin (I will walk you through installing it in Step 1)
Let’s get started!
Step 1: Install and Activate WPConsent
The first thing you will want to do is head over to the WPConsent website and choose a plan that fits your needs.
Once you have signed up and completed your purchase, log in to your WPConsent account and download the plugin ZIP file from your account downloads page.
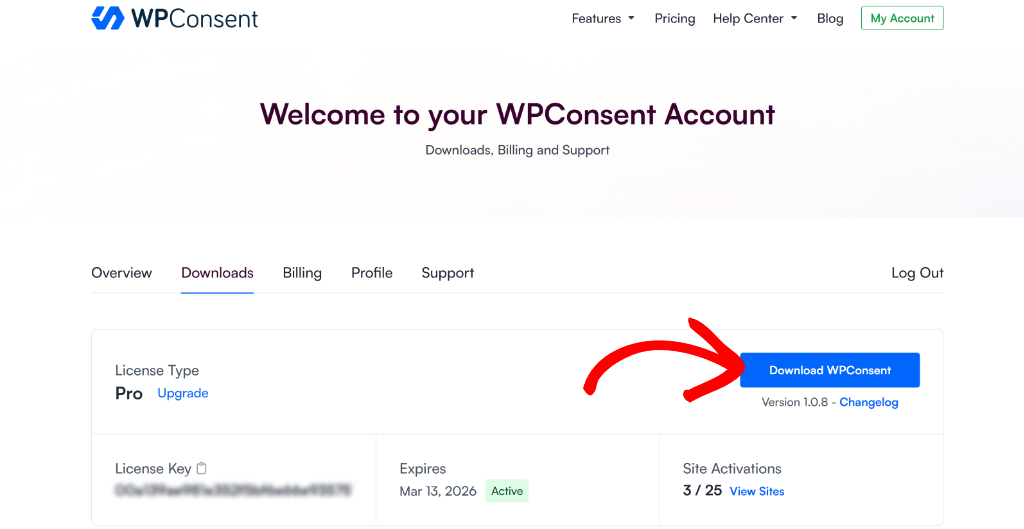
Next, you will need to upload the plugin files to your WordPress site and install WPConsent.
Simply log into your WordPress admin dashboard and navigate to Plugins » Add Plugin. At the top of the page, you will see an Upload Plugin button. Go ahead and click it, then upload the WPConsent ZIP file you just downloaded.
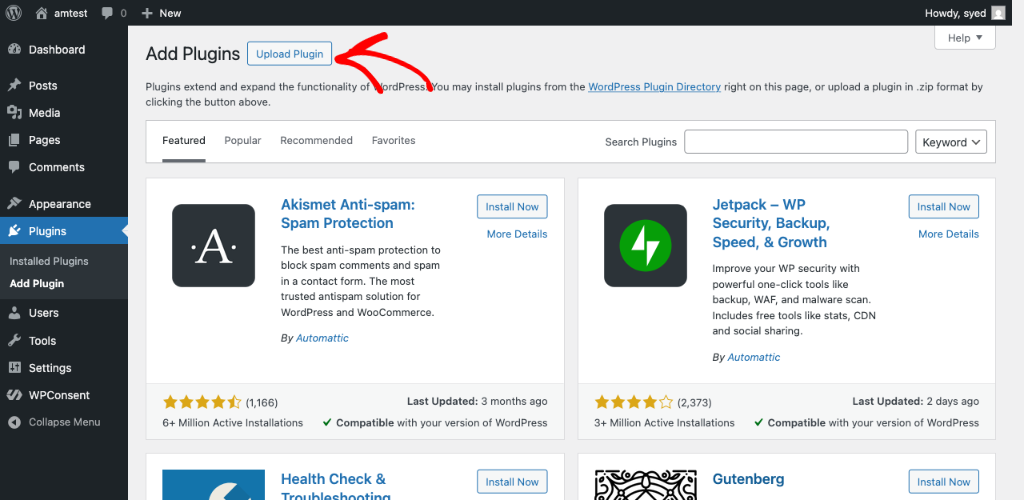
If you need help with this, then please see this guide on how to install a WordPress plugin.
After activation, you will notice WPConsent appear in your admin sidebar menu. The plugin may also launch a quick setup wizard to help you get started.
For the purposes of this tutorial, I am going to walk through each setting manually, so you understand exactly what each option does and why it matters for your Google Ads cookie consent on WordPress.
Step 2: Run the Cookie Scanner
WPConsent comes with a powerful built-in cookie scanner that crawls your site and identifies every cookie and tracking script running on your pages. This is incredibly useful because most site owners have no idea just how many cookies their site sets, especially from third-party services like Google Ads.
To run the scanner, navigate to WPConsent » Scanner in your WordPress admin sidebar. You will land on the Website Scanner page with a Scan Your Website button. Go ahead and click it.
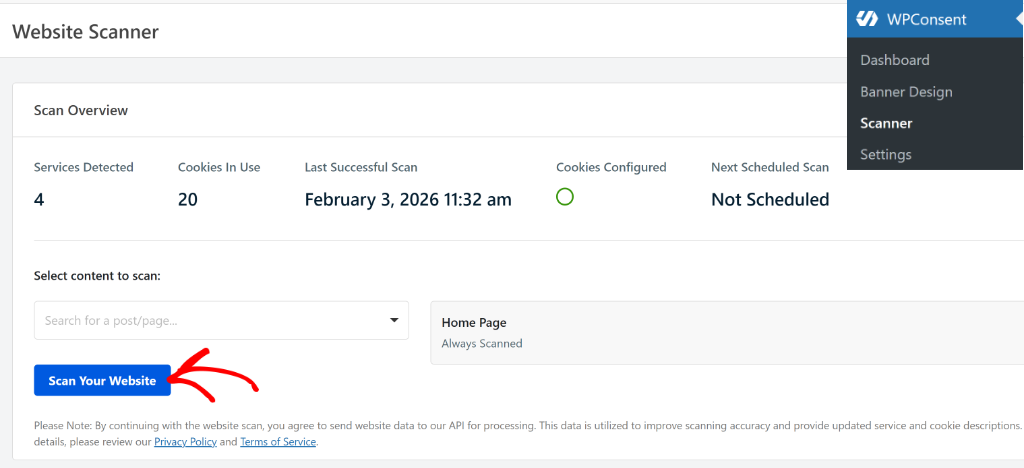
The scanner will take a moment to crawl your site. Once it finishes, you will see a detailed list of every cookie detected, organized by category.
Simply scroll down to the Detailed Report section and look for Google Ads under the Marketing category.
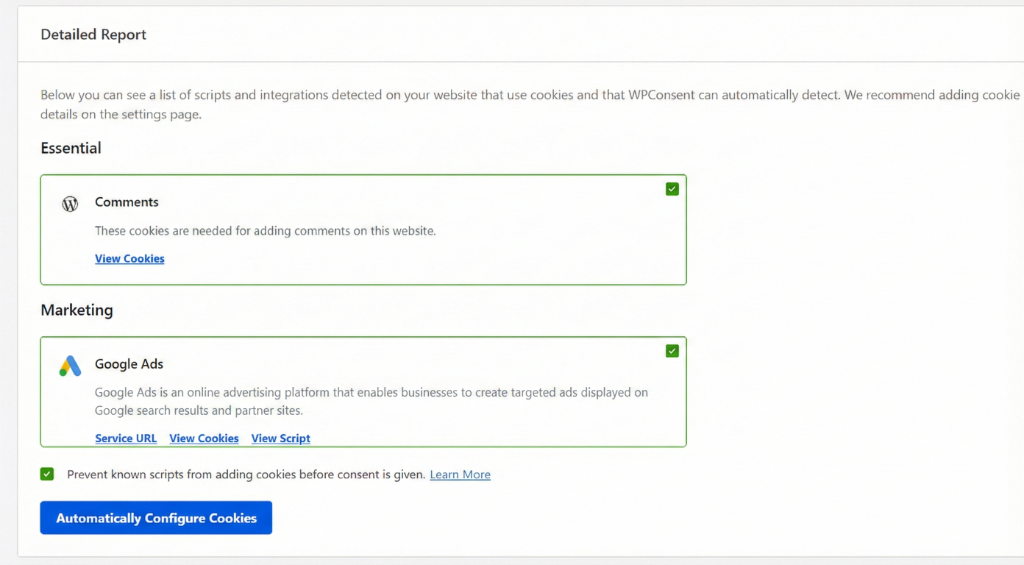
Next, you can click the Automatically Configure Cookies button. Make sure that the ‘Prevent known scripts from adding cookies before consent is given’ checkbox is selected.
This scan gives you a clear picture of the problem. Every one of those marketing cookies has been loading for all your visitors, regardless of whether they consented. Now it is time to fix that.
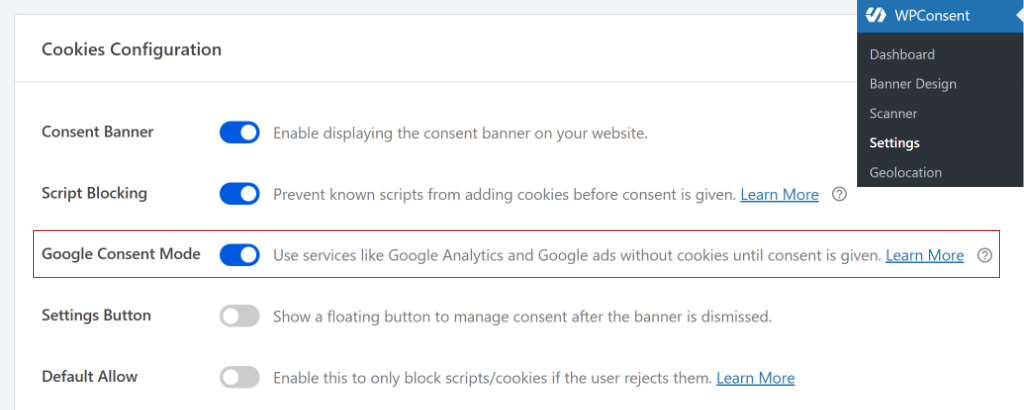
Step 3: Enable Automatic Script Blocking for Google Ads
With the scan complete, you know exactly which Google Ads scripts and cookies are on your site. Now let’s make sure they do not load until your visitors give their explicit consent.
You can navigate to WPConsent » Settings in your admin sidebar. You will land on the main Settings tab, where you will find a toggle labeled Script Blocking. Go ahead and turn this toggle ON.
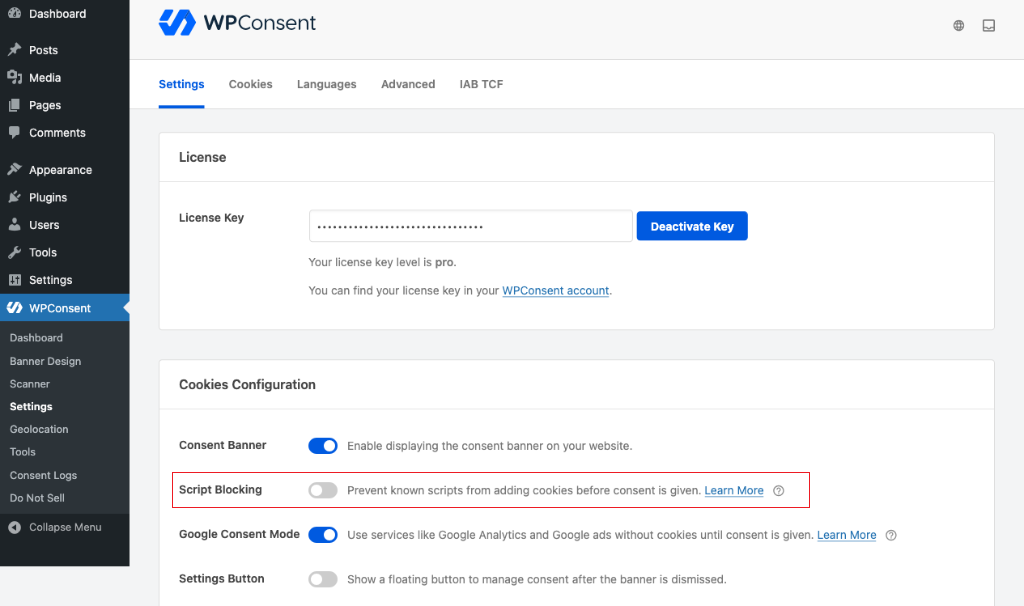
What this does behind the scenes is powerful and elegant. WPConsent maintains a comprehensive database of known tracking scripts from services like Google Ads, Google Analytics, Facebook Pixel, Microsoft Clarity, and many others.
When you enable script blocking, WPConsent automatically detects these scripts on your pages and prevents them from executing until the visitor has consented to the appropriate cookie category.
This is what makes WPConsent such an effective Google Ads script blocking plugin: it handles detection and categorization for you, so you do not need to manually identify and configure each script.
The beauty of WPConsent’s automatic script blocking is that you do not need to manually identify and configure each script. If you have any custom scripts or iframes that are not automatically detected, you can add those manually, but for Google Ads, the automatic approach covers everything, including the remarketing tag.
An important thing to note is that with script blocking enabled, your Google Ads cookies will no longer load until consent is granted. As a result, Google will have less data to work with. In order to preserve your advertising data, you’ll need to enable the Google Consent Mode (GCM).
Let’s look at how you can do that in the next step.
Step 4: Enable Google Consent Mode
When Google Consent Mode is enabled, Google scripts are allowed to load but operate in restricted mode (no cookies, cookieless pings only). This helps safeguard your advertising data.
To enable this option, you can head to the WPConsent » Settings page, look for the Google Consent Mode toggle and turn it ON.
You might be wondering why you need this when you have already blocked the scripts.
Google Consent Mode is a framework that tells Google’s tags exactly how to behave based on your visitors’ consent choices. Without it, blocking Google Ads scripts means Google gets absolutely zero data from visitors who have not consented. With Consent Mode enabled, Google’s tags can adjust intelligently.
Here is how it works. Google Consent Mode v2 uses four key parameters to control data collection:
- ad_storage — Controls whether Google Ads cookies can be set
- ad_user_data — Controls whether user data can be sent to Google for advertising purposes
- ad_personalization — Controls whether data can be used for remarketing and ad personalization
- analytics_storage — Controls whether Google Analytics cookies can be set
When a visitor has not yet consented (or actively rejects cookies), all of these parameters default to “denied.” When they accept marketing cookies, the parameters flip to “granted,” and everything works as normal.
WPConsent communicates these consent signals to Google’s tags automatically, which means you do not need to write any custom gtag() calls or modify your tracking code. This is what makes WPConsent Google Ads consent mode setup so straightforward.
Many WordPress consent plugins require you to configure Consent Mode manually through Google Tag Manager or custom code. WPConsent handles it with a single toggle.
Google made Consent Mode v2 mandatory for advertisers targeting users in the European Economic Area, and WPConsent gives you full support with a single toggle.
Step 5: Configure Your Cookie Banner
Now that the technical backbone is in place, it is time to set up the banner that your visitors will actually see and interact with. Navigate to WPConsent » Banner Design in your admin sidebar.
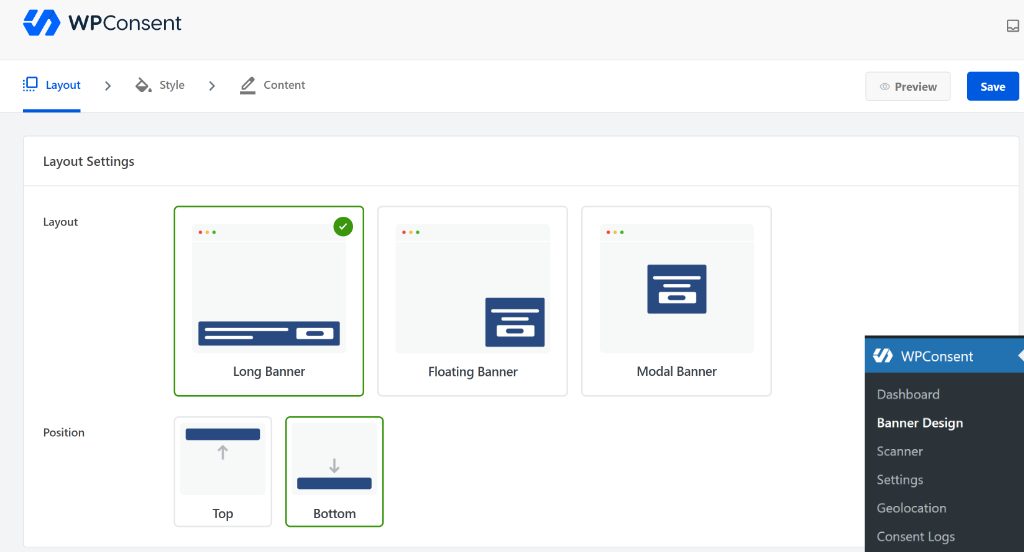
This is where you can customize the appearance, style, and text of your cookie consent banner. WPConsent gives you full control over colors, positioning, and messaging so the banner fits naturally with your site’s design.
The most important thing from a compliance standpoint is that your banner includes three clear options: Accept All, Reject, and Preferences.
You can follow our complete guide on how to easily add a cookie consent banner to your WordPress website.
I also want to point out that WPConsent is one of the few WordPress consent plugins that has earned official IAB TCF verification, which means Google and other ad networks automatically recognize and trust your consent signals. This is particularly important for making your Google Ads WordPress setup GDPR compliant.
Take a few minutes to style the banner so it matches your site’s look and feel, then save your changes. With the banner configured, we are ready to test the whole setup.
Step 6: Test Your Setup
With everything configured, let’s make sure it all works together properly. Save all your changes in WPConsent, then open your site in an incognito or private browsing window.
You can use incognito mode because it starts with a clean slate, no cached cookies or previous consent choices that might interfere with testing.
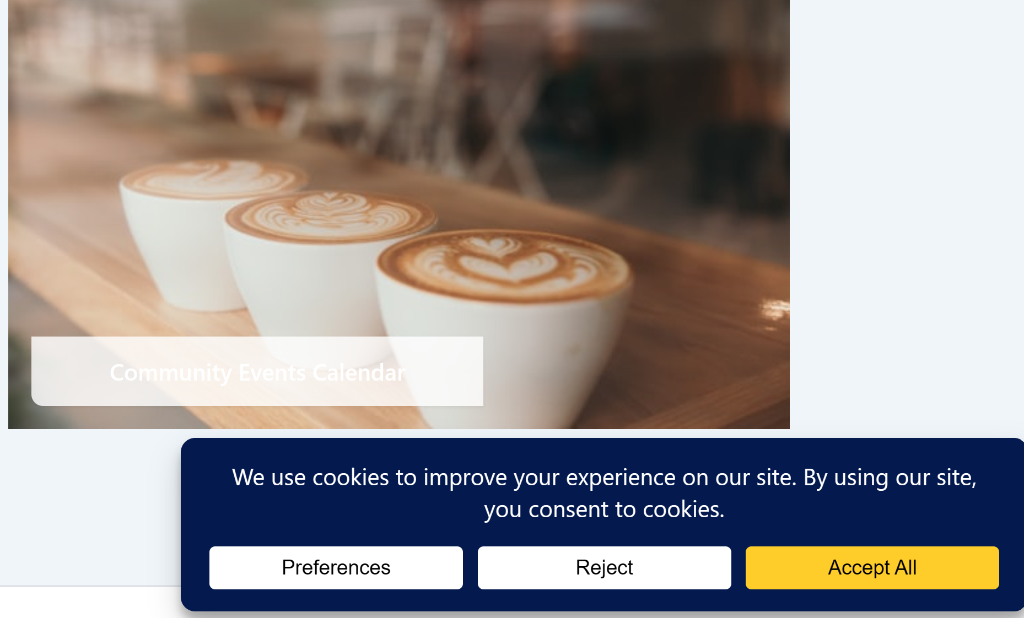
When the page loads, you should see your cookie consent banner appear. Before you interact with it, take a moment to appreciate what is happening behind the scenes. Your Google Ads scripts are being held back. No marketing cookies are being set. Your site is compliant right out of the gate.
Now try clicking Accept All and refreshing the page. At this point, Google Ads scripts should load normally, and the associated marketing cookies should appear.
Verify Google Ads Scripts Are Actually Blocked
Trusting that everything is working is not enough. I recommend verifying your setup with your own eyes. Here are three methods you can use to confirm that Google Ads scripts are properly blocked until consent.
Method 1: Browser Developer Tools
This is the most direct and reliable verification method. Open your site in Chrome using an incognito window and press F12 (or right-click and choose Inspect) to open Developer Tools.
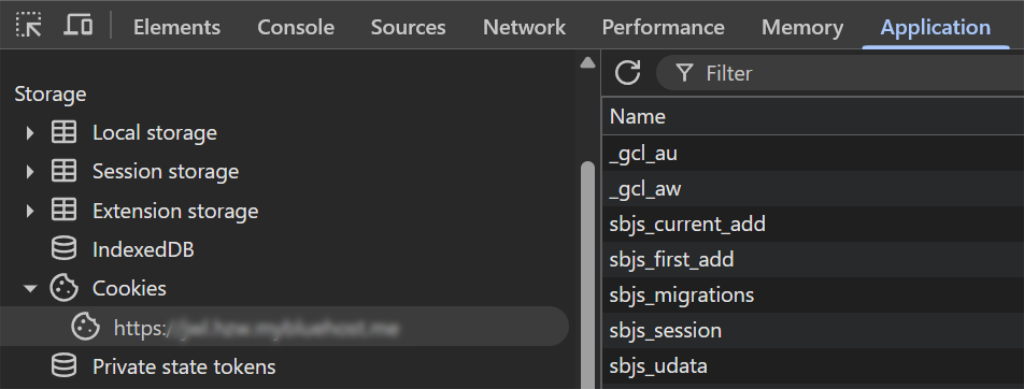
From here, you can click on the Application tab at the top of DevTools, then expand the Cookies section in the left sidebar and click on your site’s domain.
Before you interact with the consent banner, look through the list of cookies. You should not see _gcl_au, _gcl_aw, _gcl_dc, IDE, or any other Google Ads cookies listed here. If the list is clean, your script blocking is working.
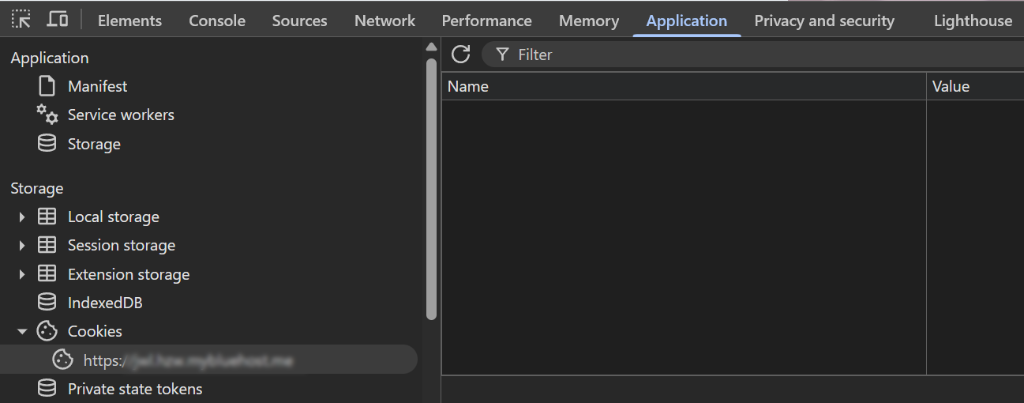
You can also check the Network tab for extra verification. Filter the network requests by typing “googleads” or “gtag” in the filter box. Before consent, you should see no requests going out to Google’s advertising domains.
Now, go ahead and accept cookies through your consent banner. Once you refresh the page, check the Application tab again. This time, you should see the Google Ads cookies appearing, confirming that the scripts loaded properly after consent was given.
This before-and-after check is the gold standard for verification. I recommend running through it every time you update your tracking setup or make changes to your consent configuration.
Method 2: WPConsent Consent Logs
For ongoing monitoring, WPConsent keeps detailed records of every consent interaction.
Note: Consent Logs are disabled by default. If you do not see any consent entries, go to WPConsent » Settings and scroll down to find the Consent Logs toggle.
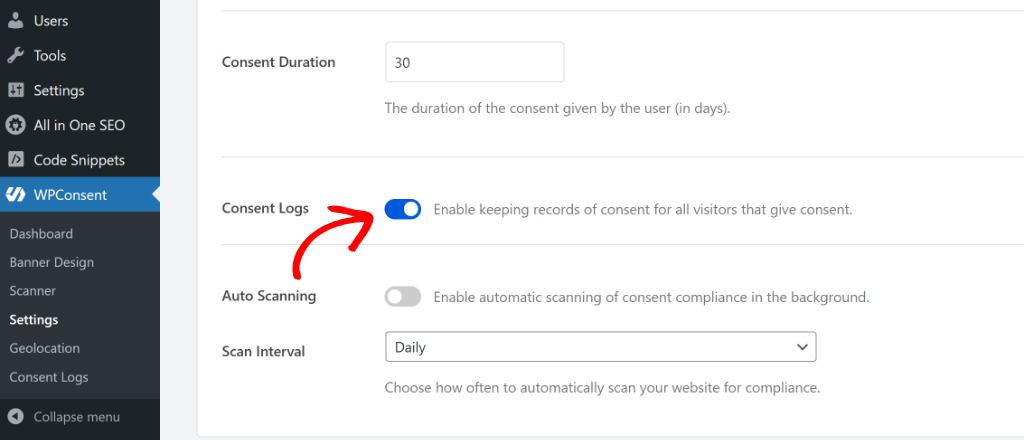
Go ahead and click on it to turn it ON and click Save Changes. New consent events will be recorded going forward.
To view them, simply navigate to WPConsent » Consent Logs in your WordPress admin to see a log of all visitor consent events.
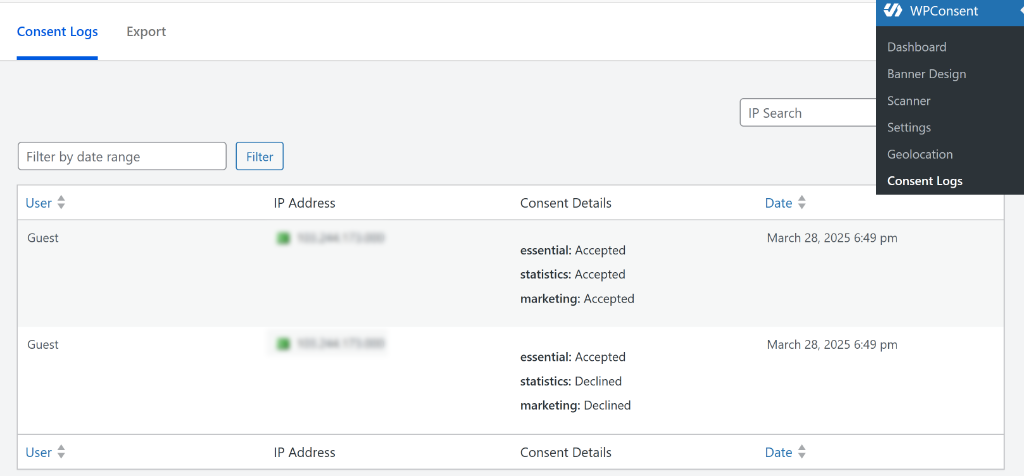
Each entry shows when consent was given or denied, and which categories the visitor accepted. This is not just useful for verification. It is also your proof of compliance if a regulator ever comes knocking. Under GDPR, you are required to maintain records of consent, and WPConsent handles this automatically.
You can filter the logs by date range. If you notice that very few visitors are accepting marketing cookies, that is normal. Consent rates for marketing cookies typically range from 40-70%, depending on your audience and banner design. The important thing is that you are giving visitors the choice and recording their decisions.
How Google Consent Mode Preserves Your Ad Data
One of the biggest concerns you’ll hear from advertisers is that blocking scripts will destroy their conversion data.
When you enable Google Consent Mode through WPConsent, you are not just blocking scripts. You are setting up an intelligent system that preserves as much data as possible while staying compliant. There are two modes to understand.
1. Advanced Consent Mode
This is the default when you enable Consent Mode in WPConsent. In this mode, when a visitor denies consent, Google’s tags still send limited, cookieless pings to Google’s servers.
These pings do not contain personal data or set any cookies, but they do tell Google that a page view or interaction occurred. Google then uses machine learning, which they call conversion modeling, to estimate the conversions that likely happened among users who did not consent. This gives you a much more complete picture of your campaign performance.
2. Basic Consent Mode
This is stricter. In this mode, no data at all is sent when consent is denied. This is the safest approach from a compliance standpoint, but it means Google has less data to work with for modeling.
For most advertisers, Advanced mode strikes the right balance between compliance and data preservation. I have found that sites using Advanced Consent Mode typically see only a 5 to 15 percent reduction in reported conversions compared to unblocked tracking, because Google’s modeling fills in the gaps. That is a small price to pay for legal compliance and user trust.
The key takeaway is this: WPConsent handles the consent signal communication automatically. You do not need to write any custom code or configure complex tag settings. The plugin sends the right signals to Google’s tags based on each visitor’s consent choices, and Google’s systems take it from there.
You do not have to choose between compliance and conversion data. WPConsent gives you both with a single plugin — automatic script blocking, Google Consent Mode v2, and full consent logs for audits.
Troubleshooting Common Google Ads Consent Issues
Even with a straightforward setup, you might run into a hiccup or two. Here are the most common issues I see and how to fix them.
1. Google Ads Cookies Still Appearing Before Consent
If you are still seeing _gcl_au or other Google Ads cookies in DevTools before consenting, start by clearing your browser cache completely and testing in a fresh incognito window. Old cookies can persist and give you a false reading.
If the issue persists, check whether another plugin or your theme is loading Google Ads scripts independently of WPConsent. Some plugins inject tracking scripts directly into the page header, bypassing consent management entirely.
Head to WPConsent settings and make sure the Script Blocking toggle is ON, then run the scanner again to confirm WPConsent has detected all the relevant scripts.
2. Google Ads Conversions Dropped to Zero
If your conversion count falls off a cliff after enabling script blocking, the first thing to check is whether you also enabled Google Consent Mode. Script blocking alone without Consent Mode will cause this exact problem, because Google receives no data at all from visitors who have not consented.
Just confirm that scripts are firing correctly after a visitor accepts cookies. Use the DevTools verification method as described above. Give it 24 to 48 hours after enabling Consent Mode for Google’s conversion modeling to start filling in the gaps.
3. Scripts Blocked That Should Not Be
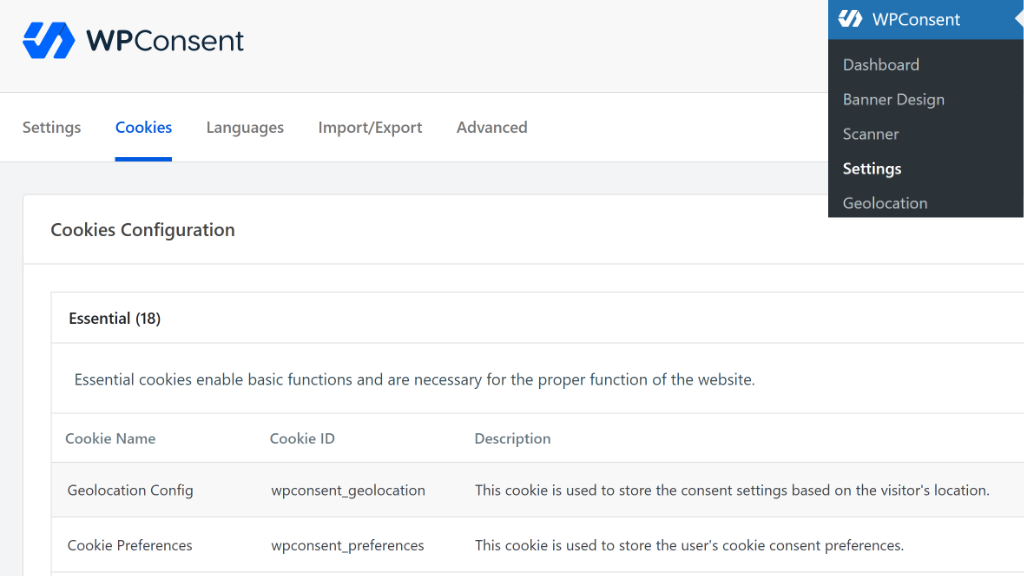
If WPConsent is blocking scripts that you need to load regardless of consent (like essential functionality scripts), navigate to WPConsent » Settings » Cookies tab. Here you can review the list of detected services and adjust their categorization.
Essential cookies and scripts are never blocked by WPConsent, but sometimes a script gets miscategorized. You can reclassify it or whitelist specific scripts as needed.
If you are still running into issues, WPConsent’s support team is available to help. Pro and Elite plan holders get priority support for faster resolution.
FAQs About Google Ads Consent
1. Does blocking Google Ads scripts until consent affect my ad campaigns?
When you use WPConsent with Google Consent Mode enabled, Google can still model conversions from visitors who denied consent. Most advertisers see minimal impact on their reported conversion data. The scripts fire normally for visitors who accept marketing cookies, so your remarketing audiences and conversion tracking continue to work for consenting users.
2. Is blocking Google Ads scripts required by GDPR?
Yes. Under the GDPR, you must block Google Ads cookies before they load because cookies like _gcl_au and _gcl_aw are classified as non-essential marketing cookies. They require explicit opt-in consent before they can be set on a visitor’s browser.
3. What is Google Consent Mode v2 and how does WPConsent support it?
Google Consent Mode v2 is a framework that lets Google tags adjust their behavior based on a visitor’s consent status. It uses parameters like ad_storage, ad_user_data, ad_personalization, and analytics_storage to control what data is collected and when. WPConsent has built-in Google Consent Mode v2 support that automatically communicates your visitors’ consent choices to Google tags.
4. Does WPConsent block Google Ads scripts automatically or do I need to configure each one manually?
WPConsent’s automatic script blocking detects and blocks Google Ads scripts, including gtag.js, the conversion linker, and remarketing tags, without any manual configuration.
5. Will blocking Google Ads scripts slow down my WordPress site?
Quite the opposite, actually. For visitors who have not consented, your site will load faster because fewer third-party scripts are executing on the initial page view. Unlike cloud-based consent platforms, WPConsent is 100% self-hosted, so there are no external API calls slowing down your site, and you maintain full ownership of your consent data.
6. Do I need to block Google Ads scripts for visitors from the United States?
While the GDPR primarily applies to visitors in the EU and EEA, California’s CCPA and CPRA also have requirements around tracking and data sharing that may affect your Google Ads setup. WPConsent offers geolocation-based consent, which means you can show consent banners only to visitors in regions where privacy laws require it.
7. What happens if a visitor changes their mind after accepting or rejecting cookies?
WPConsent includes a preferences panel that visitors can access at any time to update their consent choices. If someone initially accepted marketing cookies but later decides to revoke that consent, Google Ads scripts will be blocked again on their next page load, and the relevant cookies will be cleared from their browser.
Blocking Google Ads scripts until consent is no longer optional if you are advertising to visitors in the EU, UK, or even California. The good news is that with WPConsent, the entire process takes just a few minutes and does not require any technical expertise.
I hope this article helped you learn how to block Google Ads script until consent in WordPress. You may also want to see our guides on how to stop reCAPTCHA before consent on your WordPress website and how to block Google Maps widget before consent in WordPress.
If you liked this article, then please follow us on X (formerly known as Twitter). You can also leave a comment below if you need any assistance.