When I launched my first WordPress business site, I thought I had everything covered. But I had no idea how my site was handling personal data or cookies when it came to CCPA compliance. Worse yet, I didn’t have any systems in place to handle data deletion requests or opt-out preferences.
The California Consumer Privacy Act (CCPA) is a law designed to protect the privacy rights of California residents by giving them more control over the personal data that businesses collect. It applies to companies and websites that do business in California and meet specific criteria.
Failure to meet compliance requirements can lead to up to a $7,500 fine and possible lawsuits. That’s when I realized that I need to make my WordPress website CCPA compliant.
In this guide, I’ll share all the details for WordPress and CCPA compliance using the right tools and settings. Since this is a long read, you can click the links below to jump ahead to any section:
- What is CCPA?
- How Does CCPA Affect WordPress Sites?
- How to Make Your WordPress Site CCPA Compliant
- Install a Cookie Management Plugin
- Identify What Data You Collect
- Block Third-Party Scripts Before Consent
- Set Up Geolocation Rules for CCPA Compliance
- Add Your Cookie Consent Banner
- Create A Privacy Policy for Your WordPress Website
- Add a Cookie Policy for CCPA Compliance
- Track and Log User Consent
- Set Up Do Not Sell Requests
- Handle Data Deletion and Access Requests
- FAQs About WordPress and CCPA Compliance
Disclaimer: Please note that this guide is for informational purposes only. Nothing on this website should be taken as legal advice.
What is CCPA?
The California Consumer Privacy Act, or CCPA, is a law created to protect the privacy rights of people living in California. It gives individuals greater control over their personal information, such as names, emails, browsing habits, and other data that businesses collect when they use websites or services.
Now, you might be wondering who it applies to?
CCPA is applicable mainly to for-profit businesses that do business in California and meet certain thresholds. These include earnings over $26 million a year, handling data from over 100,000 California residents, or at least 50% of their revenue comes from selling or sharing personal data of California residents.
Besides that, California residents also have important rights regarding their personal data under CCPA, which includes:
- Right to know what personal data you collect
- Right to delete their personal data if they ask you to
- Right to opt-out or say “no” if you sell or share their data
- You cannot treat users differently or discriminate against those who exercise their rights
That said, let’s see how it impacts WordPress website owners.
How Does CCPA Affect WordPress Sites?
If your site collects personal information from California residents and meets certain business thresholds, you are required by law to comply with the CCPA.
Ignoring these obligations can result in substantial fines, up to $2,500 per unintentional violation, and up to $7,500 for intentional breaches. Moreover, users can file lawsuits if their data rights are violated, so the financial and legal risks are real.
As a WordPress website owner, you must be transparent by posting a clear privacy policy explaining what data they collect, why, and what rights consumers have.
Plus, you need to let users access, delete, or opt out of the sale/sharing of their data, while ensuring that all your plugins and third-party services honor data privacy standards.
To make your site CCPA compliant, you can implement consent banners for cookies and provide clear opt-out forms or links. You also need to offer easy ways for users to exercise these rights, such as a ‘Do Not Sell My Personal Information’ link on your site.
Now, let’s look at all the steps you can take to ensure WordPress CCPA compliance.
How to Make Your WordPress Site CCPA Compliant
When it comes to making your WordPress site CCPA compliant, many business owners think they’ll need to spend weeks trying to figure out manual compliance solutions, reading legal documents, and attempting to code cookie banners themselves.
However, that’s not the case with the right tools and plugins. You can simply follow these steps to ensure CCPA compliance for your WordPress website.
1. Install a Cookie Management Plugin
The first thing you can do is get hold of a cookie management plugin for your WordPress site. CCPA compliance can be technical and has a lot of moving parts. If you try to manually configure them, then it can take a lot of time, and you might need to hire a developer.
This is where WPConsent comes in handy. It is a comprehensive WordPress cookie management plugin that handles CCPA compliance with ease.
For instance, you can use it to automatically set up cookie banner and settings for CCPA based on users’ location, scan for third-party scripts, create custom consent banners, manage cookie preferences, and more.
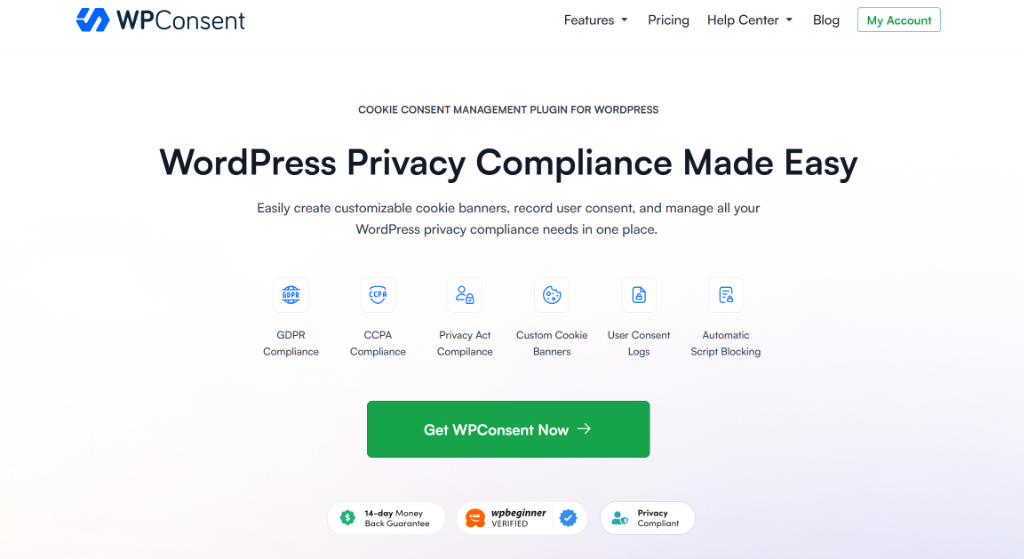
What sets WPConsent apart from other cookie notice solutions out there is that it’s a self-hosted WordPress plugin. This means you have full control over your data, which is great for staying in line with CCPA’s privacy focus.
Plus, you won’t have to worry about extra charges because you can use it on as many pages or pageviews as you want. Unlike other cookie tools that often charge based on pageviews or the number of pages.
To get started, you can choose WPConsent premium plans that offer advanced features like geolocation templates,a pre-built library of services, multilingual features, a Do Not Sell addon, and more. There is also a WPConsent Lite version available for free.
2. Identify What Data You Collect
Next, you need to know exactly what personal data you’re collecting from California visitors and ensure WordPress CCPA compliance.
Simply start by performing a complete data audit of your WordPress site. I recommend making a list of all the plugins and tools that might gather user information, such as contact forms, analytics plugins, email marketing tools, and social media widgets.
WPConsent makes this process much easier with its built-in scanner. You can go to WPConsent » Scanner from your WordPress dashboard and click the ‘Scan Your Website’ button to automatically detect cookies and tracking scripts.
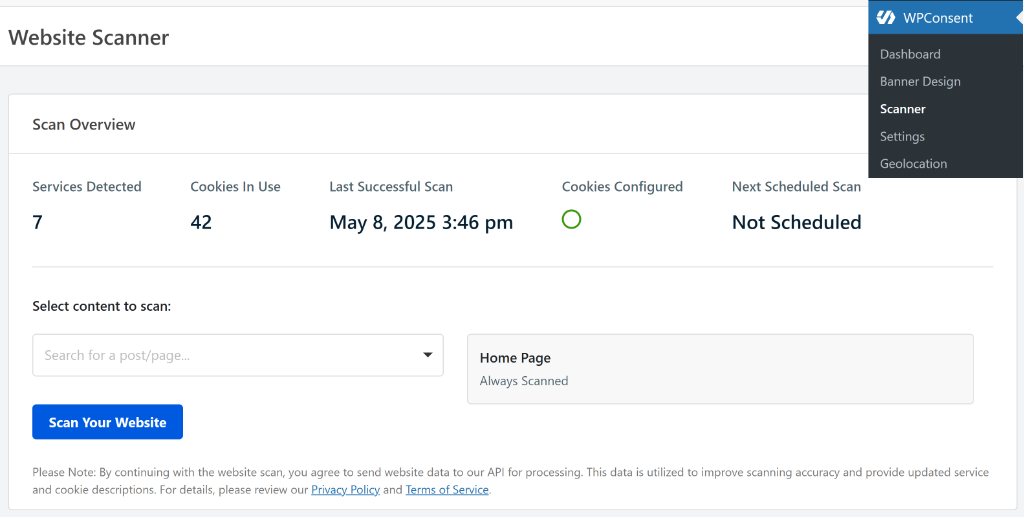
WPConsent will scan your homepage by default. But you can select specific pages like your contact page, checkout page, and other pages where visitors enter personal information. This comprehensive scan ensures you identify all the ways your site collects data from California residents.
The scanner will show you a detailed report of all the data collection happening on your site. You’ll see cookies organized by categories like Essential (necessary for your site to function), Statistics (like Google Analytics), and Marketing (such as Facebook Pixel or advertising trackers).
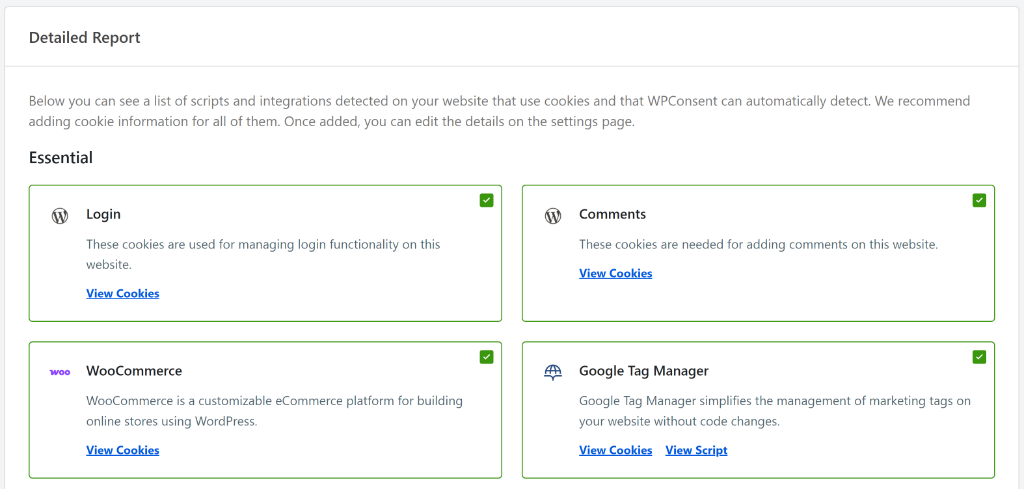
You can learn more by following our guide on how to find which cookies your WordPress website is using.
3. Respect Opt-out Requests from Users
Under CCPA, you need to allow users to opt-out of sharing their data while ensuring that all your plugins and third-party services honor this data privacy standard.
What this means is that you can allow scripts and cookies to load on your site normally. But when a user opts-out and rejects services from tracking them, then the cookies get removed, and you’re no longer allowed to track them moving forward.
To make sure you meet these CCPA requirements, first you’ll need to configure cookies on your site.
WPConsent handles this automatically through its script blocking feature. In your detailed cookie report, you can scroll down to the bottom of the page and make sure the Prevent known scripts from adding cookies before consent is given checkbox is ticked.
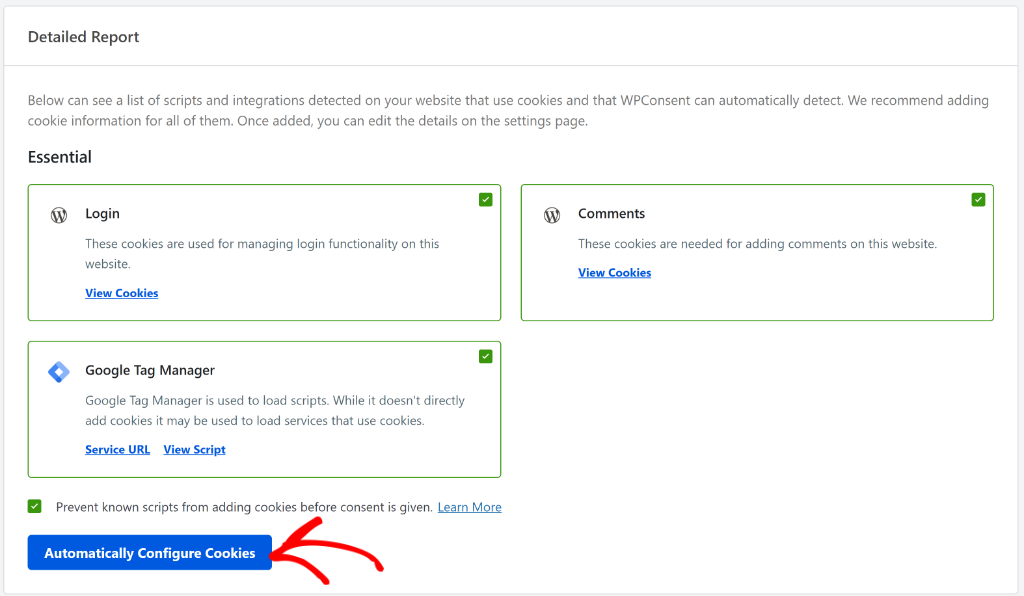
After that, you can click the ‘Automatically Configure Cookies’ button. This tells WPConsent to block common tracking scripts like Google Analytics, Google Ads, and Facebook Pixel from loading until your visitor consents.
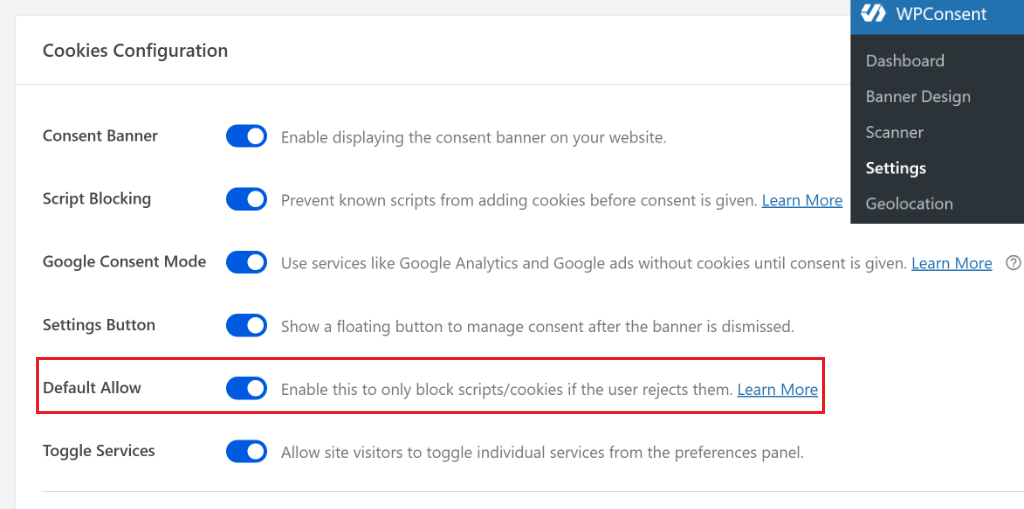
Once that’s done, you’ll need to enable the Default Allow feature in WPConsent. This setting changes the way cookies are blocked. By default, WPConsent will prevent cookies from being added to your site by blocking scripts before consent is given.
When the ‘Default Allow’ option is enabled, scripts will be loaded as usual until the user rejects them, meeting CCPA requirements. If the user rejects the cookies, then the cookies will be cleared and the page will be reloaded to reflect the new consent choice.
To start, you’ll need to go to WPConsent » Settings from the WordPress dashboard. From here, scroll down to the ‘Cookies Configuration’ section and click the toggle for ‘Default Allow’ option to enable it.
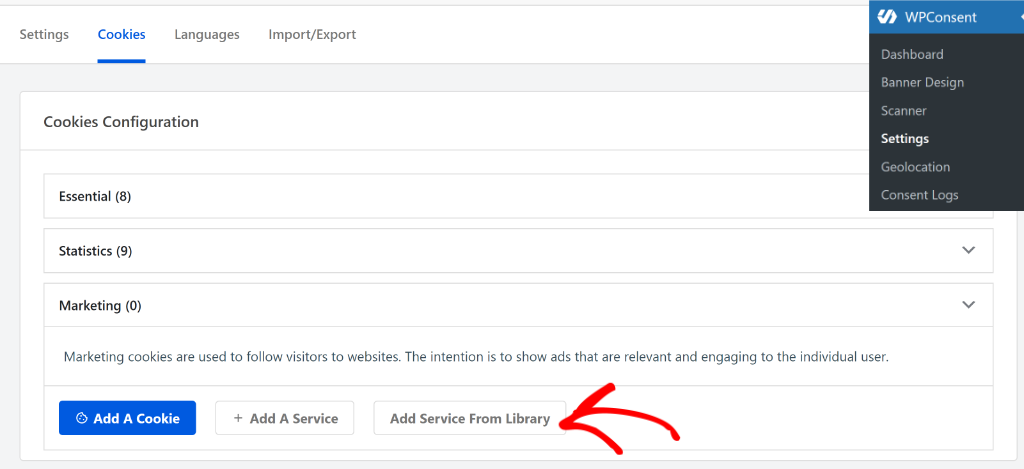
Besides that, the plugin also includes a pre-built library of services for scripts it might not automatically detect. If you notice a service missing from the scan, simply go to WPConsent » Settings and switch to the ‘Cookies’ tab.
From here, click ‘Add Service From Library’ under any cookie category to manually add services with just one click.
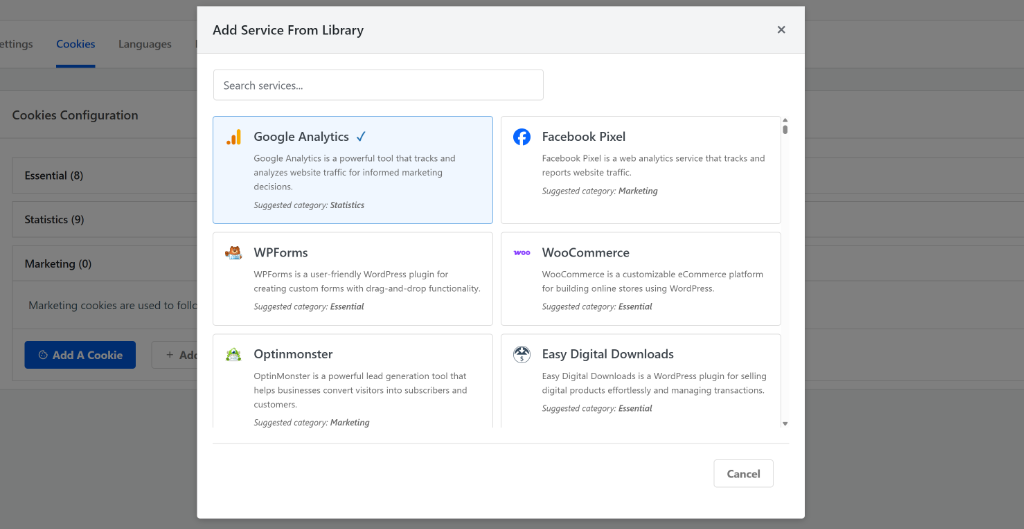
Next, you will see a list of services in the built-in library.
Simply select the service you want to add.
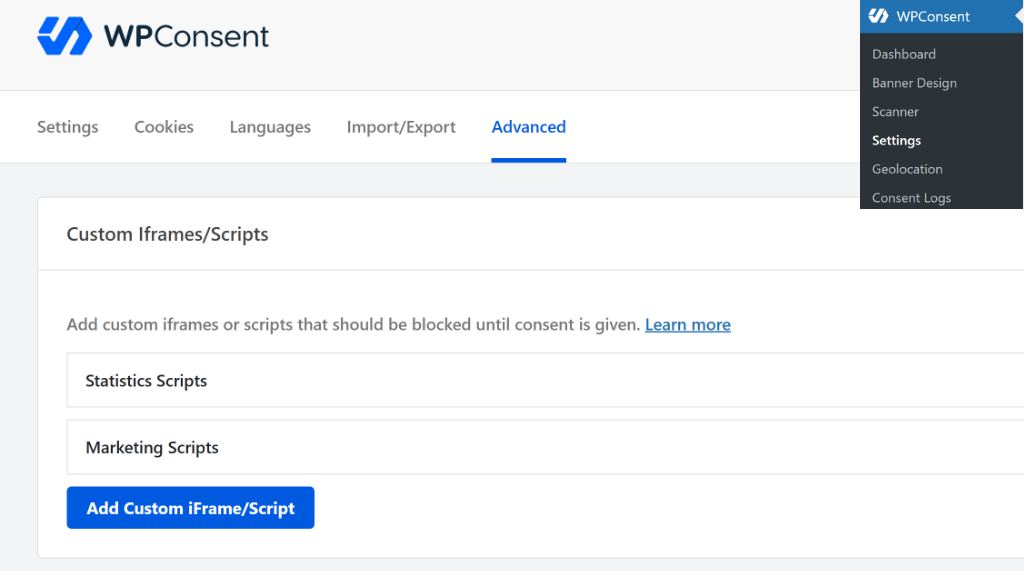
Besides that, WPConsent also lets you block custom scripts and iframes on your site.
For instance, let’s say you’re running Reddit Ads on your site. You can add these scripts in WPConsent and prevent them from loading until a user gives consent.
4. Set Up Geolocation Rules for CCPA Compliance
Wouldn’t it be awesome if you could automatically set up cookie consent settings for users from California?
With WPConsent, you can easily set up location-based rules and configure consent settings in just a few clicks. What this does is that it automatically loads the correct script blocking settings, cookie consent banner, and more for visitors from a particular region.
As a result, you can ask for consent from the right visitors to whom privacy laws apply and collect more data to provide a better user experience on your site.
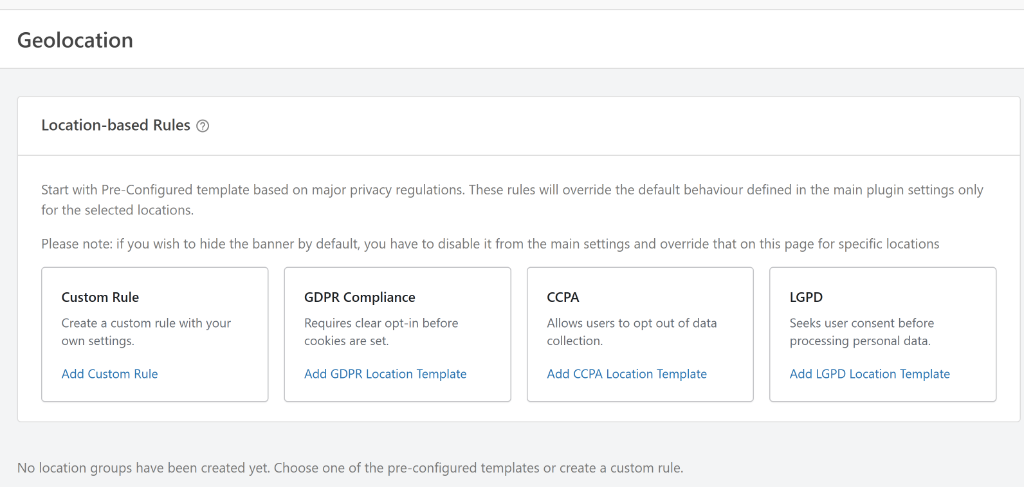
The best part is that the plugin comes with pre-built templates for major privacy laws, including CCPA, GDPR, and LGPD.
You can simply head to WPConsent’s Geolocation page from your WordPress dashboard to view the location based rules and click the Add CCPA Location Template option.
The plugin will then automatically block scripts and cookies added by various services, show a consent banner, and add an opt-out consent mode.
It works by detecting when California visitors arrive on your site and presenting them with clear privacy choices. It then manages their preferences across all your tracking tools and marketing plugins.
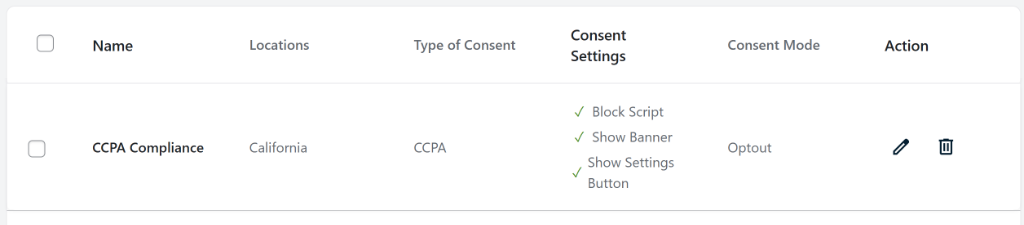
You can also click the pencil icon to edit the location-based rules further.
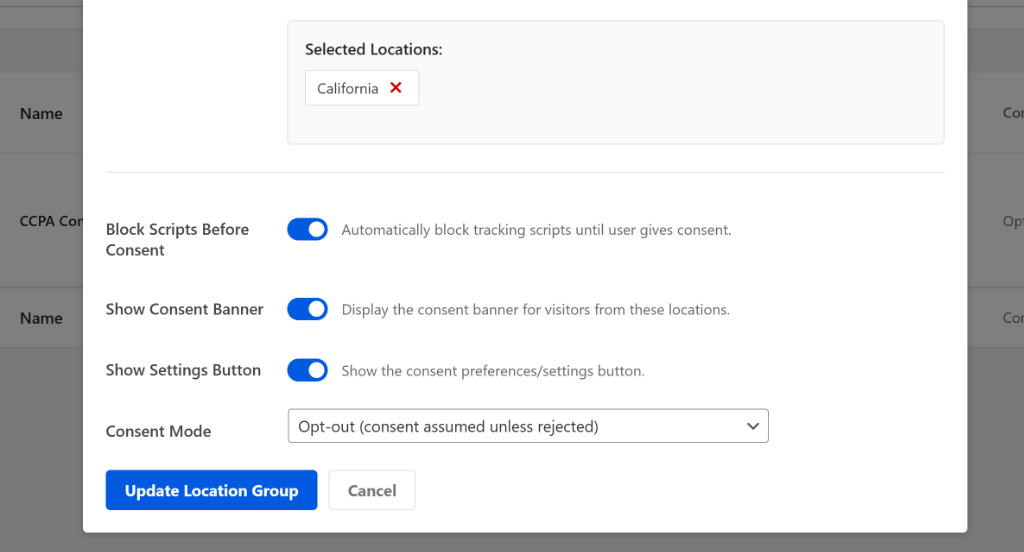
For example, there are options to enable and disable block scripts before consent, show a consent banner, show a settings button, and change the consent mode. However, I would recommend the default settings set by the plugin when you select the CCPA location template.
5. Add Your Cookie Consent Banner
Next, it’s time to create the consent banner that will inform California visitors about your data collection and give them control over their privacy choices.
WPConsent makes creating a professional cookie banner incredibly simple with its pre-designed templates. The plugin offers several banner styles, including long banners, floating banners, and modal banners that you can position at the top or bottom of your site.
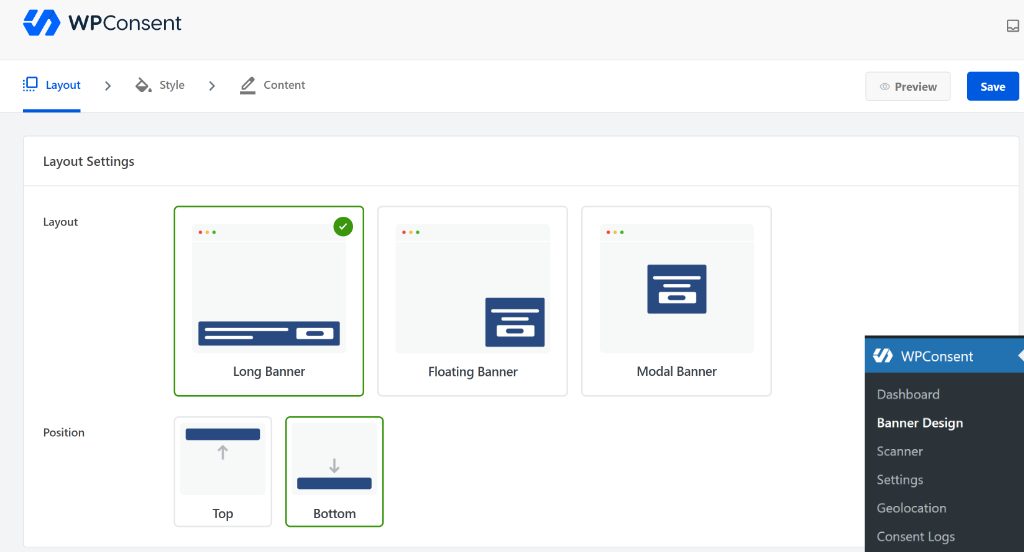
You can simply choose a template that fits your site’s design and matches your brand.
From here, simply customize everything about the banner’s appearance, including background colors, text colors, button styling, and even add your own logo.
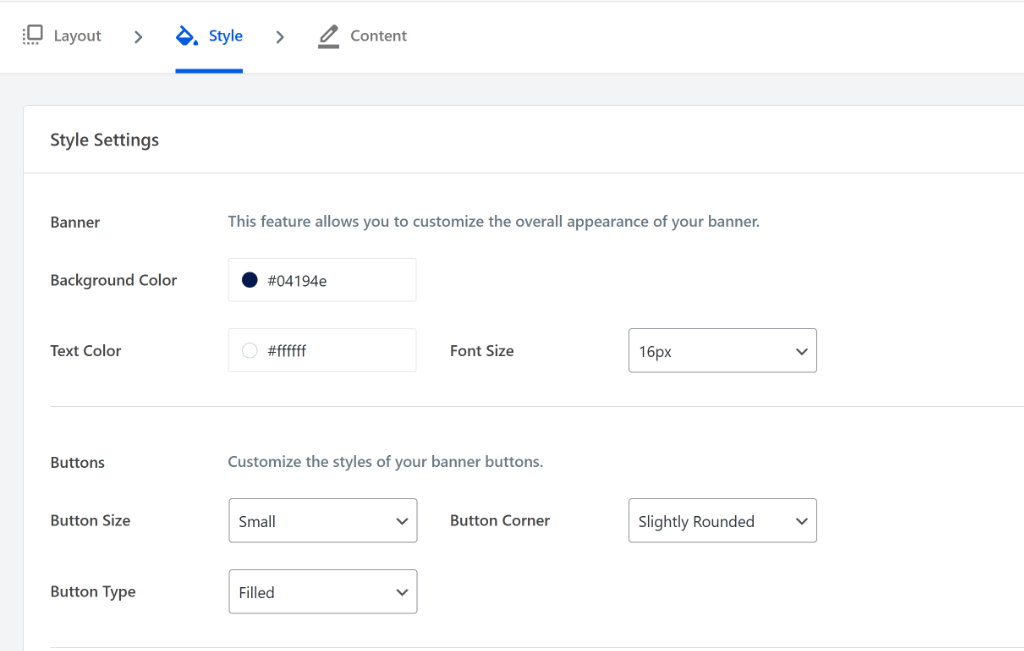
The plugin also provides default text that’s already pre-loaded for the banner, but you can modify it to better match your site’s tone.
For more details, please see our guide on how to add a cookie consent banner for WordPress.
WPConsent shows you a live preview as you make changes, so you can see exactly how the banner will look on your website. When you’re satisfied with the design and messaging, save your changes, and the banner will start appearing to your California visitors.
Pro Tip: WPConsent also offers multi-language support, which allows you to display banners in your user’s native language. For more details, please see our guide on how to set up multi-language cookie consent banners.
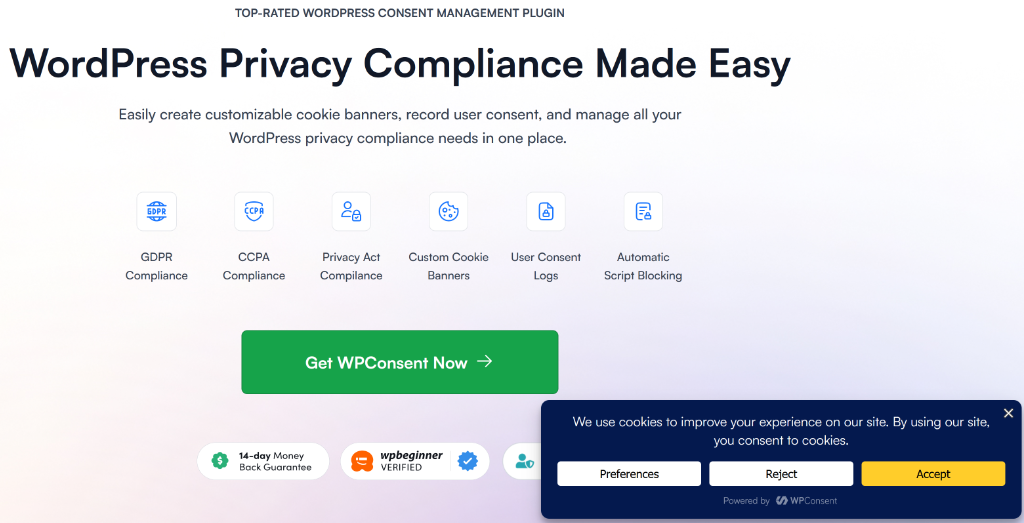
For example, here’s a cookie consent banner that appears on WPConsent website.
6. Create A Privacy Policy for Your WordPress Website
One of the essential steps you need to take for CCPA compliance is creating a detailed and comprehensive privacy policy.
A privacy policy is a page that explains how an organization or website collects, uses, stores, shares, and protects the personal information of its users or customers. Think of it as a statement of transparency, telling you exactly what happens to your data when you interact with a service.
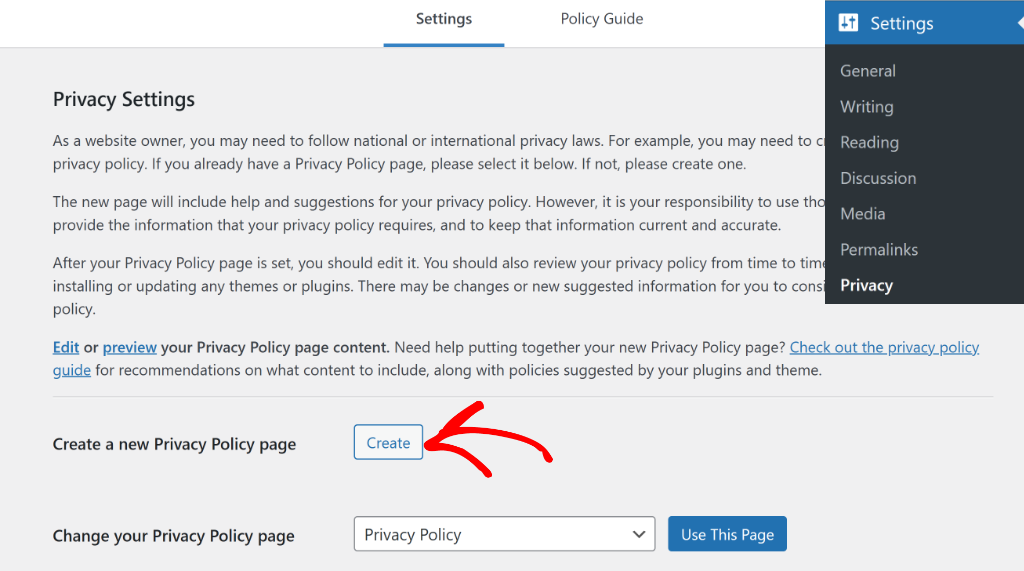
To create a privacy policy, WordPress includes a built-in generator that’s easy to use. Simply go to Settings » Privacy in your WordPress dashboard and click the ‘Create’ button to set up a basic privacy policy template.
You find more details in this guide on how to easily add a privacy policy in WordPress.
7. Add a Cookie Policy for CCPA Compliance
Aside from a privacy policy, you should also add a cookie policy to your WordPress website to improve CCPA compliance.
In your cookie policy, you should clearly list the different types of cookies your site uses, like essential, analytics, or marketing cookies. You can also explain their purpose, such as tracking website visitors or delivering targeted advertisements.
With WPConsent, you can automatically generate a cookie policy based on the cookies it detected during your site scan.
First, you can head to WPConsent » Settings and scroll to the Cookie Policy section. From here, click ‘Generate Cookie Policy Page’.

The plugin will create a detailed page listing all the cookies your site uses, what data they collect, and their purpose. This saves you hours of manual work and ensures accuracy since it’s based on your actual cookie scan results.
8. Track and Log User Consent
Under CCPA, you need to maintain detailed records of when and how visitors gave consent for data processing. This is really helpful if you’re ever audited or questioned about your compliance practices, as these logs serve as your proof that you’re respecting user choices.
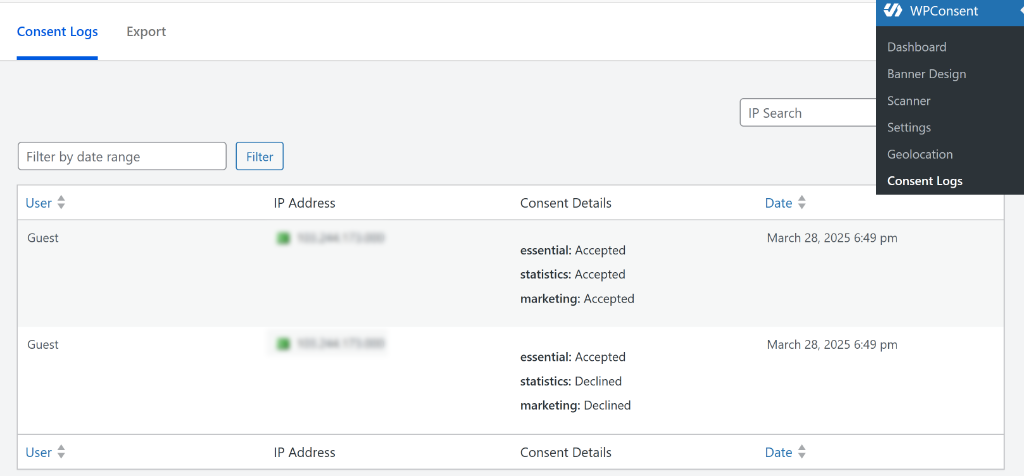
WPConsent automatically handles this complex requirement through its built-in consent logging system. Every time a visitor makes a choice about cookies on your site, the plugin records essential details, including their IP address, specific consent choices, and the exact date and time.
You can view all this consent data by going to WPConsent » Consent Logs in your WordPress dashboard. Here you’ll see a comprehensive record of every consent decision made on your site since the plugin was activated.
For more details, please see our guide on how to manage cookie consent data in WordPress.
The best part is that the plugin stores all this information locally on your server, which means you maintain full control over this sensitive compliance data. You’re not relying on external services to store these crucial records.
If you need to share consent records with auditors, legal teams, or regulatory authorities, WPConsent also lets you export the data as CSV files. This makes it easy to provide concrete proof of your CCPA compliance when needed.
9. Set Up Do Not Sell Requests
CCPA gives California residents the right to opt out of the sale or sharing of their personal information. This means that you need to provide an easy way for visitors to exercise this right without creating barriers or confusion.
WPConsent’s Do Not Sell addon makes it very easy to meet this requirement. You can simply go to WPConsent » Do Not Sell from your WordPress dashboard and switch to the ‘Configuration’ tab.
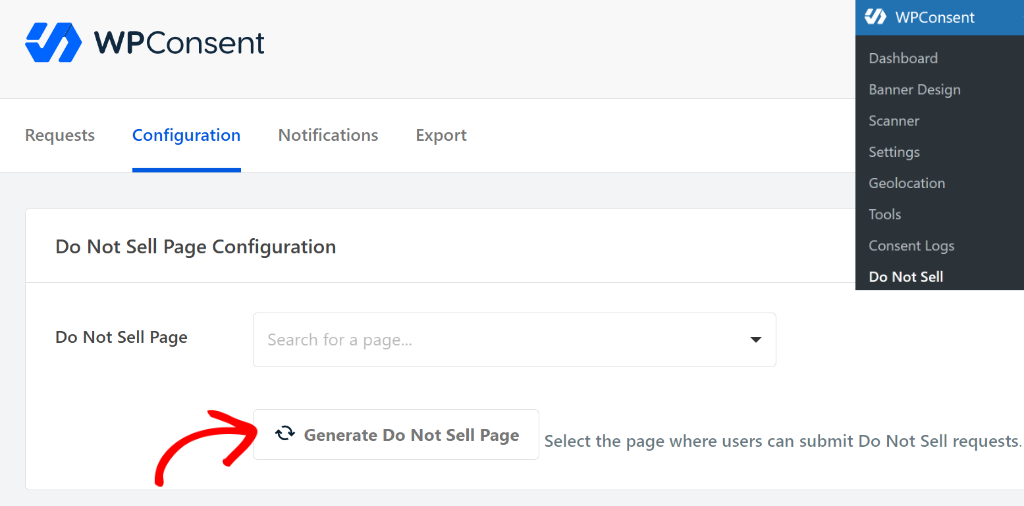
From here, simply click the ‘Generate a Do Not Sell Page’ button, and the plugin will automatically create a professional page where visitors can submit opt-out requests. The page includes a simple form that collects the necessary information to process their request properly.
This straightforward approach gives visitors a clear path to exercise their CCPA rights without requiring them to send emails or navigate complex processes. The form is designed to be user-friendly while collecting all the details you need.
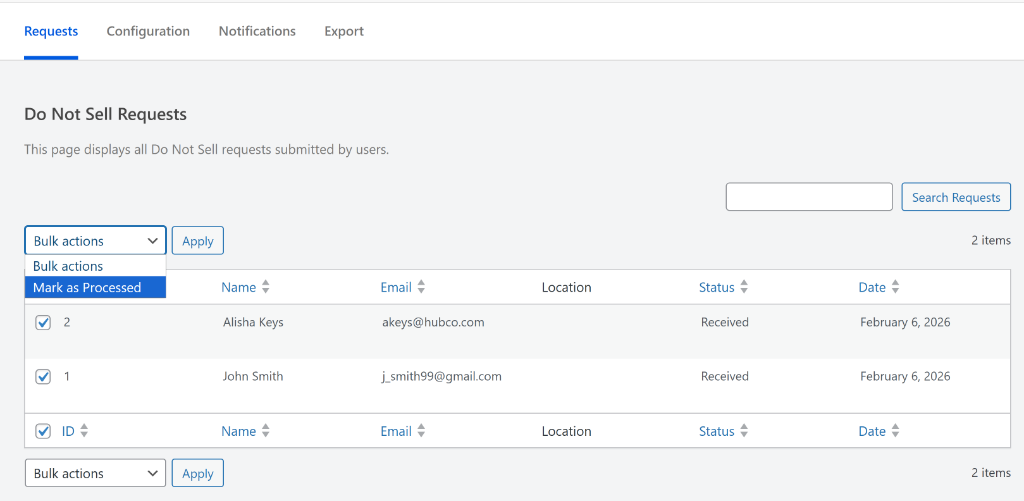
WPConsent stores all Do Not Sell requests locally in your WordPress database, giving you complete control over this sensitive information. You can view and manage all requests directly from your dashboard, making it easy to track compliance and respond promptly to user requests.
10. Handle Data Deletion and Access Requests
Under CCPA, California residents have the right to request deletion of their personal data. To meet this requirement, you need efficient systems to handle these requests within the required timeframes.
For data deletion requests, you can ask users to send an email or submit a form where they can request erasing their data.
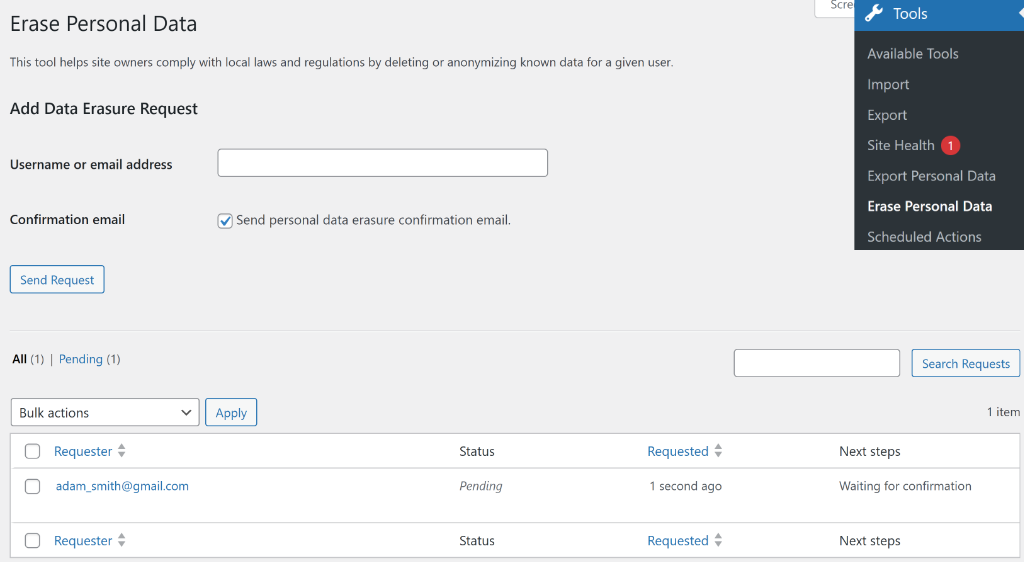
WordPress includes a built-in tool to help you fulfill these requests. Simply go to Tools » Erase Personal Data and enter the user’s information in the provided field. The system will locate their data, and you can then process it for deletion.
For data access requests, WordPress also provides a built-in tool that helps export user data. This helps you gather the information needed to locate and export a user’s personal data efficiently.
Simply head to Tools » Export Personal Data from the WordPress dashboard and enter the user’s details. WordPress will then create a comprehensive .zip file containing all their stored information that you can securely share with them.

FAQs About WordPress and CCPA Compliance
1. How do I handle data deletion and access requests from California residents?
You can use WordPress tools to fulfill data deletion and access requests by employing the built-in options to erase personal data or export user data, and consider using WPConsent or similar plugins to facilitate request submissions efficiently.
2. What steps can I take to make my WordPress site CCPA compliant?
You can ensure compliance by installing a cookie management plugin like WPConsent, auditing the data you collect, blocking third-party scripts before consent, setting up geolocation rules, adding a cookie consent banner, creating privacy and cookie policies, logging user consent. You can also handle data access and deletion requests efficiently.
3. How does CCPA affect WordPress websites?
If a WordPress site collects personal information from California residents and meets certain business thresholds, it must comply with CCPA regulations, including being transparent about data collection, providing users with access, deletion, and opt-out options, and respecting their privacy rights.
4. What is the California Consumer Privacy Act (CCPA)?
The CCPA is a law designed to protect the privacy rights of California residents by giving them more control over their personal data collected by businesses, including rights to know, delete, opt-out of data sharing, and non-discrimination.
I hope this guide helped you learn about WordPress and CCPA compliance. You may also want to see our guide on how to stop Google Maps from loading before consent and beginners guide to Google Analytics cookie consent in WordPress.
If you liked this article, then please follow us on X (formerly known as Twitter). You can also leave a comment below if you need any assistance.