Since March 2024, Google requires Consent Mode V2 for anyone running Google Ads to visitors in the European Economic Area.
But even if you’re not running ads, skipping it still costs you. GA4 uses consent signals to model analytics data for visitors who decline cookies. Without those signals, you get gaps in your reporting that no workaround can fill.
This tutorial shows you three ways to connect Google Analytics cookie consent to your WordPress site.
Then we’ll activate Google Consent Mode V2 in one step using WPConsent. By the end, your site sends the right signals to Google automatically without coding or guesswork.
Key Takeaways
- MonsterInsights is the easiest way to connect Google Analytics 4. A setup wizard handles everything, no code required.
- WPConsent activates Google Consent Mode V2 for all three Google Analytics connection methods with a single toggle.
- The Google Consent Mode V2 (GCM V2) toggle in WPConsent is on by default. Just confirm it’s active and the setup is done.
- Site Kit users must also enable the consent mode toggle in Admin Settings. It’s easy to miss.
- WPConsent free covers everything in this tutorial, banner, cookie scan, and full GCM V2 support.
How to Set Up Google Consent Mode V2 in WordPress
Before You Start
Let’s make sure you have everything at hand.
- First, you need a Google Analytics 4 property before you begin. If you haven’t created one, set it up at analytics.google.com.
- You’ll also need WPConsent installed. The free version of the WordPress plugin from the plugin directory handles everything in this tutorial. We’ll walk through the install in Step 2.
Now, since this is a detailed tutorial, we have broken it up into several sections. Use the table of contents below to skip to the section you want to read.
- Step 1: Connect Google Analytics to WordPress
- Step 2: Install and Activate WPConsent
- Step 3: Enable Google Consent Mode V2
- Step 4: Set Up Your Cookie Banner
- How to Troubleshoot your Google Consent Mode V2 for Google Analytics Setup
- What Is Google Consent V2 Mode?
- Frequently Asked Questions
- Google Consent Mode V2 Is Now Live on Your Site: One Click with WPConsent
- Additional Resources
Finally, pick one of the three Google Analytics methods below. You don’t need all three, just the one that fits your setup. With that out of the way, let’s dive in.
Step 1: Connect Google Analytics to WordPress
All the methods listed below will help you connect Google Analytics to WordPress. But, here’s how the three methods compare before you choose:
| Method | Cost | Setup | Works with WPConsent | Extra GCM Step |
|---|---|---|---|---|
| WPCode | Free | Paste one code block | ✅ Yes | None |
| MonsterInsights | Pro | Wizard, no code | ✅ Yes | Enable Privacy Guard in Engagement tab |
| Site Kit | Free | Google wizard, no code | ✅ Yes | Enable consent mode in Admin Settings |
Method 1: Add Your Google Tag Manually with WPCode
This approach skips the analytics plugin entirely. You copy your Google tag from GA, paste it into your site header using WPCode, and WPConsent takes care of the consent signals.
It’s the lightest option, since you don’t need extra plugins, but it delivers the same result. Most importantly, you can use the free version of WPCode to connect your WordPress site to Google Analytics 4.
Go to Plugins » Add New and search for “WPCode.” Once done, click Install Now, then Activate.
Now get your Google tag.
In Google Analytics, click the gear icon at the bottom left to open Admin. Under Data collection and modification, select Data Streams.
If your data stream is already set up, click the arrow on the right to open it. If not, click Add stream and follow the prompts to add your site.
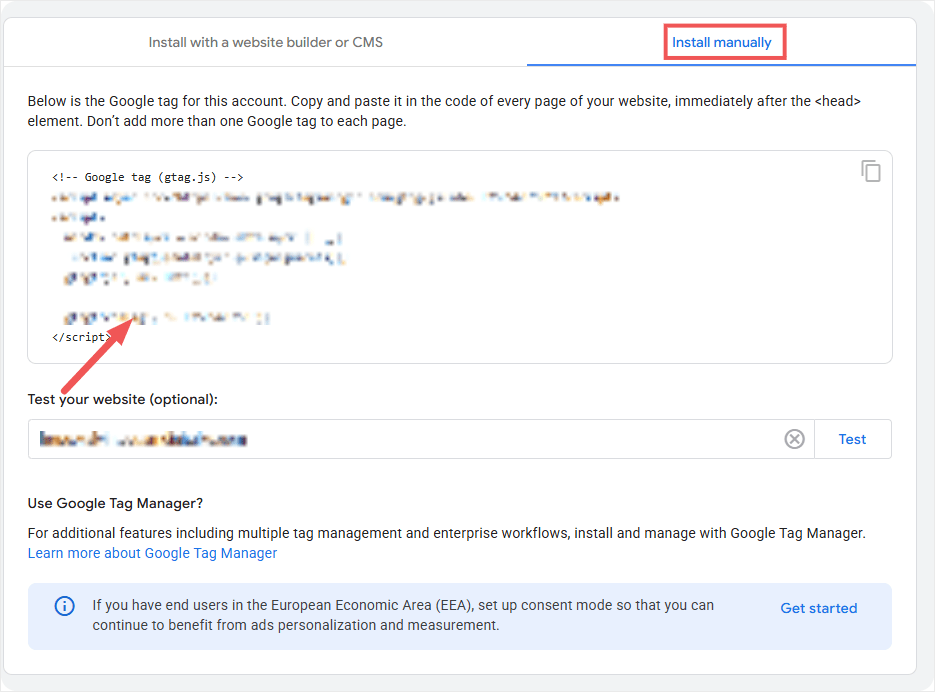
Then, inside the stream, scroll down to the Google tag section and click View tag instructions. On the next screen, select the Install manually tab to display your tag code; copy it.
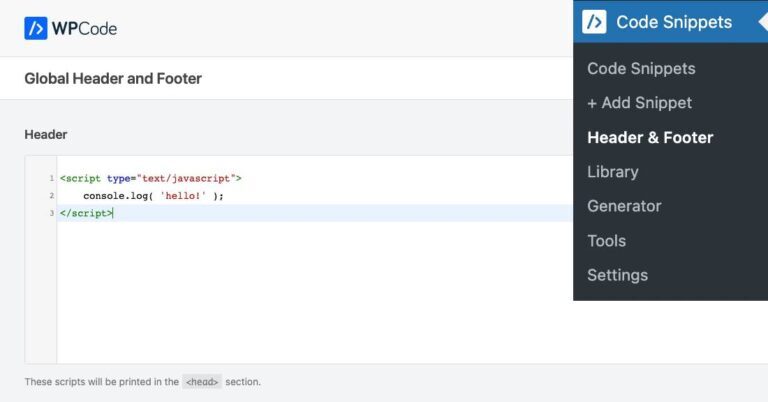
Back in WordPress, go to Code Snippets » Headers & Footers to open the code editor.
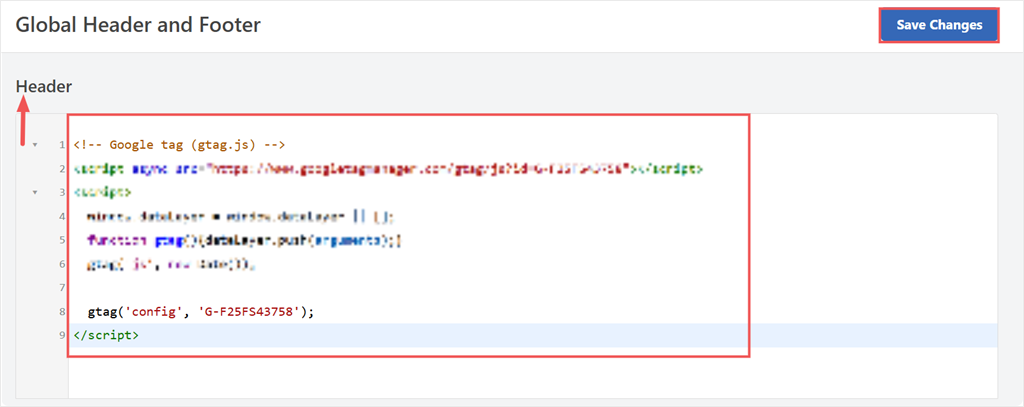
Here, paste your Google tag into the Header section and click Save Changes.
That’s it.
To confirm the tag is live, go back to Google Analytics. Under View tag instructions, enter your site URL and click Test. A green tick means the tag is detected correctly.
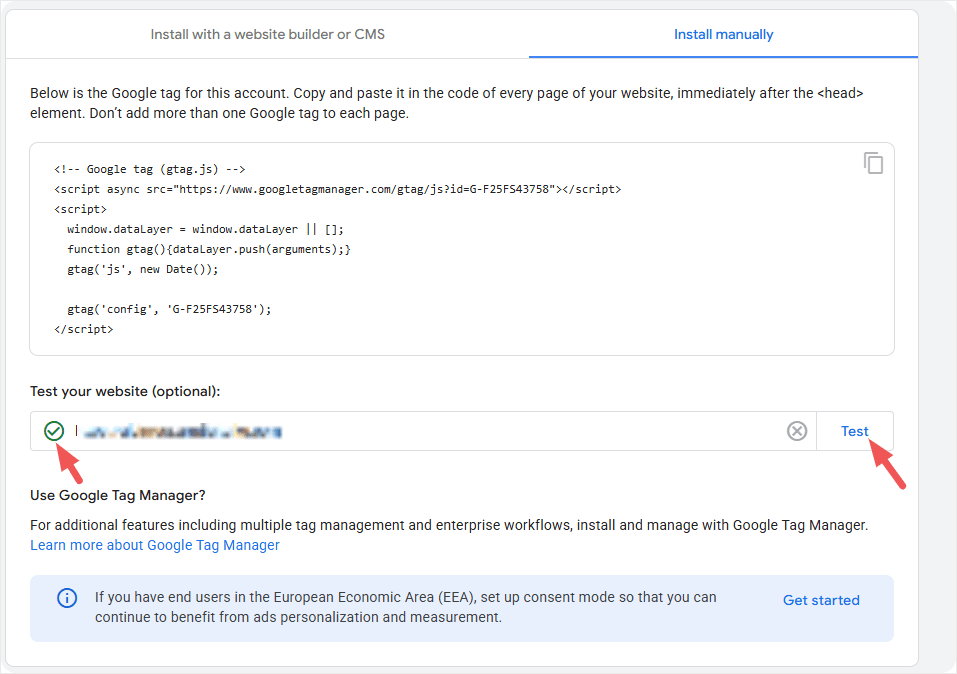
Well done, you have now connected Google Analytics to WordPress, with WPCode ready to set up Google Consent Mode V2 compliance.
Skip to Step 2 → once you see the green tick.
Method 2: Install MonsterInsights (Recommended)
MonsterInsights is one of the most popular Google Analytics plugins for WordPress, with over 2 million active installs. The setup is guided, meaning no code or manual configuration.
But, while MonsterInsights has a free version, you cannot use the Lite version to enable Google Consent Mode V2. You need the EU Compliance add-on, which is only available on the premium version.
So to use this analytics plugin, you need to purchase a plan on their official website. Once done, you will need to log in to your MonsterInsights account and download the plugin file. While at it, also copy the License key.
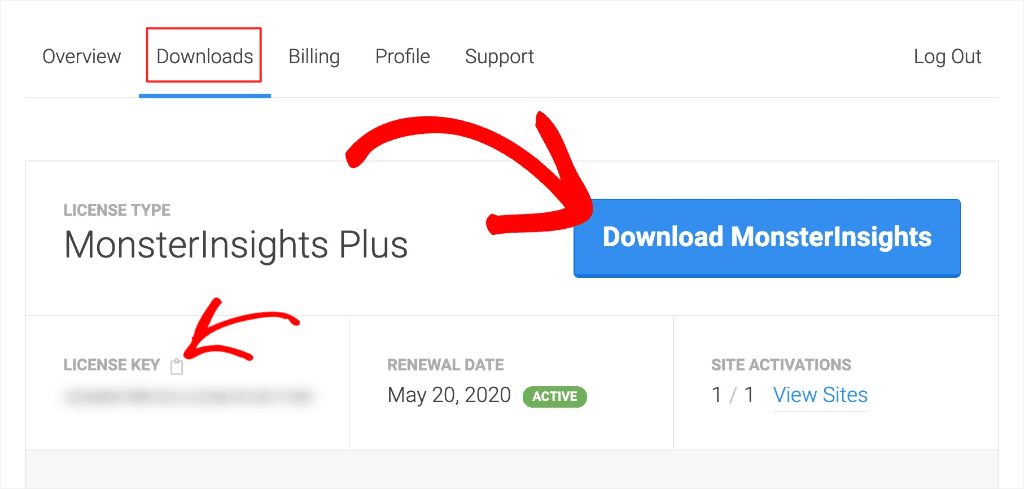
After that, head to your WordPress site and install it as you would any other plugin. Use this guide to set up MonsterInsights Pro.
Once activated, the setup wizard opens. Click Connect MonsterInsights to start.
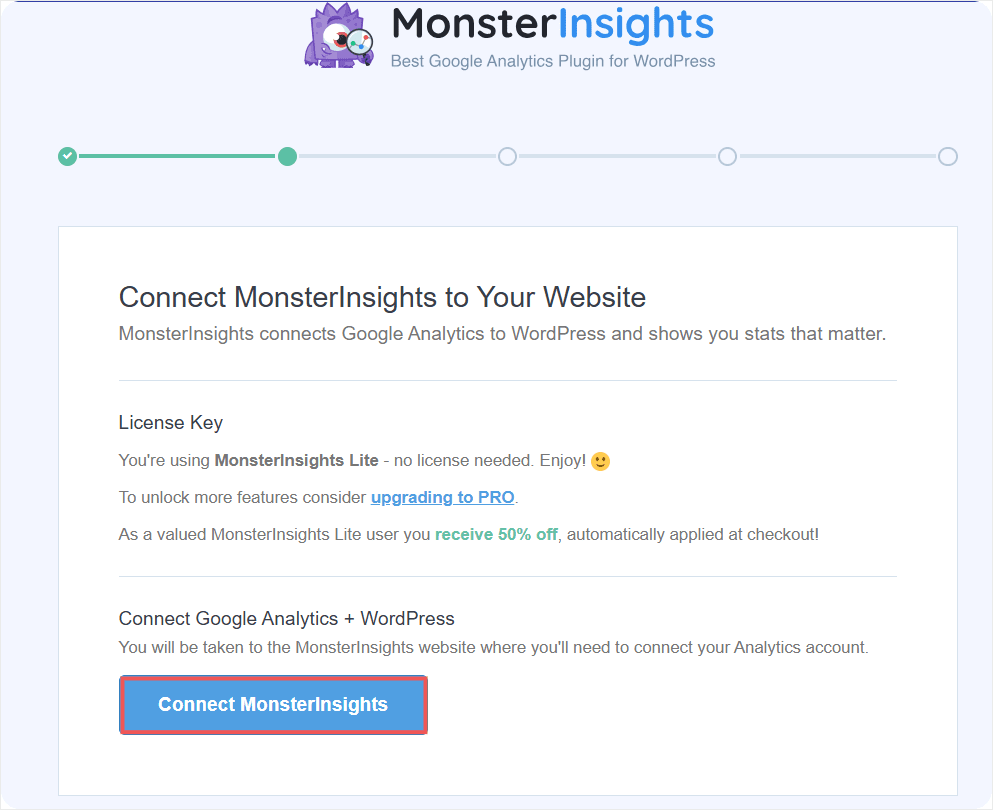
You’ll be taken to Google to sign in. Choose the account your GA4 property is under, and grant the permissions MonsterInsights requests. It needs read access to pull your data into the WordPress dashboard.
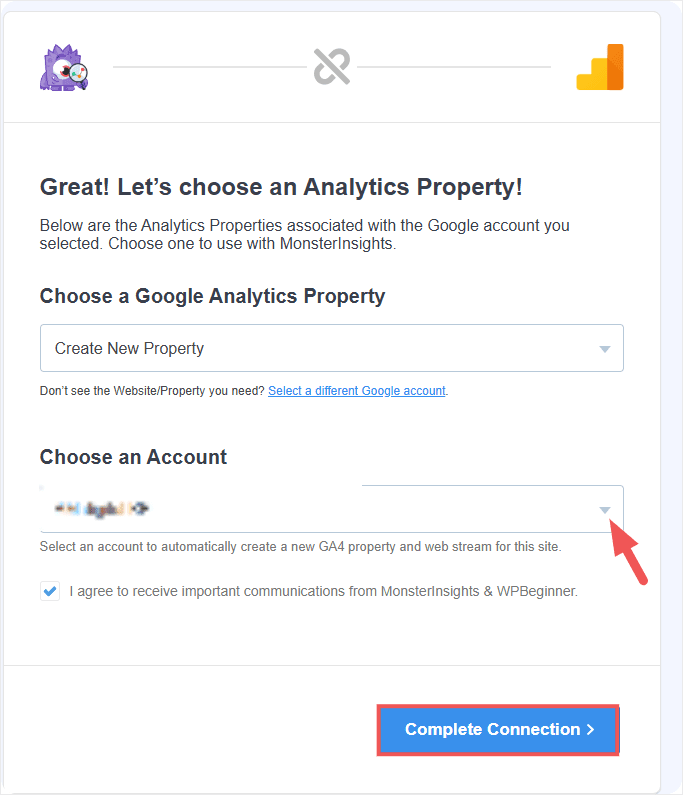
After granting access, you’re redirected back to MonsterInsights in your WordPress dashboard. Pick your account, property, and data stream from the dropdowns, then click Complete Connection.
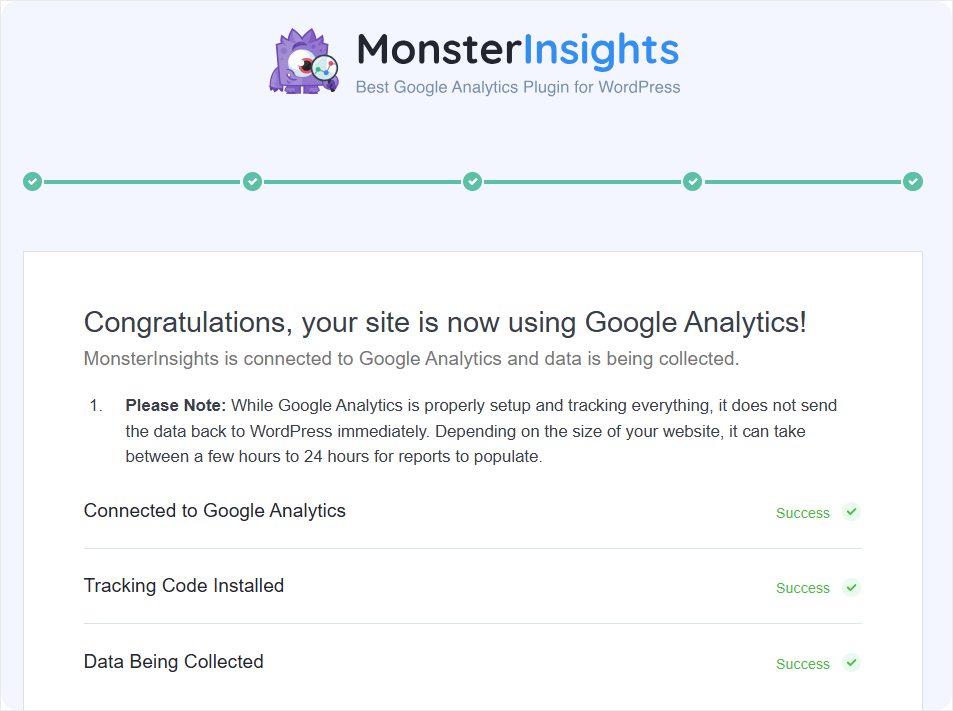
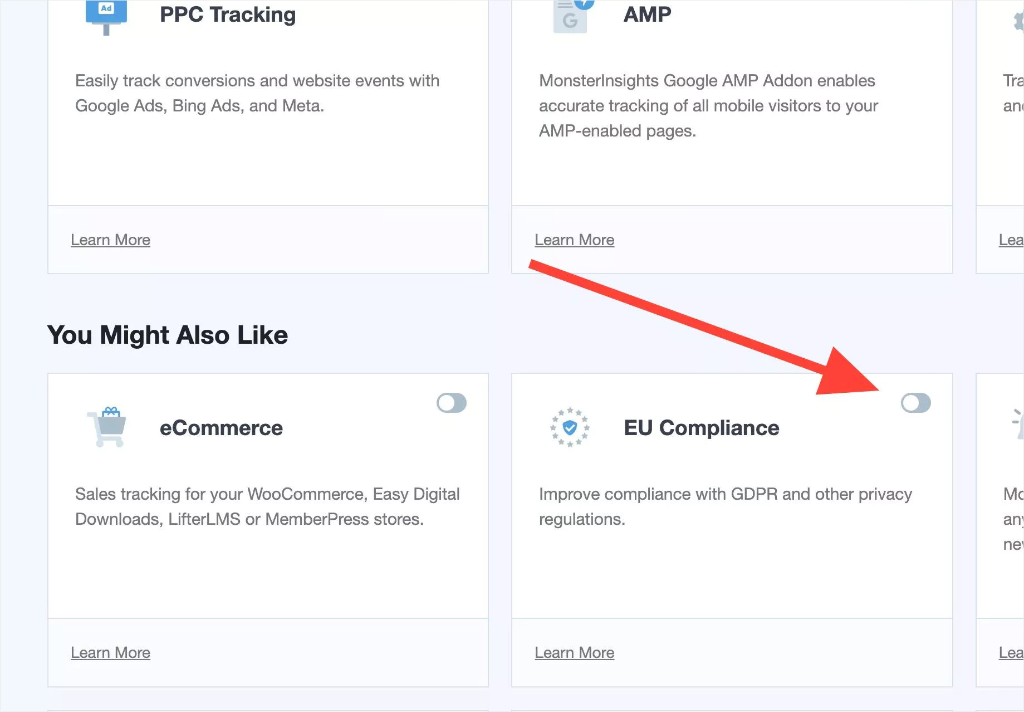
Google Analytics is now connected. But you need to activate the EU Compliance addon to enable Google Consent Mode V2.
To do this, go to Insights » Add-ons and install the EU Compliance add-on.
Once active, go to Insights » Settings and click the Engagement tab. Turn on Enable Privacy Guard. This tells MonsterInsights to hold back all GA4 tracking until a visitor has responded to your consent banner.
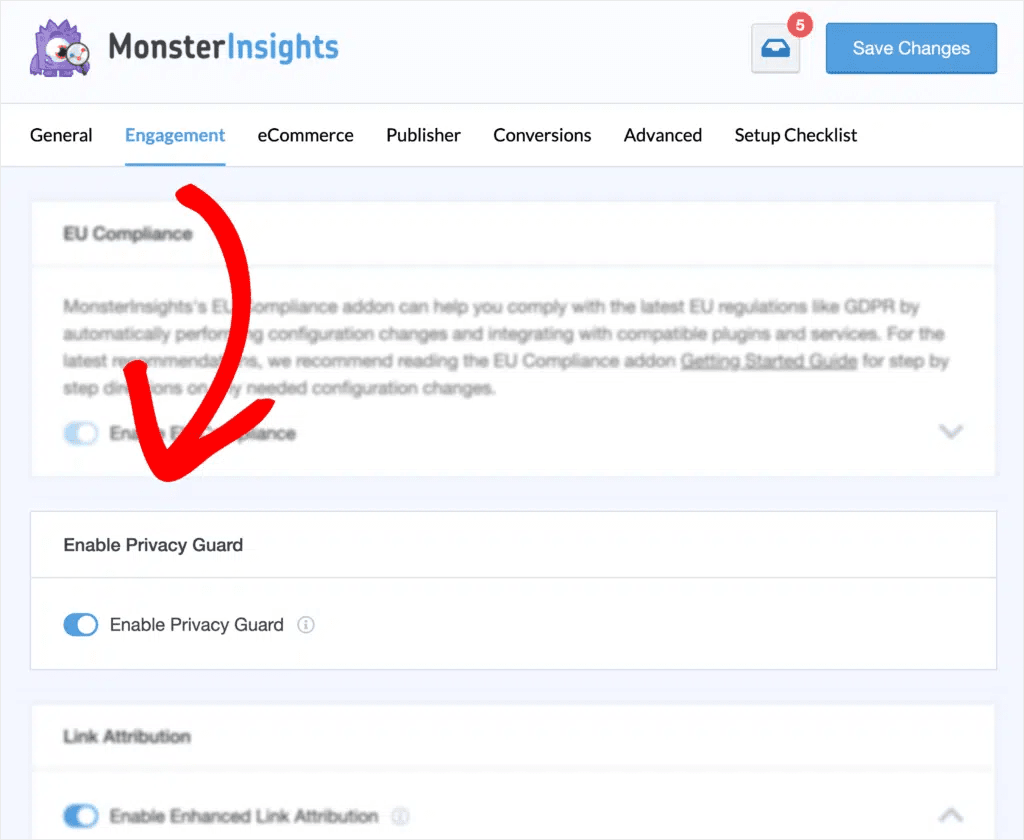
That’s it, you have now connected Google Analytics to WordPress, and set up MonsterInsights for Google Consent Mode V2 compliance.
Skip to Step 2 → once you see the green tick.
Method 3: Connect Site Kit
Site Kit is Google’s own WordPress plugin. It connects GA4, Search Console, and PageSpeed Insights from one place. If you already use multiple Google tools, Site Kit keeps them under one dashboard.
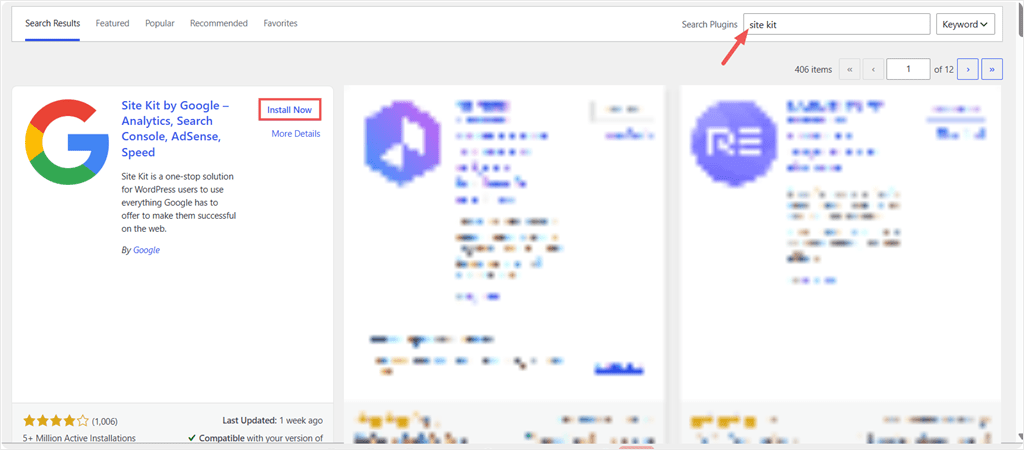
Go to Plugins » Add New and search for “Site Kit by Google.” Once you locate it, click Install Now, then Activate.
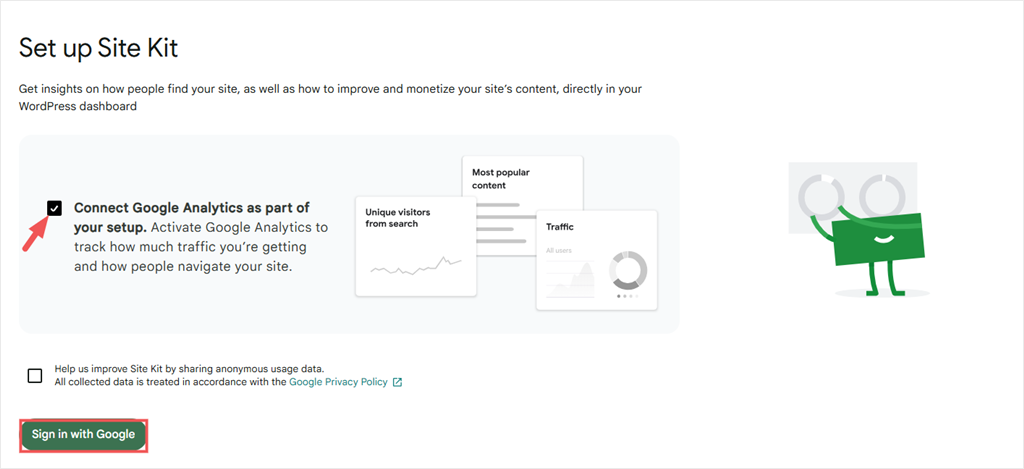
Next, the setup screen opens. Check the box next to Connect Google Analytics as part of your setup, then click Sign in with Google.
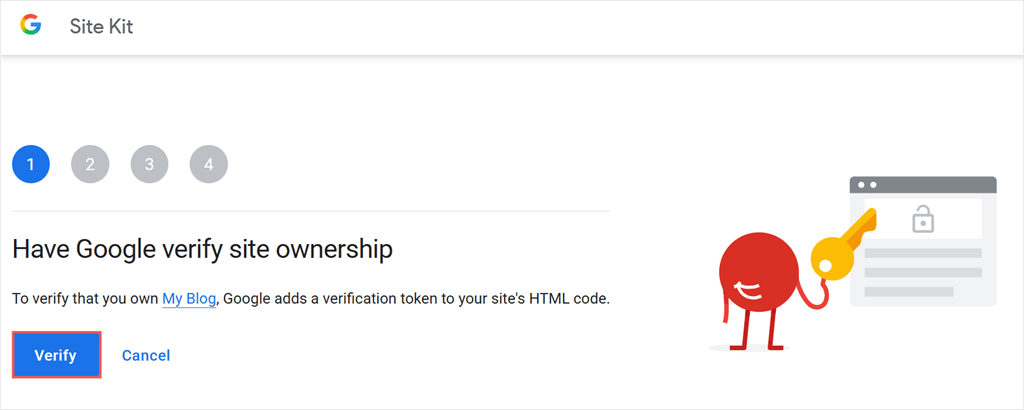
After this, select your Google account and grant the required permissions. Site Kit will ask you to verify that you own the site. When this pops up, click Verify.
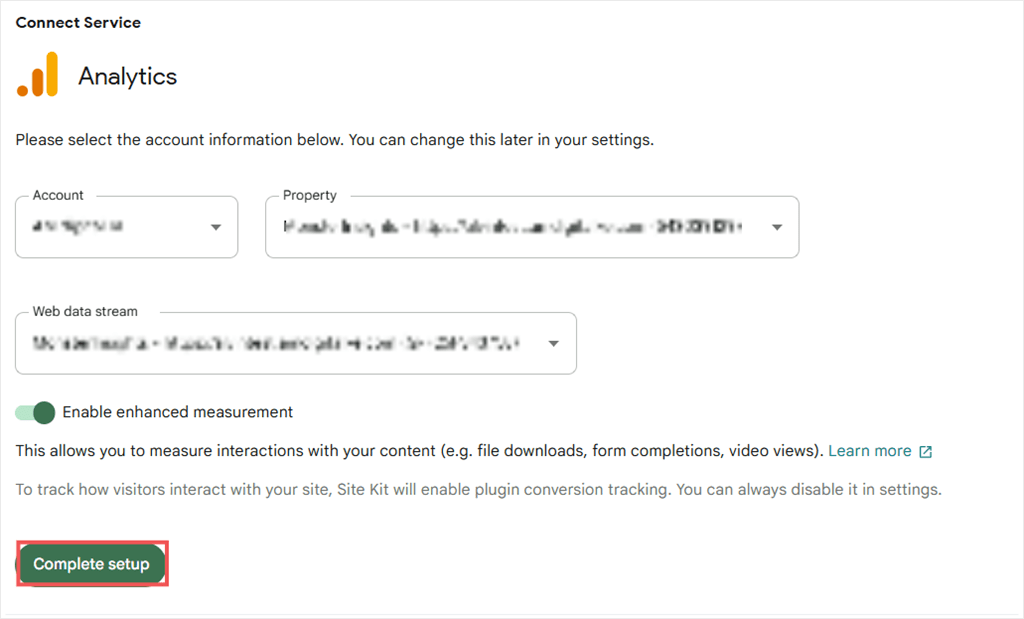
Then on the next screen, follow the remaining prompts. Select your Google Analytics account, property, and web data stream, then complete the setup.
⚠️ One step you should not skip: go to Site Kit » Settings and click the “Admin Settings” tab. Under “Consent mode,” turn on “Enable consent mode.”
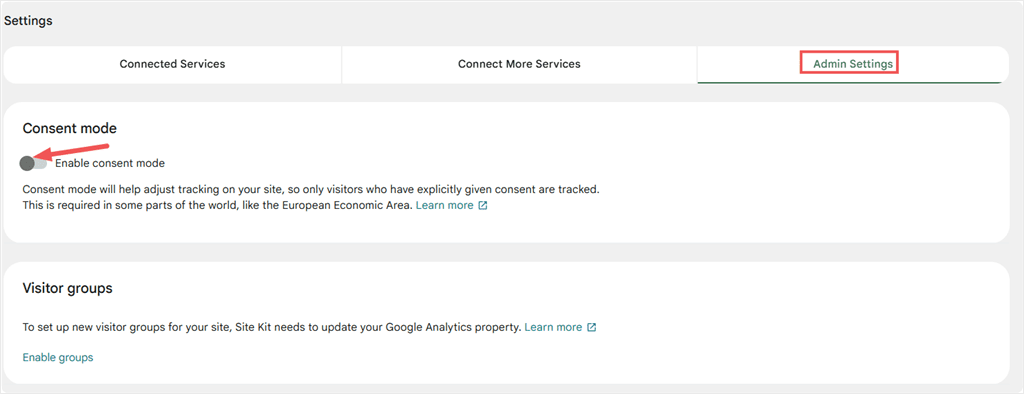
Without this, Site Kit doesn’t respond to the consent signals WPConsent, or any other Google Consent Mode V2 plugin sends. Turn it on before moving to Step 2.
Step 2: Install and Activate WPConsent
Regardless of which Google Analytics method you chose, WPConsent is what activates Google Consent Mode V2. It handles the consent banner, reads visitor choices, and sends the right signals to GA4 and Google Ads automatically.
The free version covers setting up Google Consent Mode V2. So we will use it for this tutorial.
To set it up, go to Plugins » Add New, search for “WPConsent,” click Install Now, then Activate.
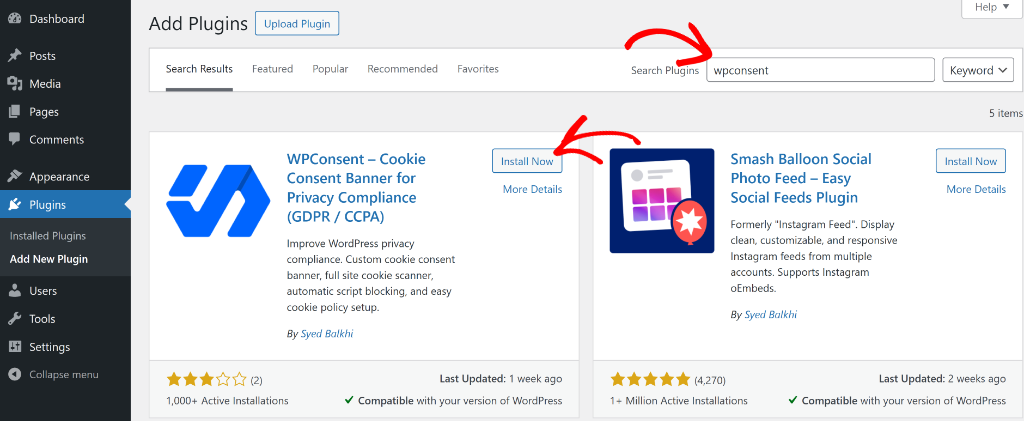
If you prefer the Pro version, Purchase a plan from the WPConsent website, download the zip file from your WPConsent account and upload it at Plugins » Add New » Upload Plugin.
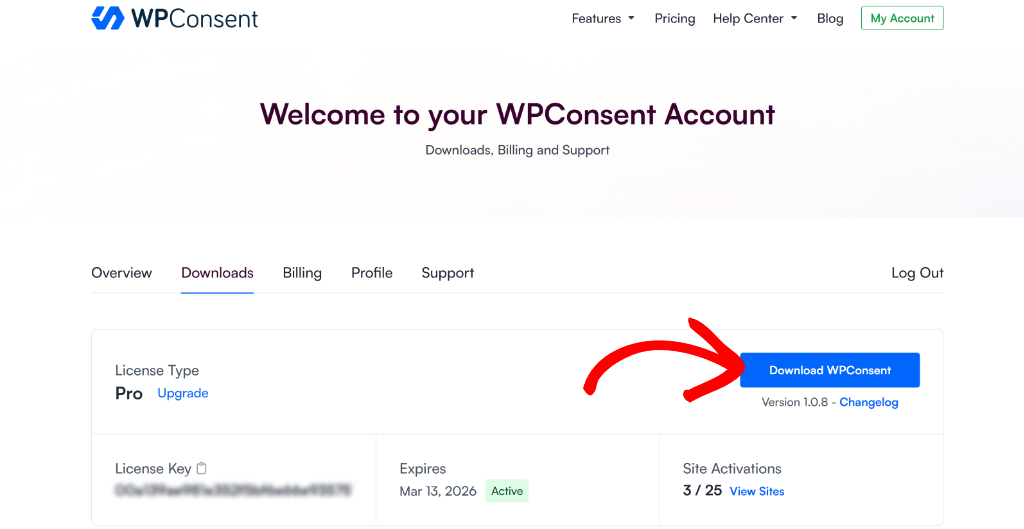
If you need assistance, here is a tutorial on how to install and set up WPConsent.
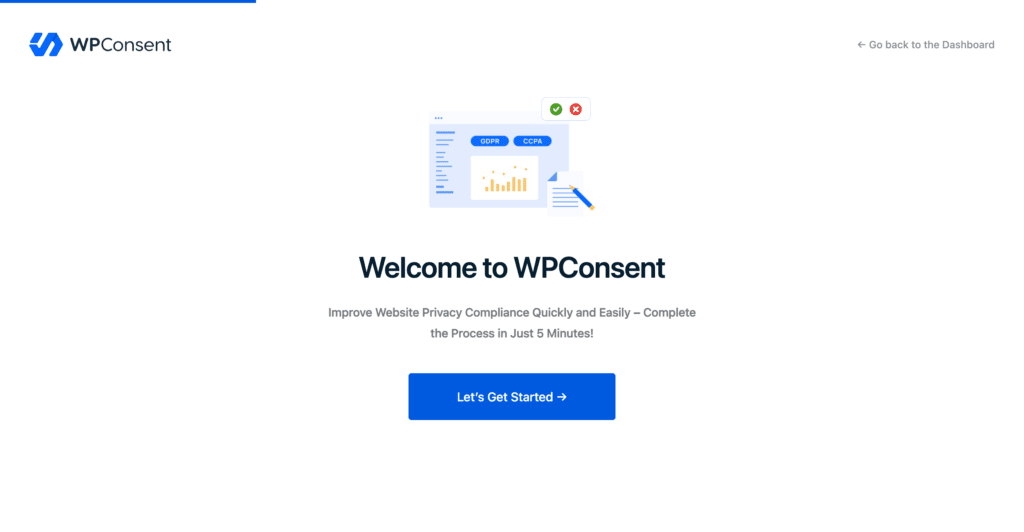
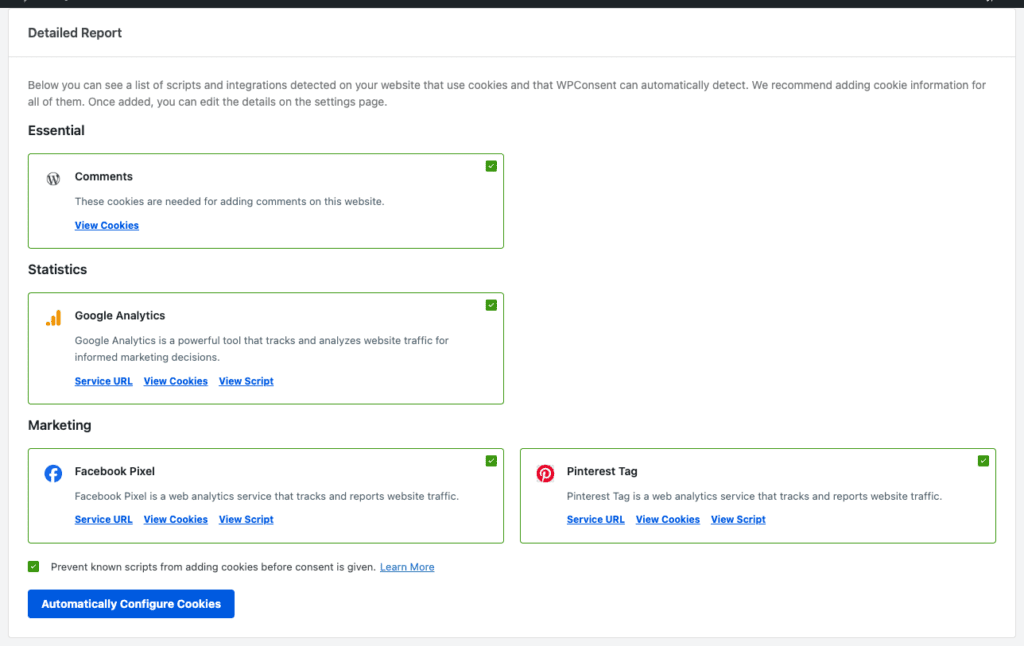
Once activated, WPConsent opens its setup wizard. It walks you through adding your license key (if you’re on Pro), running a cookie scan on your site, and confirming your consent categories.
The scan finds cookies your site already sets, so your banner reflects what’s actually running, not a generic list.
If you want to explore other consent management options, our guide to the best WordPress cookie consent plugins covers what’s available and how they compare.
Step 3: Enable Google Consent Mode V2
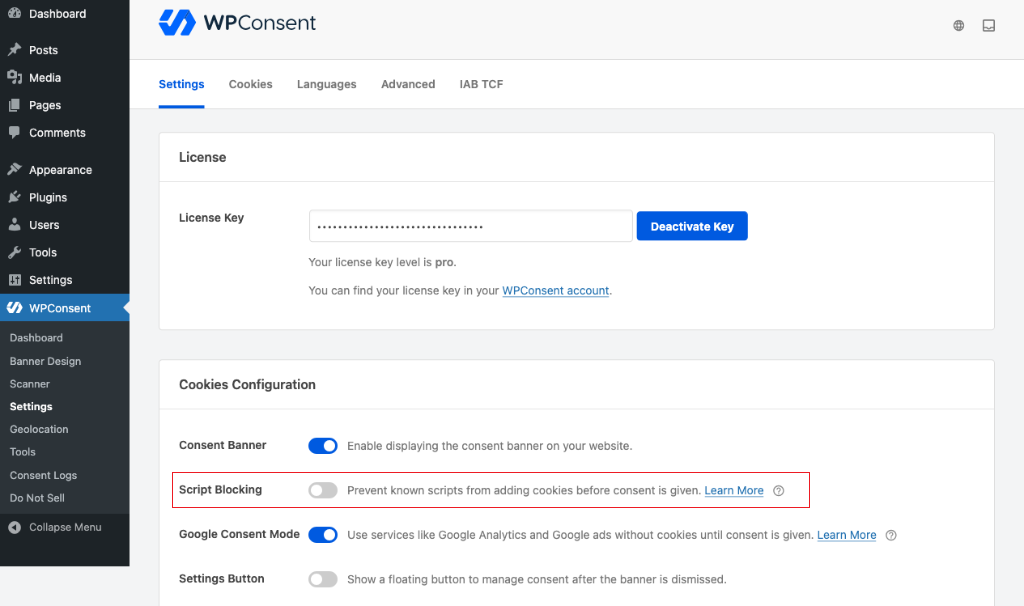
Once you have installed WPConsent, and run a scan, go to WPConsent » Settings and scroll down to the Cookie Configuration section.
You’ll see the Google Consent Mode toggle. By default, it’s already active. Just confirm it’s switched on.
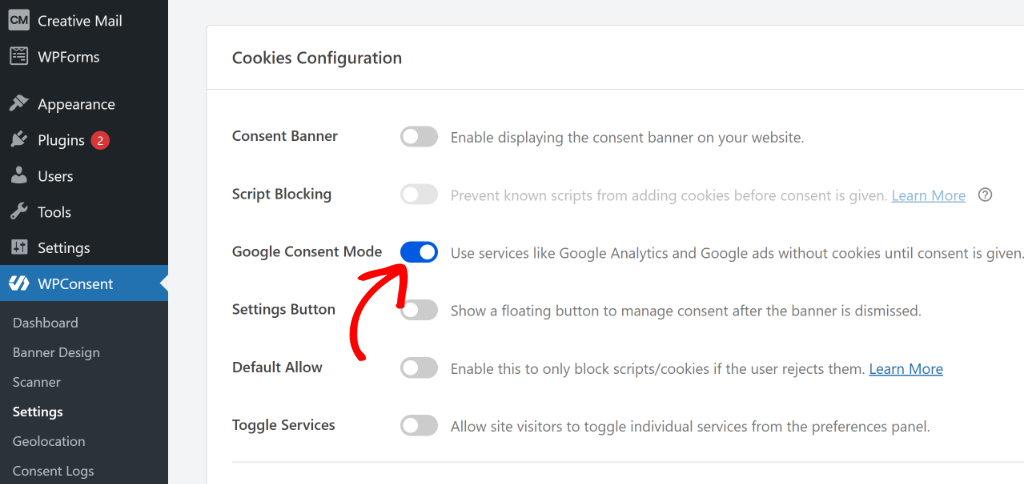
That’s the entire setup. From this point, whenever a visitor interacts with your banner, WPConsent sends the correct GCM V2 signals to GA4 and Google Ads. No extra configuration. No code.
🛡️ How WPConsent Protects You From the First Pageview
Before your banner even loads, WPConsent sets all consent signals to denied by default. This means no GA4 cookies are set during that split second before a visitor sees your banner. Though Google still receives the anonymous, cookieless pings it needs to model your missing data safely. The toggle in Step 3 is what activates this, not the banner itself.
And because WPConsent stores all consent data on your own server, no consent records are sent to a third-party cloud.
Step 4: Set Up Your Cookie Banner
GCM V2 is configured, but it needs a banner to work. Without one, visitors have no way to make a consent choice. And without that choice, no signal fires.
So, how do you set up a consent banner with WPConsent?
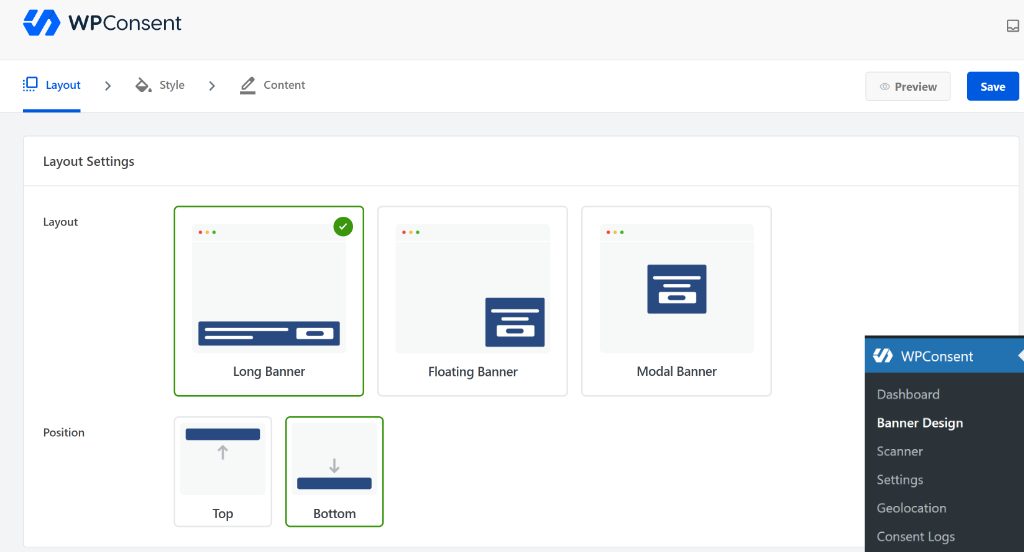
Go to WPConsent » Banner Design. Choose your layout, adjust your colours to match your site, and update the button text if needed. Click Save when you’re done.
For a complete walk-through of every banner option, see our guide on how to add a cookie consent banner to your WordPress site.
If you run a WooCommerce store, consent setup needs a few extra considerations around customer data and payment cookies. Our WooCommerce cookie consent guide walks through what’s different for store owners.
How to Troubleshoot your Google Consent Mode V2 for Google Analytics Setup
GA4 is still tracking before consent is given
Check your method-specific settings.
- MonsterInsights Pro users: go to Insights » Settings, click the Engagement tab, and confirm Enable Privacy Guard is on. Site
- Kit users: go to Site Kit » Settings » Admin Settings. Confirm the Enable consent mode toggle is on.
- For WPCode users, WPConsent handles this automatically once the Step 3 toggle is active.
The consent banner isn’t showing on your site
Run a cookie scan first. WPConsent needs to detect your site’s cookies before the banner displays correctly.
- Go to WPConsent » Dashboard and click Scan.
- For help understanding what the scan finds, see our guide on how to find which cookies your WordPress site is using.
- If you use a caching plugin, clear your site cache after making WPConsent changes, and test in a private browser window since the banner doesn’t show for logged-in admins by default.
Google Consent Mode V2 signals aren’t showing in Google Analytics
- In GA admin, go to Admin » Data collection and modification » Data streams, open your stream, and look for the Consent overview section.
- It should show consent mode as active. Give it up to 24 hours after the first setup before checking. Consent data takes time to populate in reports.
MonsterInsights shows as disconnected
- Go to Insights » Settings » General and click Re-authenticate.
- This usually happens after a Google account password change or an access revocation. The re-authentication takes about two minutes.
What Is Google Consent V2 Mode?
Google Consent Mode v2 is an updated framework that helps websites handle user privacy choices while still collecting valuable analytics data.
The “V2” part is important because it added two new consent types that weren’t in the original version. These include ad_user_data and ad_personalization.
The first one controls whether Google can collect user data for advertising purposes, while the second determines if that data can be used for personalized ads.
Google created this system to balance user privacy with the need for website owners to understand their audience and measure advertising performance. Think of it like a smart traffic controller for your website’s data.
When users visit your site, Consent Mode v2 sends signals to Google services like Google Analytics and Google Ads about what types of data collection they’ve agreed to.
This happens automatically in the background, so users don’t see the technical complexity. The system works by sending consent signals to Google’s servers before any tracking begins.
This means Google knows exactly what data it can and cannot collect from each visitor, helping you stay compliant with privacy laws while maintaining useful analytics.
Frequently Asked Questions
Do I need Google Consent Mode V2 if I’m not running Google Ads?
You don’t need it specifically for Google Ads if you’re not using that product. But GA4 uses consent signals to model data for visitors who decline cookies. Without Consent Mode, those visitors leave a gap in your reports that GA4 can’t fill. We recommend setting it up regardless. The toggle in Step 3 takes seconds.
Does WPConsent work with all three GA connection methods?
Yes. WPConsent uses the WP Consent API, which works alongside MonsterInsights, WPCode, and Site Kit. Whichever method you chose in Step 1, WPConsent sends the correct GCM V2 signals automatically when a visitor responds to your banner.
What Happens if I Do Not Implement Google Consent Mode V2?
Without implementing Google Consent Mode V2, your website faces several significant risks. Google Analytics 4 and Google Ads may stop collecting data properly from visitors in regions with strict privacy laws, leading to incomplete reporting and reduced advertising effectiveness.
Your website also becomes vulnerable to privacy law violations. Regulations like GDPR and LGPD require proper consent management, and non-compliance can result in substantial fines and legal action from regulatory authorities.
What Are Google Consent Types?
Google Consent Mode V2 uses four switches that control what Google is allowed to track. When a visitor accepts or declines on your banner, WPConsent automatically flips the appropriate switches.
Here’s what each one controls in plain English:
- Ad user data: Can Google collect that visitor’s data to improve its ad targeting?
- Analytics storage: Can Google track how people use your site (pages visited, time spent)?
- Ad storage: Can Google store advertising cookies on the visitor’s device?
- Ad personalization: Can Google use that data to show the visitor personalized ads?
Most visitors who accept all cookies turn all four on. Visitors who decline turn all four off. WPConsent handles this in the background. You don’t need to configure any of them manually.
Do I Need Google Consent V2 Mode?
You need Google Consent Mode v2 if your website uses Google Analytics, Google Ads, or other Google marketing tools and serves visitors from regions with privacy regulations. This includes the European Union, California, and other jurisdictions with strict data protection laws.
How Does Consent Mode V2 Affect My Analytics Data?
Consent Mode v2 uses Google’s machine learning to model user behavior when visitors don’t consent to tracking. This means you still get valuable insights about traffic patterns and conversions, even from users who prefer privacy. Your data may show some differences compared to pre-consent implementation, but Google’s modeling typically provides reliable estimates for most metrics.
Is Google Consent Mode V2 free to set up?
Yes. The GCM V2 toggle in WPConsent is available in the free version. You don’t need a Pro plan to activate it. WPConsent Pro adds features like geolocation-based display rules, consent logging for audits, and IAB Transparency and Consent Framework (TCF) 2.3 support.
What happens to my GA4 data if I skip Consent Mode V2?
GA4 still collects data from visitors who accept cookies. But for visitors who decline, you get gaps in your reporting. Consent Mode lets Google use modeled data to estimate what you’re missing. Without it, those gaps are empty and stay empty. If you’re running Google Ads, it’s worth reading our guide on blocking Google Ads scripts until consent is given for a fuller picture.
Google Consent Mode V2 Is Now Live on Your Site: One Click with WPConsent
With everything in place, every visitor interaction with your banner goes straight to GA4 with the correct signals attached. Visitors who accept get tracked as normal.
Visitors who decline trigger cookieless modeling, so Google can estimate what your data looks like instead of leaving it blank. And because WPConsent sets all consent signals to denied before your banner even appears, that first split second is covered too.
Most sites skip this step entirely, or set it up in a way that only works for visitors who accept. You’ve done it correctly.
Your GA4 reporting is now as accurate as it can be under consent-based measurement, and you’re ahead of any future enforcement changes Google makes. That’s a solid place to be.
The free version from WordPress.org covers everything in this tutorial. This includes the banner, cookie scan, and full Google Consent Mode V2 support.
Explore WPConsent Pro if you need consent logging, geolocation rules, or IAB Transparency and Consent Framework (TCF) 2.3 support.
Additional Resources
Now that Consent Mode is running, here are three natural next steps for a complete setup.
- Customizable Cookie Banner: Make your consent banner match your brand without touching any code.
- Automatic Cookie Policy Generation: Generate a cookie policy that updates itself whenever your site’s cookies change.
- GDPR Compliance for WordPress: Consent Mode is one piece of the puzzle. This guide covers everything else your site needs to stay fully compliant.
WPConsent handles the technical side of GCM V2 for you. One toggle in your settings, and your site sends the right signals to Google every time a visitor makes a consent choice.