Need to prove that your visitors actually gave consent before you processed their data? WPConsent’s consent logs automatically record every banner interaction, storing who consented, what they consented to, and when. This guide walks you through enabling, viewing, filtering, exporting, and cleaning up consent logs.
Pro Feature: This feature requires WPConsent Pro.
Table of contents
- Prerequisites
- Enabling consent logging
- Understanding what gets captured
- Viewing consent logs
- Filtering and searching logs
- Exporting logs to CSV
- Cleaning up old logs
- Verifying your setup
- FAQ
- Conclusion
Prerequisites
- WPConsent Pro installed and activated
- A consent banner configured and displaying on your site
Enabling consent logging
WPConsent doesn’t record consent interactions by default. You’ll need to turn the feature on first.
- Navigate to WPConsent >> Settings.
- The default Settings tab loads automatically.
- Scroll to the Consent Logs toggle.
- Turn on Enable keeping records of consent for all visitors that give consent.
- Click Save.
Once enabled, WPConsent registers a REST API endpoint at /wp-json/wpconsent/v1/log-consent. The frontend banner sends a POST request to this endpoint each time a visitor saves their consent choices.
Understanding what gets captured
Each log entry is stored in the wpconsent_consent_logs database table. Here’s what WPConsent records:
| Field | Description |
|---|---|
| User | WordPress user ID for logged-in visitors, or 0 for guests |
| IP Address | Anonymized visitor IP address (see below) |
| Country Code | 2-letter country code from geolocation lookup, or XX if unavailable |
| Consent Data | JSON object with each cookie category and service set to accepted or declined |
| Timestamp | Date and time of the consent interaction (stored in both local and UTC formats) |
IP anonymization
WPConsent anonymizes IP addresses before storing them. No full IP address is ever written to the database.
- IPv4: The last octet is replaced with
000. For example,192.168.1.45becomes192.168.1.000. - IPv6: The last 5 groups (positions 3 through 7) are replaced with
0000. For example,2001:0db8:85a3:0000:0000:8a2e:0370:7334becomes2001:0db8:85a3:0000:0000:0000:0000:0000.
This approach preserves enough information for regional analysis while protecting individual privacy.
Viewing consent logs
To review all recorded consent interactions, navigate to WPConsent >> Consent Logs. Make sure the Consent Logs tab is selected.
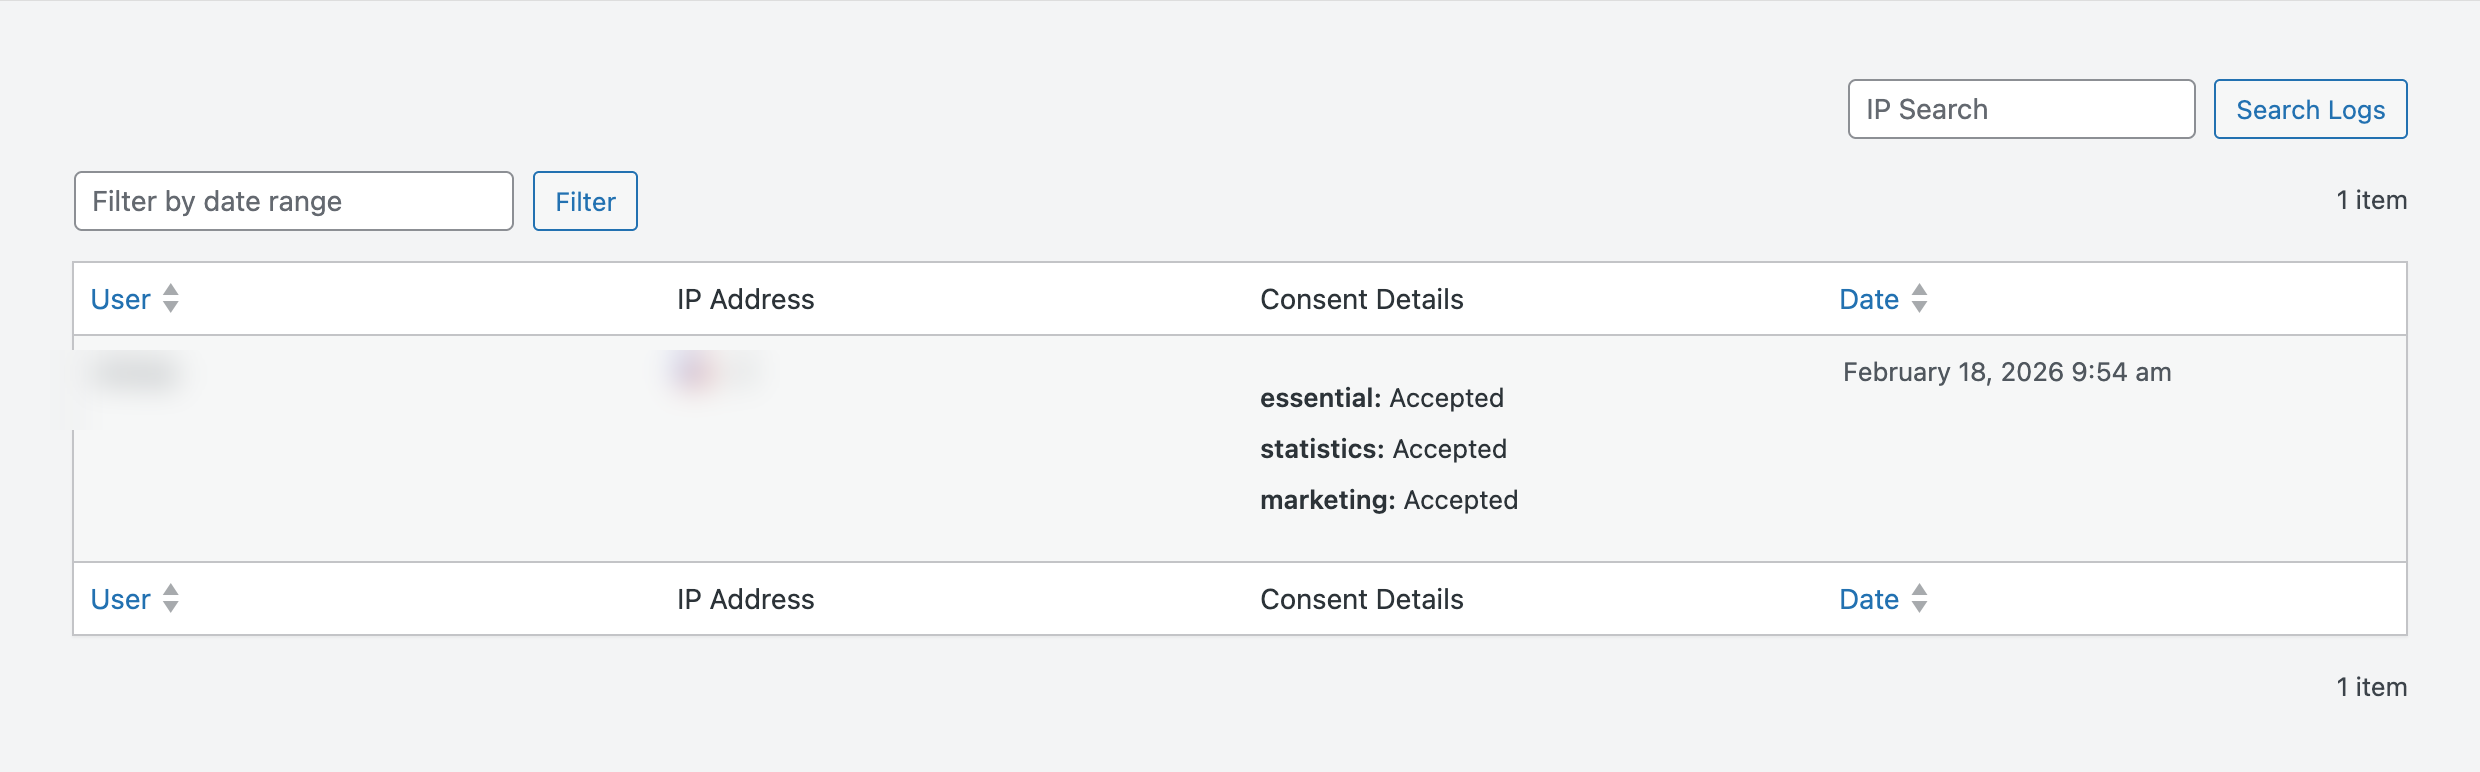
The table displays 20 records per page with 4 columns:
- User: The WordPress username, or “Guest” for visitors who weren’t logged in.
- IP Address: The anonymized IP with a country flag icon (when geolocation data is available).
- Consent Details: A summary of category-level choices (Essential, Statistics, Marketing) shown as Accepted or Declined. If the visitor had GPC (Global Privacy Control) enabled, that status appears as well. Click View Services to expand individual service-level decisions.
- Date: Formatted using your WordPress date and time settings.
Filtering and searching logs
WPConsent provides built-in tools to find specific records quickly.

Filtering by date range
- Click the Filter by date range input above the table.
- Select a start date and an end date using the date picker.
- Click Filter to apply.
To remove the filter, click Clear.
Searching by IP address
- Enter a full or partial IP address in the IP Search box.
- Click Search Logs.
The search supports partial matching:
- A full IPv4 like
192.168.1.100matches that specific anonymized address. - A partial IPv4 like
192.168automatically wildcards the remaining octets. - A partial IPv6 like
2001:db8automatically wildcards the remaining groups.
Because IP addresses are anonymized on storage, the last octet of an IPv4 address is always 000. Keep this in mind when searching.
Exporting logs to CSV
You can export consent records for compliance reporting, legal requests, or external analysis.
- Navigate to WPConsent >> Consent Logs.
- Select the Export tab.
- Set a From date and a To date for the range you want to export.
- Click Export.

The export processes records in batches of 1,000 to handle large datasets without timing out. A progress bar shows the current status. When processing completes, the CSV file downloads automatically.
The downloaded file is named consent-logs-YYYY-MM-DD_HH-MM-SS.csv and contains these columns:
| Column | Content |
|---|---|
| Date | Timestamp in your WordPress timezone |
| User ID | WordPress user ID or “Guest” |
| IP Address | Anonymized IP |
| Essential Cookies | Accepted or Declined |
| Statistics Cookies | Accepted or Declined |
| Marketing Cookies | Accepted or Declined |
| Services | Comma-separated list of individual services with their status |
Cleaning up old logs
Over time, your consent logs table can grow large. WPConsent lets you remove outdated records to manage database size and comply with data retention policies.
- Navigate to WPConsent >> Tools.
- Select the Database tab.
- Scroll to the Clear Consent Logs section.
- Choose a time period from the Clear logs older than dropdown:
– 3 months – 6 months – 1 year – 2 years – All time
- Click Delete Logs.
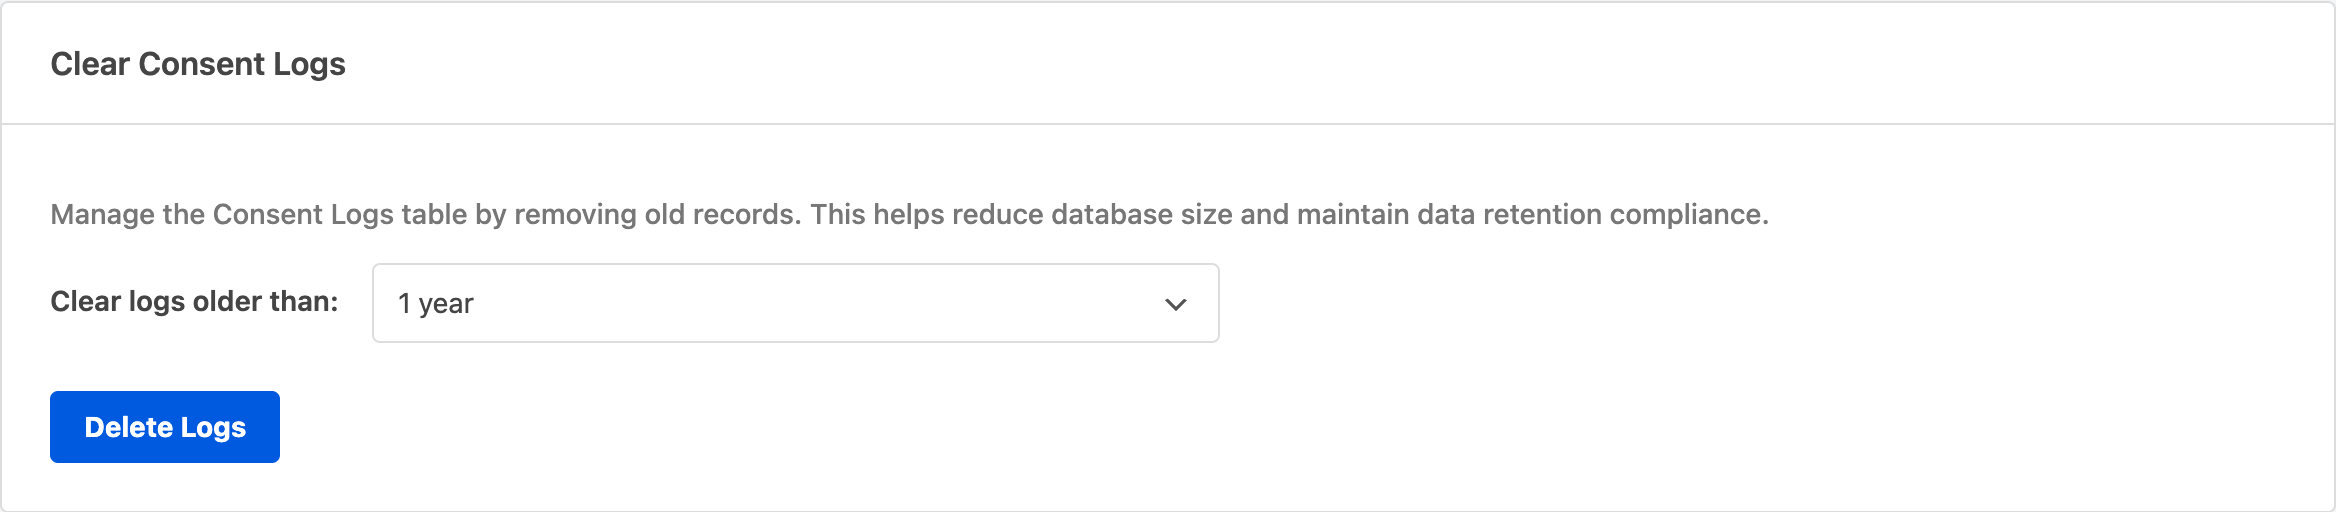
The deletion runs in batches of 1,000 records to prevent server timeouts. A progress indicator tracks the operation. This action is irreversible, so deleted records can’t be recovered.
Most privacy regulations recommend keeping consent records for at least as long as the consent is valid. Check your specific regulatory requirements before setting a retention period.
Verifying your setup
After enabling consent logging, confirm everything works correctly.
Testing a consent interaction
- Open your site in an incognito or private browser window.
- Interact with the consent banner (accept, decline, or customize choices).
- Navigate to WPConsent >> Consent Logs.
- Verify a new entry appears with your anonymized IP, the correct consent choices, and the current timestamp.
Confirming the REST endpoint
Visit yoursite.com/wp-json/wpconsent/v1/log-consent in your browser. You should see an error message like:
{"code":"rest_missing_callback_param","message":"Missing parameter(s): consent_data"}This confirms the endpoint is active. The frontend banner automatically sends the correct data when visitors interact with it.
If you see a 404 error instead, check that consent logging is enabled in WPConsent >> Settings and that your WordPress permalinks are saved (navigate to Settings >> Permalinks and click Save Changes).
FAQ
Why aren’t my consent logs appearing after I enabled the feature?
First, confirm the toggle is on in WPConsent >> Settings. If it is, open your browser developer tools and check the Network tab for requests to /log-consent. A failed request may indicate a REST API conflict with another plugin or a server firewall blocking the endpoint.
Why are country flags missing from some log entries?
Country codes are determined by geolocation. If the geolocation service is unavailable when a log entry is created, WPConsent stores XX as the country code and no flag displays. When you view the logs page, the system attempts to look up and store the country code for any entries that are missing one.
Why isn’t the export button responding?
Make sure you’ve selected both a From and To date before clicking Export. The export requires a date range. If the progress bar appears but the download never starts, check your browser’s popup blocker settings and verify that the wp-content/uploads/wpconsent/exports/ directory is writable.
Why does the Consent Logs page show a warning?
If you see a notice that says consent logs are disabled, click the provided link to go to the settings page. Then enable the Consent Logs toggle and save. The warning disappears once logging is active.
Conclusion
Consent logs help you keep a record of visitor consent decisions. By enabling logging, reviewing records, and periodically exporting or cleaning up old data, you can better manage your consent records over time. For more on managing your plugin’s database tables and cache, see the guide on database and cache management.