If you think your WordPress site is cookie-free because you don’t have a visible banner, you might want to double-check.
The reality is often messy: contact form plugins, analytics tools, social media feeds, and caching layers are likely loading what are tracking cookies in the background right now. These hidden cookies aren’t just technical debt. They are legal liabilities.
Under regulations such as GDPR and CCPA, you must know exactly what is tracking your visitors and disclose it before obtaining consent. This is where a cookie compliance audit helps you out.
The audit isn’t complicated, but it does require actually going through your site methodically and checking for scripts that might be adding cookies to your site.
In this guide, I’ll walk you through how to audit your WordPress site for cookie compliance and help you find every hidden cookie.
Why Perform Cookie Compliance Audits?
A cookie audit is the foundation of your privacy strategy. If you don’t know what scripts are running, you can’t control them. The basic reason for having regular audits is that compliance isn’t a one-time thing. GDPR and CCPA fines are real, and regulators are increasingly active.
But beyond avoiding penalties, auditing builds trust with your visitors and helps you catch problems before they become bigger issues.
1. Compliance is Specific
Privacy laws like GDPR require you to categorize cookies by purpose, such as Essentials, Statistics, and Marketing. You can’t just slap up a generic banner.
You need to list specific cookie names and who controls them. If you are selling data (or if your cookies are doing it for you), CCPA requires clear disclosure.
2. Google Consent Mode v2
As of March 2024, Google requires proper consent signals. If you don’t have this set up, your Analytics and Ads data stops populating correctly. This is a shift in how tracking data flows to Google.
Without a verified audit and proper consent implementation, you are flying blind on marketing metrics. Conversion tracking breaks, and remarketing audiences stop building. To learn more, you may want to see our guide on how to set up Google Consent V2 in WordPress.
3. Site Performance
This is the part most people miss: audits often reveal old, abandoned scripts from plugins you deactivated months ago. I have seen sites reduce page load times significantly just by cleaning up orphaned tracking scripts discovered during a simple audit.
4. Trust Signals
When you list exactly which cookies your site uses, visitors notice. Vague privacy policies make people suspicious. A detailed, honest audit shows you respect their privacy, which builds trust.
5. Configure Cookies from New Plugins
The most common situation I see is sites that were compliant when they first set up, but drifted over time.
For instance, you might have added a new chat widget, and no one thought about its cookies. Or a marketing plugin starts setting tracking cookies that bypass the consent tool. A WordPress update changes how scripts load.
These things accumulate, and without periodic checking, you won’t know which cookies are being added to your site until something goes wrong.
That said, let’s see how you can start a cookie compliance audit in WordPress.
WordPress Cookie Compliance Audit Process
Now, let me walk you through the audit process that you can follow for your WordPress website.
Finding What Cookies Your Site Actually Sets
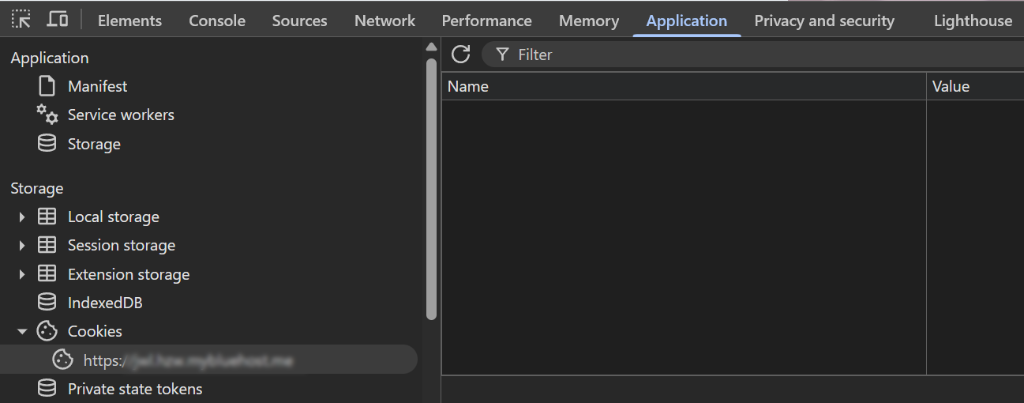
The first step is finding out which cookies are actually set on your website. Start by opening an incognito or private browser window. This gives you a clean slate with no existing cookies or consent choices.
Simply visit your site, but don’t interact with the cookie banner yet. Before you click anything, open your browser’s developer tools. In Chrome, press F12, then go to the Application tab and click on Cookies.
Look at what cookies are present before you’ve made any consent choice. At this point, you should only see essential cookies. Things like session cookies, shopping cart cookies, or login-related cookies are fine.
But if you see _ga (Google Analytics), _fbp (Facebook Pixel), or cookies from advertising networks, you have a problem. Those shouldn’t be there until someone consents.
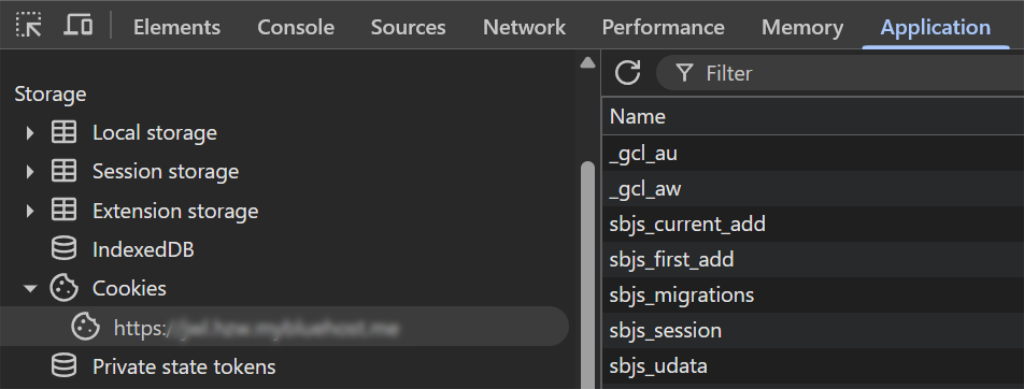
Now, make a note of every cookie you see and then accept all cookies in your banner and check again.
You should see your analytics and marketing cookies appear. Compare the before and after lists. The cookies that appeared after consent are the ones you’re blocking that are being handled correctly.
Any non-essential cookies that were there before consent are gaps in your compliance.
Pro Tip: Block Third-Party Cookies Using WPConset
Once you know the cookies that are being set on your site, you need to block them before consent. And the easiest way to do that is by using WPConsent.
It is the best WordPress cookie compliance plugin that helps scan your site for cookies, configure them, and set up a cookie banner without any technical knowledge or editing code. Unlike external tools that crawl your site from the outside, WPConsent lets you operate its scanner from within your WordPress dashboard.
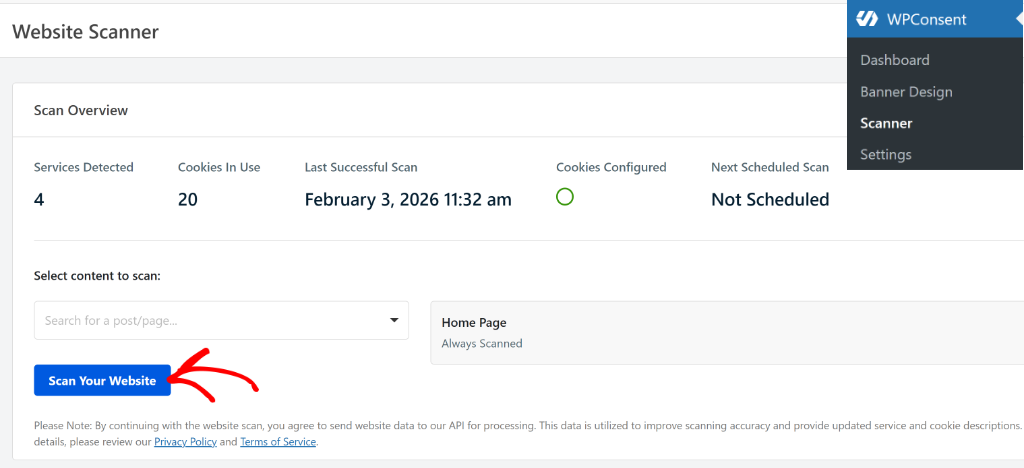
WPConsent will scan your homepage by default. But you can also add other pages to the scanning process, such as the checkout page, contact us page, and more.
This is helpful in uncovering any third-party scripts that might be adding cookies and are not picked up by the scanner. Next, you will have a list of every cookie and script found on your website. Simply scroll down to the Detailed Report section. Here, WPConsent categorizes cookies automatically under different categories.
You can then select the ‘Prevent known scripts from adding cookies before consent is given’ checkbox and click the Automatically Configure Cookies button.
Testing Your Cookie Banner
Now let’s check that your consent interface works correctly. Clear your cookies again and visit your site fresh. Look at your banner critically.
Are the accept and reject options equally easy to find and click? Under GDPR, they need to be. If accept is a big colorful button and reject is tiny gray text hidden in a corner, that’s not compliant. The options should be genuinely equal.
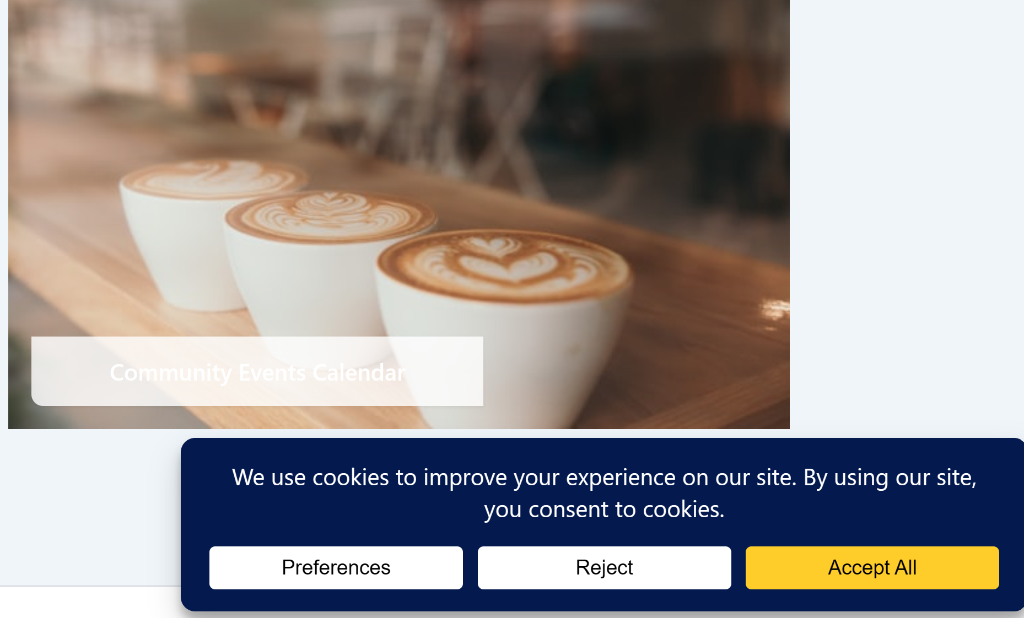
Can visitors make granular choices? Best practice is letting people accept analytics but reject marketing, or vice versa. If your banner only offers “accept all” or “reject all” with no middle ground, consider updating it.
Is there a way to change preferences later? Look for a link in your footer or elsewhere that says something like “Cookie Settings” or “Privacy Preferences.” You can click it and make sure it actually lets you modify your choices.
Verifying That Blocking Actually Works
This is the crucial test, and it’s where most sites fail. Having a banner isn’t enough. The banner needs to actually control whether scripts run.
You can clear your cookies, visit your site, and reject all cookies in your banner. Then browse your site as usual, visit a few pages, click a few links, and spend a minute or two navigating. Then check your cookies again in developer tools.
If you rejected cookies and you still see analytics or marketing cookies, your blocking isn’t working.
This is where you can block custom scripts and iframes using WPConsent. The plugin allows you to manually add scripts or embedded iframe details, and ensure that cookies are blocked before consent.
Checking Your Documentation
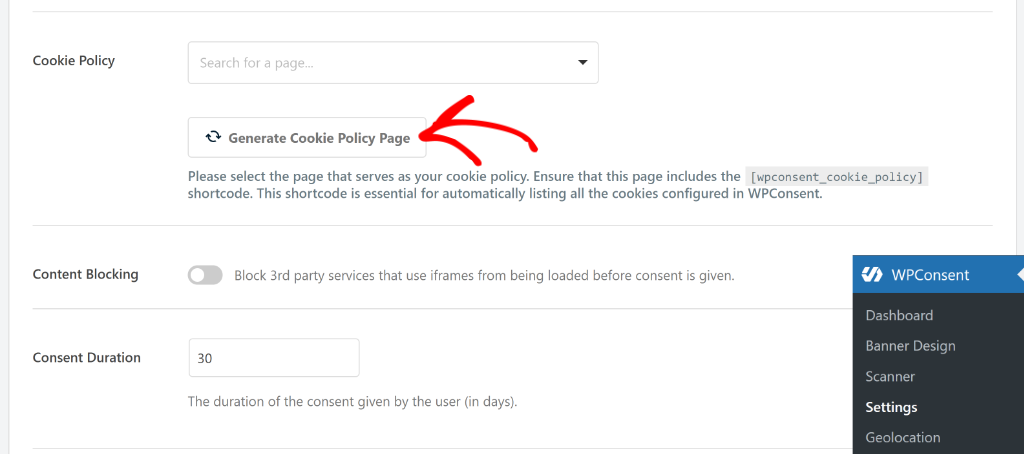
Next, you can pull up your privacy policy and cookie policy. These need to accurately reflect what your site actually does.
Simply check that every cookie you found during your inventory is mentioned and explained. If you’re using Google Analytics, Facebook Pixel, or other specific services, they should be listed with a clear explanation of what they do and why you use them.
Pro Tip: WPConsent helps you create a cookie policy page instantly. The best part is that you don’t have to worry about manually listing cookies on this page, as the plugin does the heavy lifting.
Make sure your policy explains how visitors can change their cookie preferences. You can also include the actual steps, not just a vague statement about managing settings.
And check the “last updated” date. If it says 2021 and you’ve added multiple services since then, that’s a sign your documentation needs a refresh.
Testing User Scenarios
Run through a few realistic scenarios to make sure the whole experience works as expected.
For instance, accept all cookies, then browse your site and complete a typical action like adding something to a cart or filling out a contact form. Does everything work normally? It should.
Reject all cookies and do the same thing. Your site’s essential functions should still work. If rejecting cookies breaks checkout or makes forms fail, something is miscategorized as non-essential that’s actually necessary.
Accept cookies, use your site for a while, then find the cookie settings link and withdraw your consent. The non-essential cookies should be cleared or marked as withdrawn. Some sites don’t handle this correctly, and previously accepted marketing cookies keep tracking even after withdrawal.
Set Up Auto Scanning
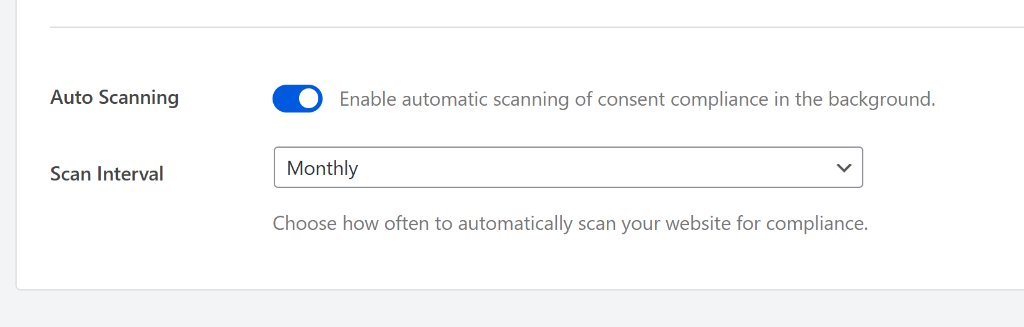
Another benefit of using WPConsent is that you can enable auto-scanning and schedule scans regularly for your website.
This prevents you from falling out of compliance when you install new plugins later. For example, if you add a live chat widget or a new Facebook pixel, the scanner detects the new cookies and updates your banner automatically.
To enable auto-scanning, you can head to the WPConsent Settings page from your dashboard. Then scroll down and click the toggle to enable Auto Scanning. Next, you can choose the scan interval from daily, weekly, or monthly.
Common Problems and How to Fix Them
The most common issue I find is cookies appearing before consent. Usually, this happens because the consent tool isn’t properly blocking scripts, or because scripts are loading before the consent tool initializes.
The fix is usually configuration, making sure all tracking scripts are registered with your consent tool and set to block until consent.
Another common problem is unequal button prominence. This is usually a design issue in your consent tool’s settings. Look for options to customize button size, color, and placement, and make reject as visible as accept.
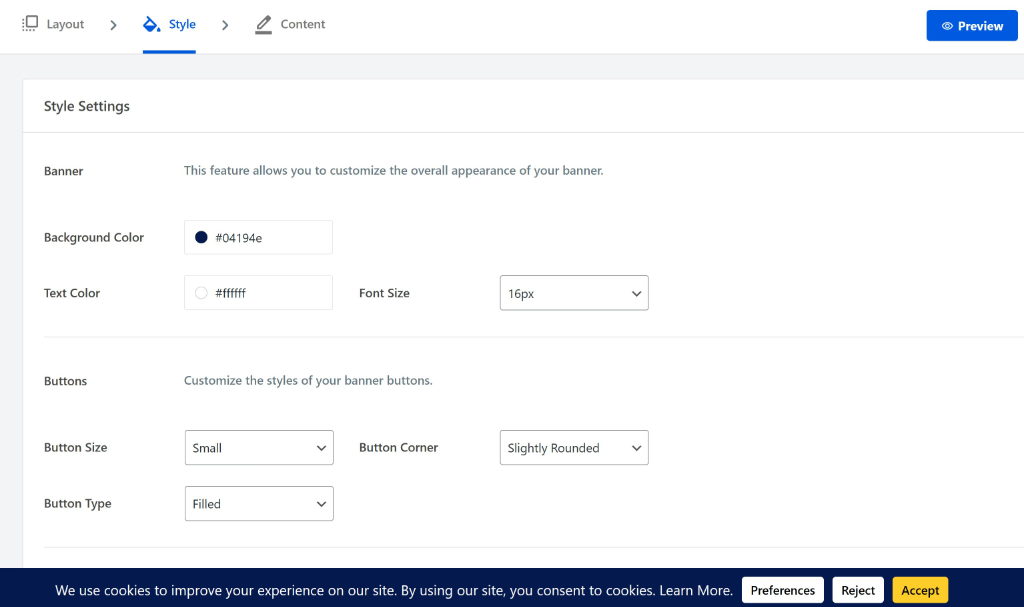
With WPConsent, you get complete control over how your cookie consent banner looks. You can customize its appearance and edit the buttons, change its position, and more.
Another issue is Cookie walls, where content is blocked until someone consents. If your banner prevents people from using your site until they click accept, remove that restriction. Visitors should be able to reject cookies and still access your content.
Outdated documentation is an easy fix, but it is often neglected. Quarterly, review your policies against your actual cookie inventory, remove cookies you no longer use, add new ones, and update the date.
When to Perform Cookie Compliance Audits
I recommend a quick check monthly. Open your site in incognito, verify the banner appears, reject cookies, and spot-check that nothing obvious is tracking before consent. This takes five minutes and catches obvious problems.
A full audit like the one described above should happen quarterly, or anytime you add significant new functionality to your site. New plugins, new integrations, major WordPress updates, and site redesigns all warrant a fresh audit.
If you’re in a regulated industry or handling sensitive data, consider an annual professional review that includes a legal assessment of your documentation and practices.
If Your Audit Finds Problems
Don’t panic. Most compliance issues are fixable quickly. If your current consent tool isn’t blocking correctly, you have two options: reconfigure it properly or switch to a tool that handles blocking automatically.
WPConsent includes a scanner that detects cookies on your site and automatic blocking for common services like Google Analytics and Facebook Pixel. If your audit revealed that your current setup isn’t actually blocking scripts, a switch might be the fastest path to compliance.
Once you’ve made fixes, run through the audit again to verify they worked. Compliance isn’t about having the right tool installed; it’s about that tool actually doing its job.
FAQs about Cookie Compliance Audit WordPress
Here are some common questions users have about cookie compliance audits.
1. How often should I audit cookie compliance?
Quick checks monthly, full audits quarterly. Also, audit after adding new plugins, integrating new services, or making significant changes to your site.
2. What if I find that my site is not compliant?
First, you’ll need to fix the specific issues you found. Usually, this means reconfiguring your consent tool or switching to one that handles blocking properly. This is where using a cookie management plugin like WPConsent comes in handy. It does the heavy lifting for you and helps configure cookies, so they don’t load before consent.
3. How often should I scan?
Scan whenever you change themes or add plugins. If you use WPConsent’s Auto Scanning, set it to weekly or monthly and let it run in the background.
4. Why does the scanner show different results than DevTools?
DevTools shows one page at one moment in time. An automated scanner crawls the whole site and aggregates the results. Use the scanner for the big picture and DevTools for spot-checking.
5. Can I block cookies manually without a plugin?
You can, but I don’t recommend it. You would need to wrap every script in conditional code that checks for consent. One plugin update could wipe your changes. It is better to use a tool that handles blocking at the infrastructure level.
I hope this article helped you learn how to audit your WordPress site for cookie compliance. You may also want to see our guide on WooCommerce cookie consent and how to implement IAB TCF in WordPress.
If you liked this article, then please follow us on X (formerly known as Twitter). You can also leave a comment below if you need any assistance.