TL;DR:
To audit your WordPress site for cookie compliance, open a private browser window and check DevTools before interacting with your cookie banner. Check again after accepting and rejecting consent to see what changes. WPConsent can also scan your site for known services and cookies, helping you see what’s running and spot what still needs attention.
Your cookie banner can look completely fine while your site still sets tracking cookies before anyone clicks anything.
A plugin update, a new analytics tag, or an embedded video can quietly change what your site loads, and a banner alone won’t tell you the difference.
This guide walks through a full WordPress cookie compliance audit, tested step by step on a live site.
This includes identifying cookies and tracking services, testing what actually happens before and after a visitor responds to your banner. Specifically checking Google Consent Mode v2 and setting up monitoring so this doesn’t remain a one-time project.
A checklist at the end turns all nine steps into a quick reference for your next audit.
Key Takeaways
- A cookie compliance audit checks purpose, consent, blocking, and documentation, not just whether a cookie is present.
- Seeing a Google Analytics or Tag Manager request before consent isn’t automatically a failure. What matters is whether it reports a denied consent state.
- Auto Scanning and Auto-Update Services are two separate settings. Turning one on doesn’t turn on the other.
- Test more than your homepage. Cookies can also appear on checkout, contact, or blog pages.
- A cookie scan is the starting point of an audit, not the whole audit.
What Is a Cookie Compliance Audit?
A cookie compliance audit checks what services and cookies your site uses, how your consent setup handles them before and after a visitor makes a choice, and whether your cookie policy matches your current configuration.
On the other hand, a cookie audit only covers which cookies exist. That’s step one, not the whole job.
A complete cookie compliance audit checks eight things:
- Cookies and trackers: what’s actually running on your site
- Purpose: why each service is there
- Consent handling: how your site handles the service before and after a visitor makes a choice
- Blocking: whether it’s actually prevented from running before consent
- Banner behavior: whether visitors can make a real choice
- Withdrawal: whether visitors can change their minds later
- Documentation: whether your cookie policy matches what’s really happening
- Monitoring: whether you’ll notice when something changes
Cookie compliance isn’t about having the right tool installed. It’s about that tool actually doing its job, and the only way to know is to test it.
On top of that, this isn’t only about avoiding a compliance gap.
Cookies left behind by a plugin you deactivated months ago can still be running on every page load, slowing your site. And a banner that doesn’t actually work is one of the fastest ways to lose a visitor’s trust the moment they notice.
5 Signs It’s Time to Audit Your Site
Some sites need this audit more urgently than others. You have a good reason to run one if:
- You added a new plugin or integration in the last three months and never re-checked cookies
- Your cookie or privacy policy hasn’t been updated in over six months
- You see Google Analytics data, but never deliberately set up Google Consent Mode v2
- Your banner’s “Reject” option is smaller or harder to find than “Accept”
- You’ve never actually tested what your site does after someone rejects cookies
None of these mean you’re in trouble. They mean it’s time to check, not guess.
What You Need Before You Start Your Cookie Compliance Audit
Before you open a single tab, gather:
- A private or incognito browser window
- Browser DevTools, built into Chrome, Firefox, and Safari
- Access to your WordPress admin
- Access to your cookie consent plugin’s settings
- A short list of the tracking services you know you use for purposes such as analytics, ads, and chat widgets
- Your current cookie or privacy policy
- A list of pages to test beyond the homepage
This guide assumes you already have a consent plugin like WPConsent installed. If you don’t yet, the manual DevTools steps below will still show you exactly what’s running on your site right now.
If you want to countercheck what you find during the manual process, you can get started with WPConsent here.
Check out our WPConsent review for more details on everything this consent plugin can do.
How to Audit Your WordPress Site for Cookie Compliance
Now that you have a better understanding of what a cookie compliance audit is, have checked for signs you need one, and have what you need ready, let’s get into it.
You can follow this audit manually with any WordPress consent setup. The WPConsent tools shown at each step are optional ways to speed up specific checks or help address what you find.
Since this guide is broken up into several sections, use the table of contents below to skip to any step you want to read.
- Step 1: Find Cookies and Tracking Services
- Step 2: Run That Same Check Automatically
- Step 3: Use the Scanner to Check More Pages
- Step 4: Set Up and Test Your Consent Banner
- Step 5: Prove Blocking Actually Works
- Step 6: Test Google Consent Mode v2
- Step 7: Check Consent Withdrawal
- Step 8: Review Your Cookie Policy Against Reality
- Step 9: Set Up Ongoing Monitoring
- What a Cookie Scanner Can't Tell You
- What If I Find Cookies I Don't Recognize?
- Common Problems
- Cookie Compliance Audit Checklist
- How Often Should You Run a Cookie Compliance Audit?
- How Long Does a WordPress Cookie Audit Take?
- FAQs: WordPress Cookie Compliance Audit
Step 1: Find Cookies and Tracking Services
Start with your browser’s own tools.
Open a private window and visit your site without touching the cookie banner. Then, press F12 (or Cmd+Option+I on Mac) to access “Developer Tools.” Go to the Application tab and select “Cookies.”
That list shows the cookies currently stored for the site before you’ve made a choice.
What you should see: nothing or essential cookies only, things like session IDs or a shopping cart.
What you shouldn’t see: analytics cookies like _ga, advertising cookies, or a third-party marketing script setting its own cookie.
In our test, the screenshot below shows an empty cookie list.
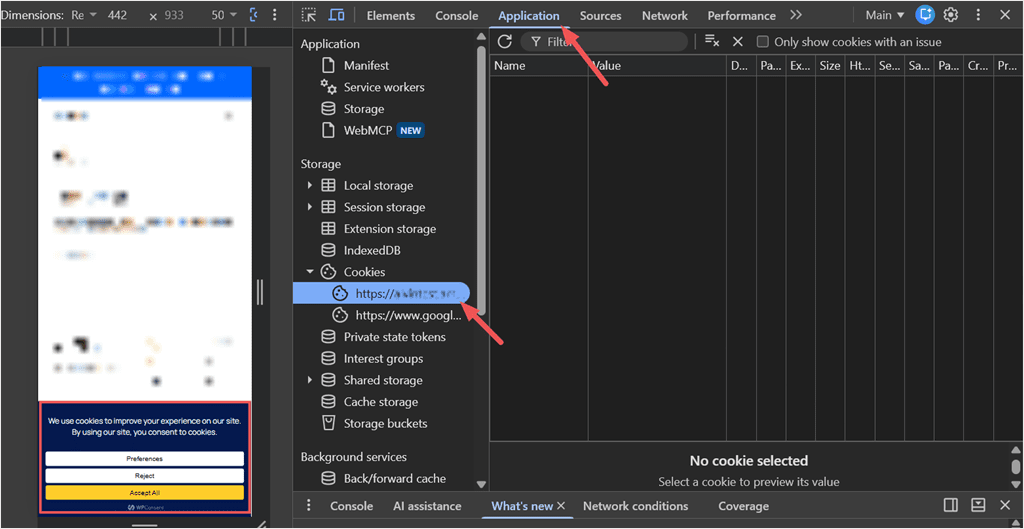
If a non-essential cookie like _ga or _fbp appears in a fresh session before you’ve made a choice, note what set it and whether that service should be blocked until consent. That’s the kind of gap this audit is designed to catch.
Now click “Accept” on your banner and reload the same panel in Developer Tools.
This time, the list should look different. Alongside your session or cart cookie, look for entries that weren’t there. If you run Google Analytics, that means _ga and a _ga_-prefixed cookie.
If you are running a consent plugin, you should also see it on the list. Plus, any other marketing or analytics tool you use will also add its own prefixes.
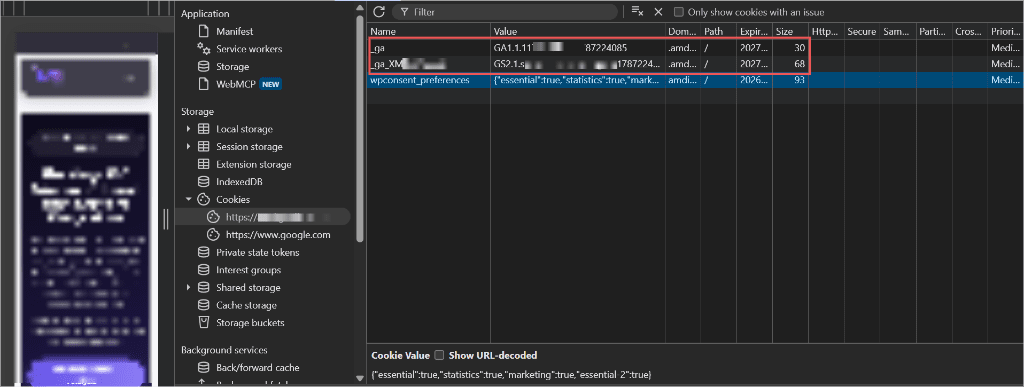
This is how it works:
Cookies get withheld until you say “Yes,” then added once you do. Between the two checks, before and after, you now have the actual full inventory of what’s running by default and what only shows up with consent.
If a consent plugin is running, non-essential scripts shouldn’t get a chance to set anything until you respond to the banner. That’s why the list was empty before and populated right after.
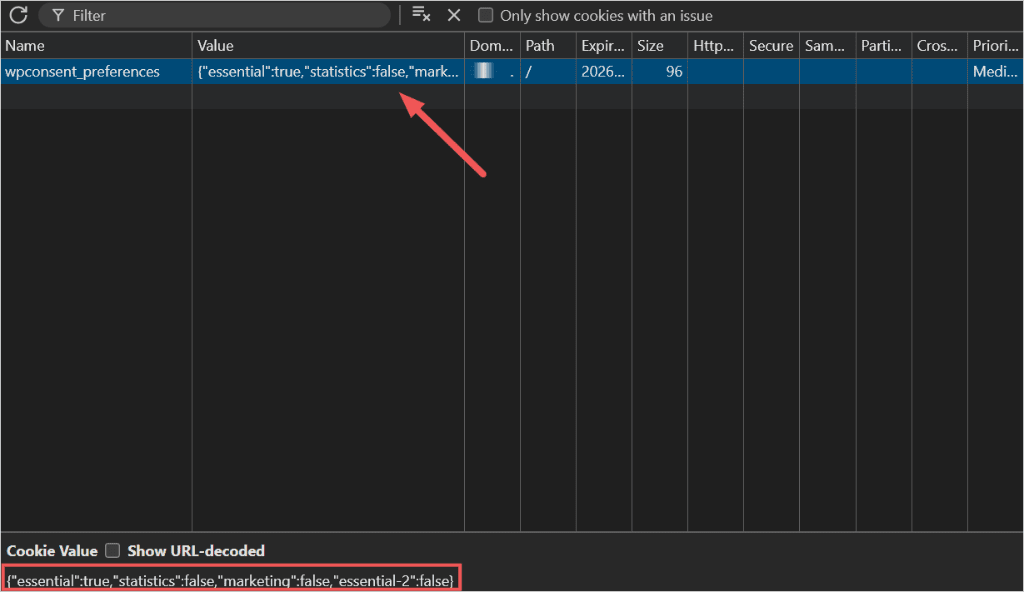
For example, look at the screenshot below. With WPConsent installed, Developer Tools shows exactly which categories you accepted, right there in the wpconsent_preferences cookie.
We cover exactly how that blocking mechanism works in Step 5.
![Screenshot of a browser's cookie panel showing a cookie value like ['essential':true, 'statistics':true, 'essential-2':true].](https://wpconsent.com/wp-content/uploads/2026/08/how-wpconsent-works-in-dev-tools.png)
If nothing changes and your consent plugin is the only cookie you see, that’s not broken. It means your site may not be running anything that sets a statistics or marketing cookie in the first place.
Repeat the page-level audit on a few more pages, not just the homepage.
As mentioned, checkout pages, contact forms, and any post with an embedded video are common places where a cookie shows up that never appears on your homepage.
Step 2: Run That Same Check Automatically
WPConsent’s Cookie Inspector gives you a guided way to repeat that check while you browse. It tracks live cookies in your browser in real time, so what it shows is directly comparable to what you just saw in DevTools.
Go to WPConsent » Scanner » Inspector and click Start Inspector. Here, Click “Go to Site.”
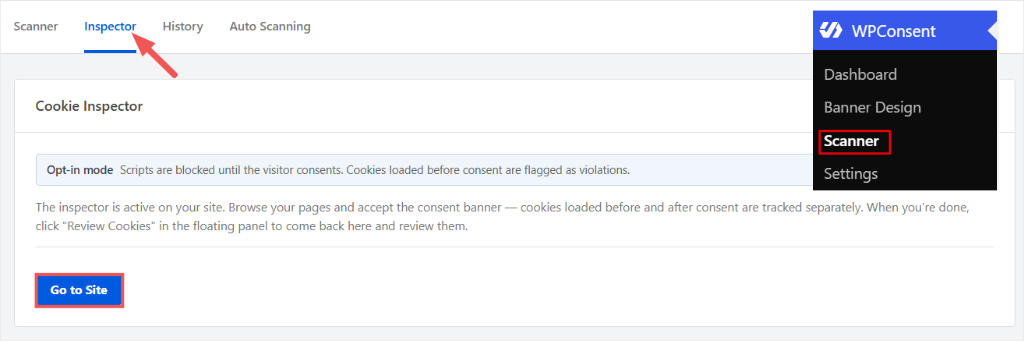
The Cookie Inspector clears your cookies, opens your site fresh, and drops a floating panel that tracks cookies in real time as you browse.
Running it on our own test site caught the same thing we found with the manual approach.
Two Google Analytics cookies, _ga and a property-specific _ga_ cookie, loaded before we configured the banner. It flagged them in a red Undocumented section the moment the panel opened.
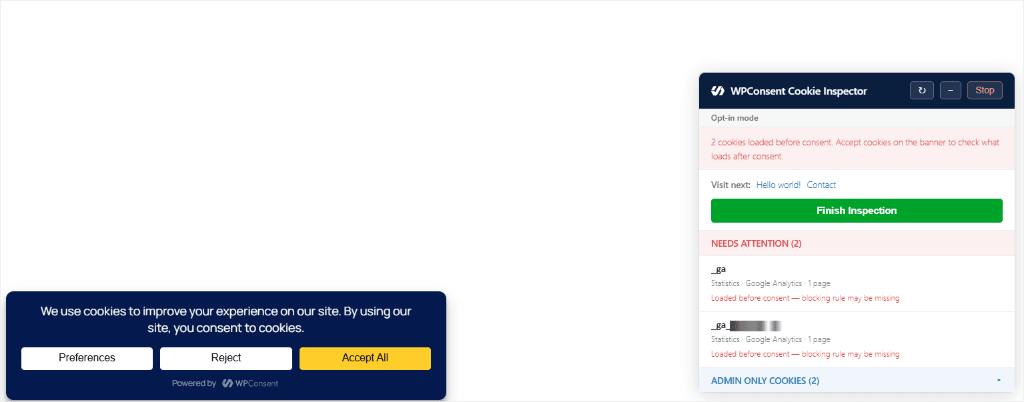
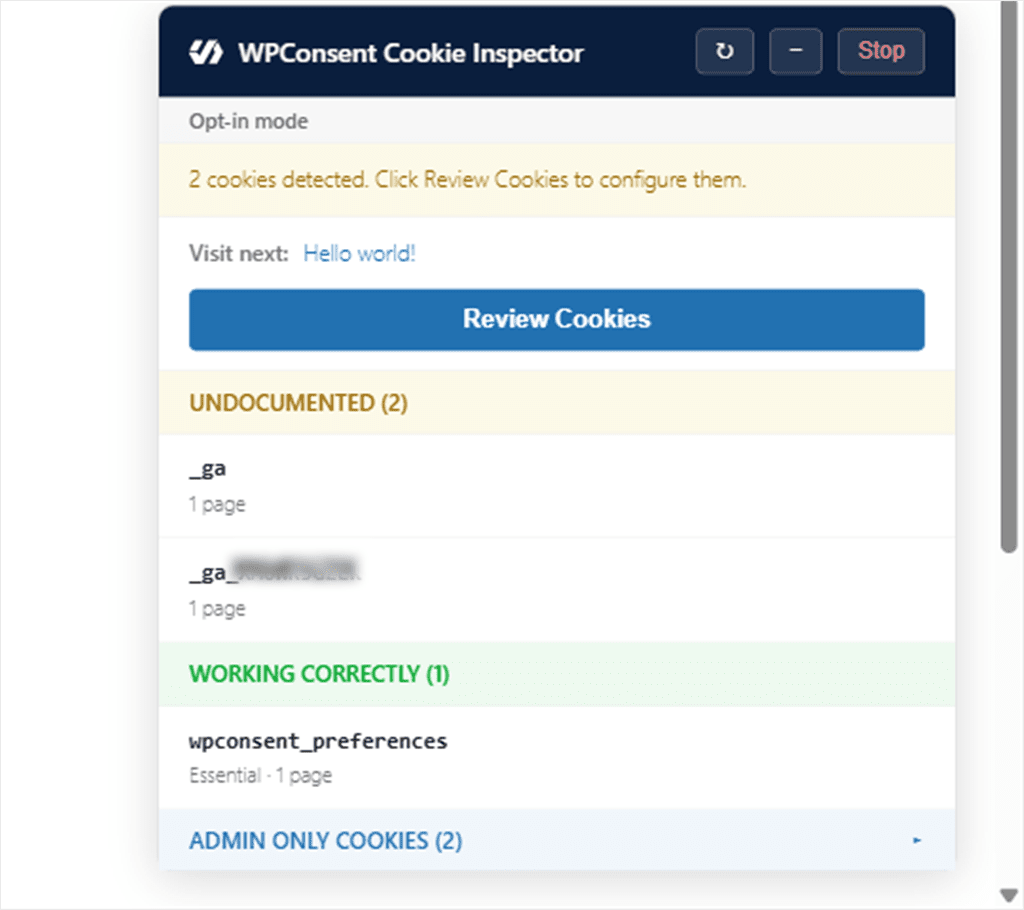
Click Accept or Reject on your banner. The panel updates instantly, sorts cookies it’s tracking, and flags ones that need attention.
On our test run, WPConsent’s own cookie landed under Working Correctly. The two Google Analytics cookies stayed under Undocumented.
Not because they were blocked incorrectly, but because they are not yet added to the cookie configuration.
Step 3 fixes that.
Step 3: Use the Scanner to Check More Pages
Both checks so far only cover the page you’re on. That’s slow across a site with dozens of pages, and it’s easy to miss pages where something extra loads.
You can finish this audit entirely by hand using the manual processes, repeated page by page.
The WPConsent scanner can help you find known services across your site, giving you a starting point for the audit.
Most of the established consent plugins include a scanner of some kind, so use whichever one you already have.
We’re using WPConsent Pro for our audit tests.
💡 WPConsent Tip
Don’t have a consent plugin with a scanner, or not ready to install one yet? WPConsent’s free online scanner shows you what’s running on your site and previews how a banner would handle it, no install required.
⚠ Heads up: the online scanner only reports. To actually configure and block what it finds, you’ll need the plugin itself.
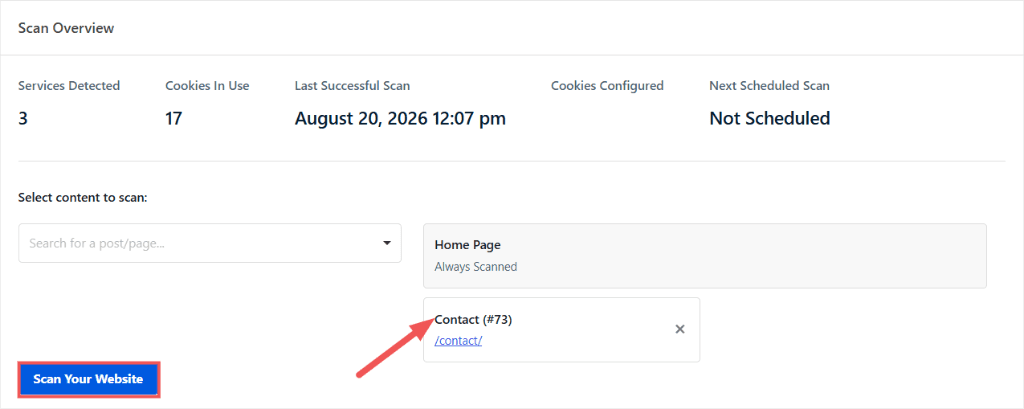
If WPConsent is already on your site, go to WPConsent » Scanner and click Scan Your Website.
By default, it checks your homepage for known tracking services and cookies. It does this right from your WordPress dashboard; no external crawler needed. It then groups what it finds into three categories: essential, statistics, and marketing.
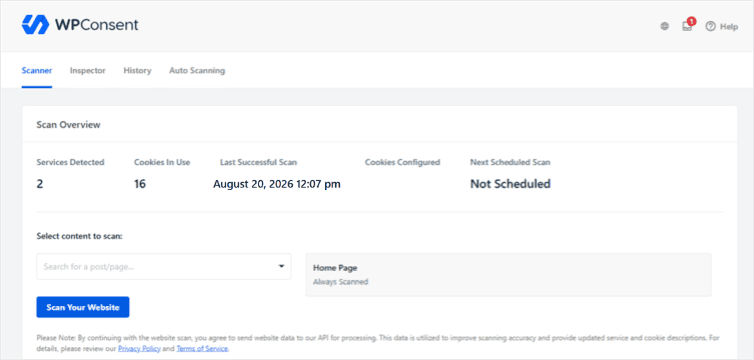
Our first scan revealed: 2 services, 16 cookies.
But as we mentioned above, you can find cookies on pages other than your homepage. So we took our own advice and added another page to the scan.
Under “Select content to scan,” on the scan screen, select the pages you want from the dropdown or search for any post or page. They will be scanned alongside the homepage, which is always scanned by default.
We added our Contact page and scanned again.
That page runs a contact form plugin that’s not on the homepage, so the scan picked up a new service this time. The numbers moved: 3 services, 17 cookies.
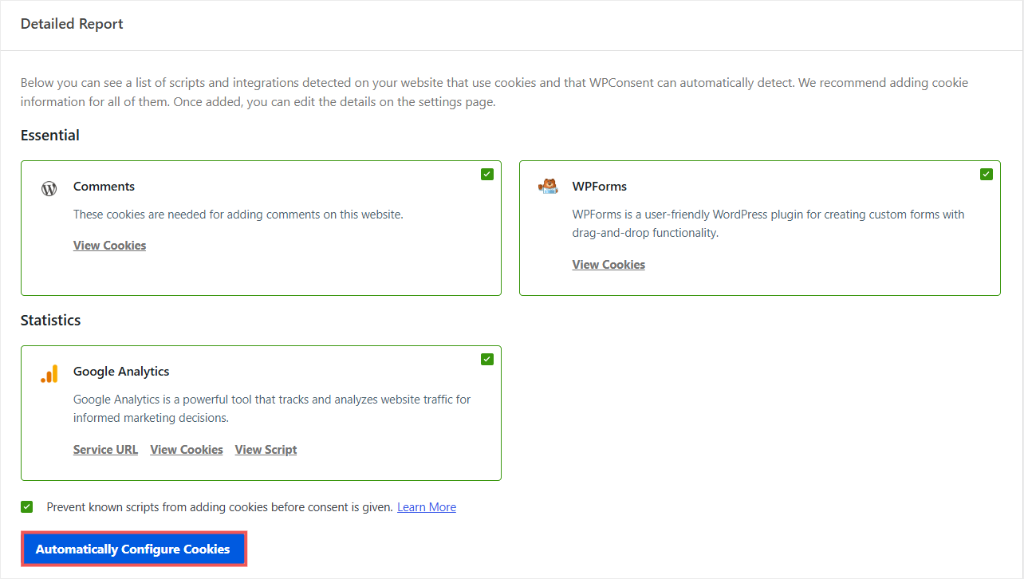
Once you complete the scan, scroll down to “Detailed Report,” and you’ll see the services WPConsent recognized, along with the cookies associated with each one. The services are selected by default for configuration.
Uncheck any services you don’t want to configure automatically, then click Automatically Configure Cookies.
You can expand each service to get more details like the script, the actual cookies, and the service URL. You will also notice that “Prevent known scripts from adding cookies before consent is given” is checked by default.
After this, WPConsent adds the selected services to your cookie configuration, so they show up correctly in your banner categories and cookie policy page, without you entering them by hand.
That’s also what clears the Undocumented flags you saw in Step 2.
For a deeper walkthrough of the scanning process, our guide to finding which cookies your site is using covers it step by step.
💡 Before You Compare the Numbers
The Scanner checks your site against a database of known tracking services. DevTools and the Cookie Inspector check only the session in front of you. They’re answering different questions, so the counts may not match.
DevTools shows what’s actually running right now. The Scanner shows which known services WPConsent detects on the pages you scan. Use the first to confirm the page you’re looking at, and the second to catch what you’d otherwise have to click through every page to find.
Step 4: Set Up and Test Your Consent Banner
Once you’ve configured your services, the next step is setting up and testing your consent banner. This is where you enable it, shape it to match your brand, and confirm it gives visitors a real choice.
There are two ways to handle this.
The WPConsent setup wizard turns the banner on and configures it for you in one flow. If you used it, your banner is already live, and you can jump to the testing checks below.
We’re going screen by screen here instead, so you can see exactly what each setting controls.
To follow along manually, go to WPConsent » Banner Design and click Preview to see how it currently looks. You can preview it at any stage as it updates with the changes you make.
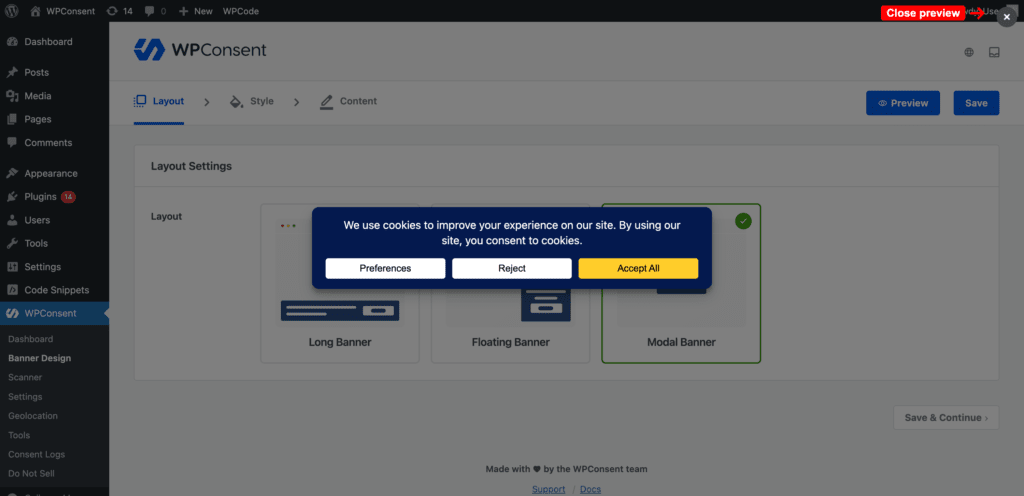
After this, go through the Layout, Style, and Content screens to edit your banner design.
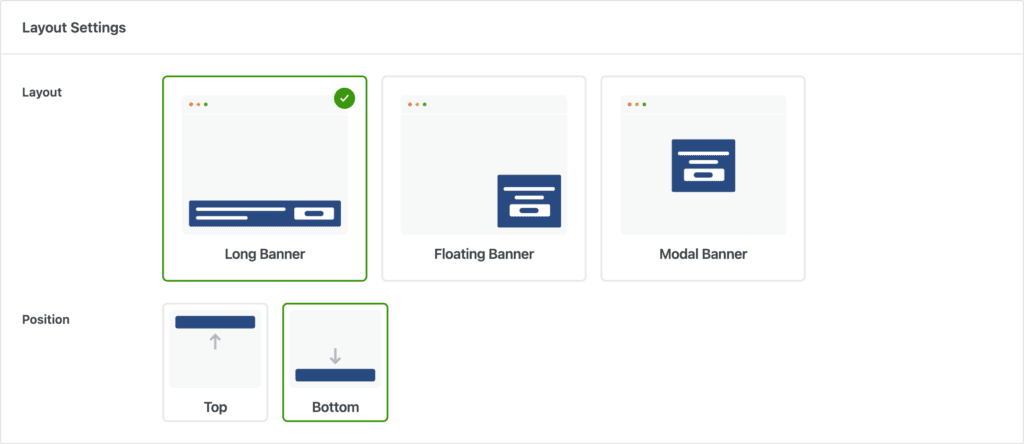
- Layout: the banner’s shape and position. You can set up a long banner across the bottom, a floating box in a corner, or a full-screen modal, and choose which edge or corner it sits on.
- Style: colors, font size, and button design. You can configure the background and text color, whether buttons are filled or outlined, square or rounded, with separate colors for Accept and Reject.
- Content: every piece of text a visitor reads. You can customize the banner message, button labels, and everything inside the preferences panel: its title, description, and cookie table headers.
For a detailed walkthrough, check out this post on how to add a cookie banner to your WordPress site.
Turn the Banner On and Test It
Once you finish customizing your banner, click “Save” and exit the Banner Design. Go to WPConsent » Settings and enable “Consent Banner” to make it live.
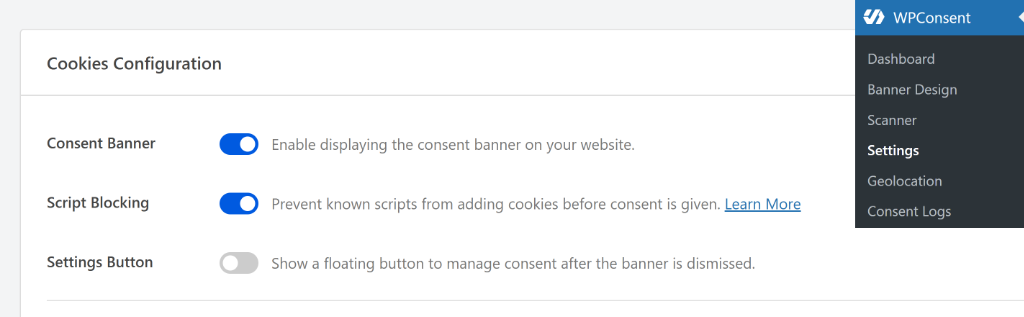
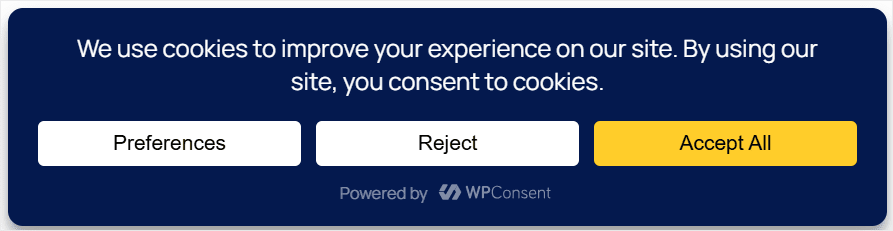
Now, using a private browser, interact with the banner itself and check that it actually gives visitors a real choice.
- Can visitors reopen their preferences later? Look for a footer link or a floating settings button.
- Are Accept and Reject equally easy to find? A reject option should be as easy to find as the accept option. If it’s smaller, harder to find, or hidden behind another step, review the banner before you consider the audit complete.
- Does content stay accessible if someone rejects cookies? A “cookie wall” that blocks the page entirely until acceptance is its own problem, separate from what cookies get set.
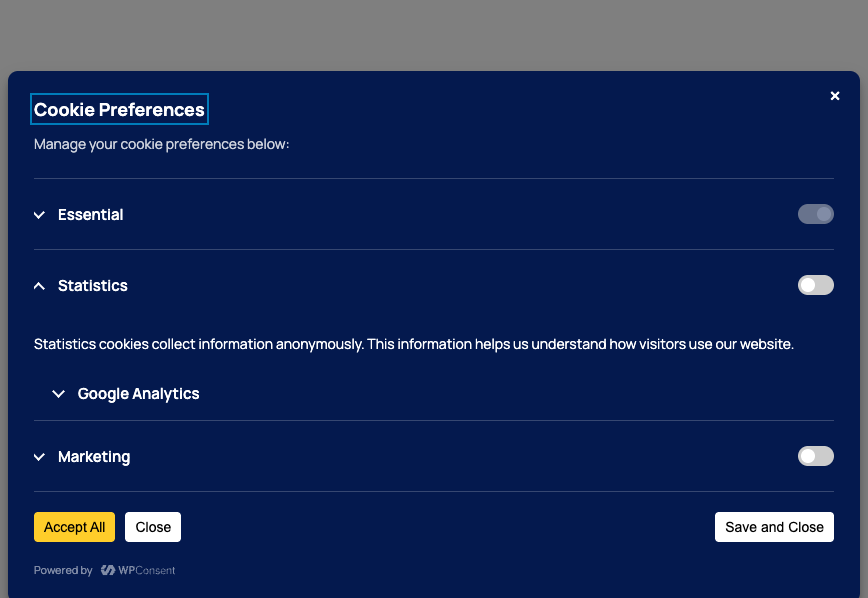
- Can visitors choose categories individually, accepting analytics while rejecting marketing, rather than only an all-or-nothing choice?
Step 5: Prove Blocking Actually Works
Finding a cookie and stopping a cookie are two different claims. This step tests the second one.
Clear your cookies, reload, and click “Reject” on your banner. Browse a few pages like a real visitor, add an item to cart and check out, or submit a contact form.
Expected: Core site functionality still works. Non-essential tracking and consent-based embeds may remain blocked, such as a video showing a placeholder instead of loading.
WPConsent saves that choice, so reload the page again and open DevTools. If blocking is actually working, you should see an empty list, or essential-only if your site sets something like a session or cart cookie.
A problem: any analytics, advertising, or marketing cookie that showed up anyway.
If something non-essential is present after rejection, it’s often because the script needs to be registered with your consent tool and set to block until consent, rather than loading directly from your theme or another plugin.
Our guide on blocking third-party cookies covers turning that setting on and what it catches.
Now let’s see the opposite: what happens when you “Accept” everything, checked at the page level with Cookie Inspector.
Go to WPConsent » Scanner » Inspector to open it.
Expected: cookies you found in Step 1 now sit under Working Correctly. That’s the full loop, blocked before consent, released after.
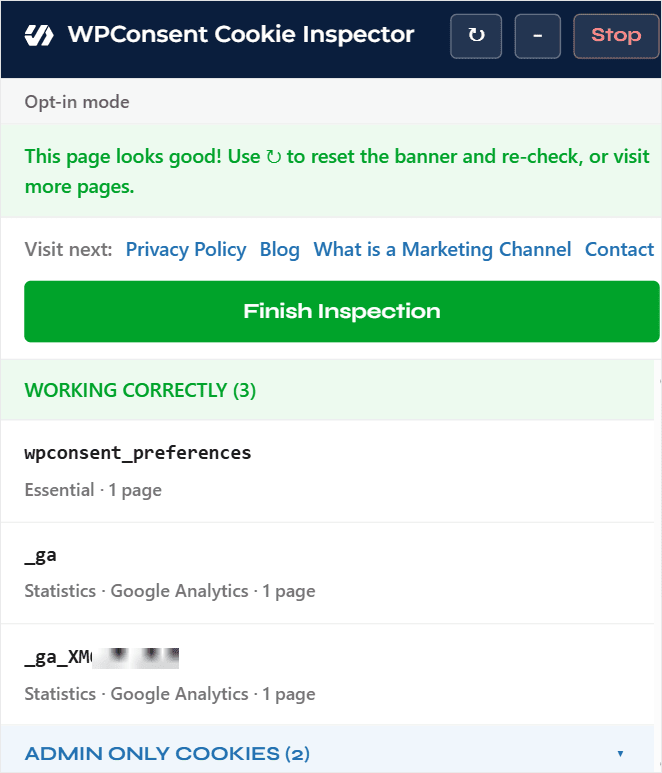
Once that passes, run the same before, accept, and reject sequence on three or four other pages, especially checkout and form pages. A script that behaves perfectly on your homepage can still fire early on a page with a different plugin or embed running.
Step 6: Test Google Consent Mode v2
This section needs the most care. It’s where many WordPress cookie compliance audits fall apart.
Google Consent Mode v2 is Google’s own framework for handling consent.
Instead of blocking Google’s tags outright when a visitor says no, it lets them keep running in a limited, cookieless way, and Google can use those signals for modeling to help fill some gaps in measurement.
With Google Consent Mode v2 set up, WPConsent handles Google services differently from the scripts it blocks outright. It lets them load, then tells Google directly what your visitor consented to.
That’s why you’ll see a Google Analytics or Tag Manager request fire in DevTools before anyone clicks anything. That’s expected, not a failure, as long as Google Consent Mode is set up.
What matters is what that request reports. WPConsent’s Default Allow setting is off by default, so every signal (ad storage, analytics storage, and the rest) starts out denied until someone accepts.
For the Technically Curious: Check the Consent Signals Yourself
This check is more technical than the rest of the audit since it uses the browser console. You don’t need it to finish the audit; WPConsent handles the signals for you. But if you want to see them directly, here’s how.
Open Developer Tools and go to the “Console” tab.
Type dataLayer and press Enter, then expand the entry with "consent" and "default". Look for the Google consent signals. Before you accept, the advertising and analytics signals should read denied, as shown below.
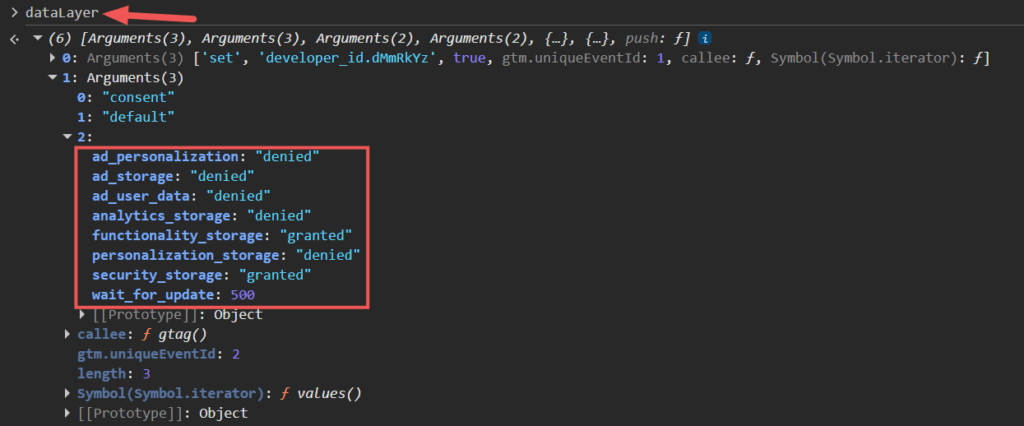
After you accept, a second consent update appears, showing which signals changed to granted.
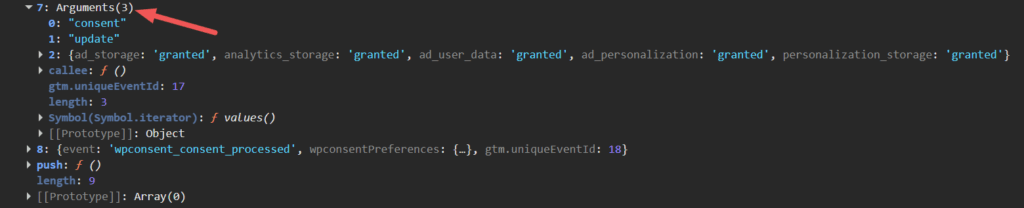
As you can see, confirming this properly takes a few technical steps.
The good news is you don’t have to build any of that yourself. WPConsent turns it on with a single “Google Consent Mode” setting, on by default.
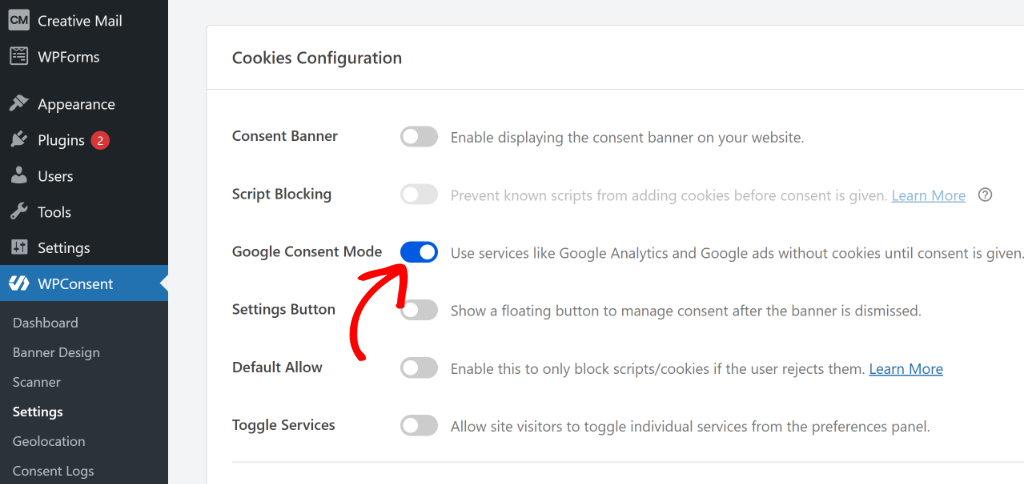
One catch: that consent call only fires once WPConsent has actually found and configured a Google service, through a scan or manually.
Turning the setting on isn’t enough by itself. If the Scanner hasn’t found a Google-pattern service yet, you won’t see this call at all, and it’s easy to mistake that for the feature being broken.
WPConsent handles the consent layer. The Google layer is still yours: Analytics or Tag Manager has to be properly set up on your side before any of this applies to it.
Check out this guide to set up Google Consent Mode V2 for Google Analytics in WordPress. You can also set up Google Consent Mode V2 with Google Tag Manager.
Step 7: Check Consent Withdrawal
Giving consent is only half of it. Visitors also need a way to take it back.
To test this, open a page and click “Accept.” Browse for a minute or two so tracking has a chance to run.
Now reopen your cookie settings. Look for a floating button in the corner of the screen or a cookie preferences link in your footer.
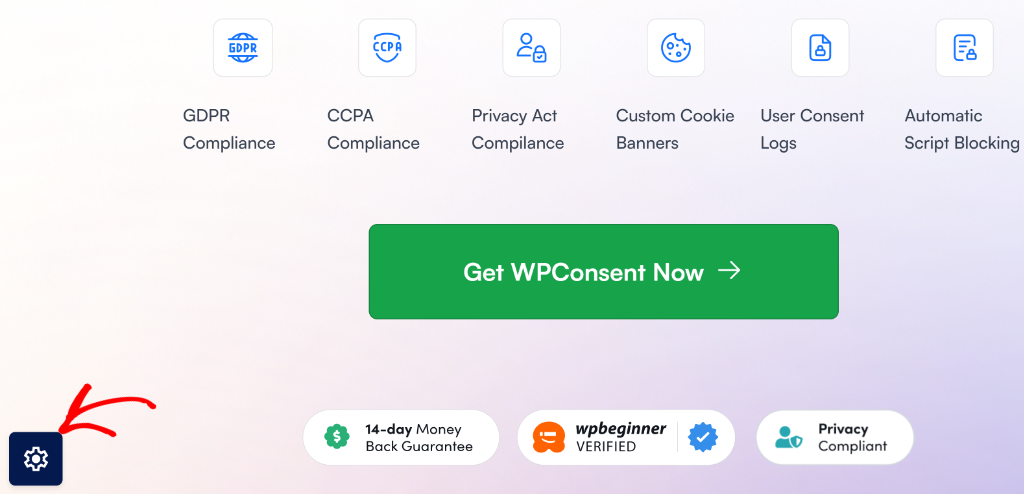
Click it, switch off everything except essential cookies, and save.
Expected: the cookies tied to what you switched off should stop being set on your next page load. Some browsers won’t delete a cookie that’s already stored until it naturally expires, but nothing new in that category should appear going forward.
WPConsent gives you three ways to allow your users to withdraw consent:
- Turn on the floating Settings Button. It lives under Cookies » Settings and adds a small button that sits in the corner of every page.
- Check out this guide on setting up the floating banner to learn more.
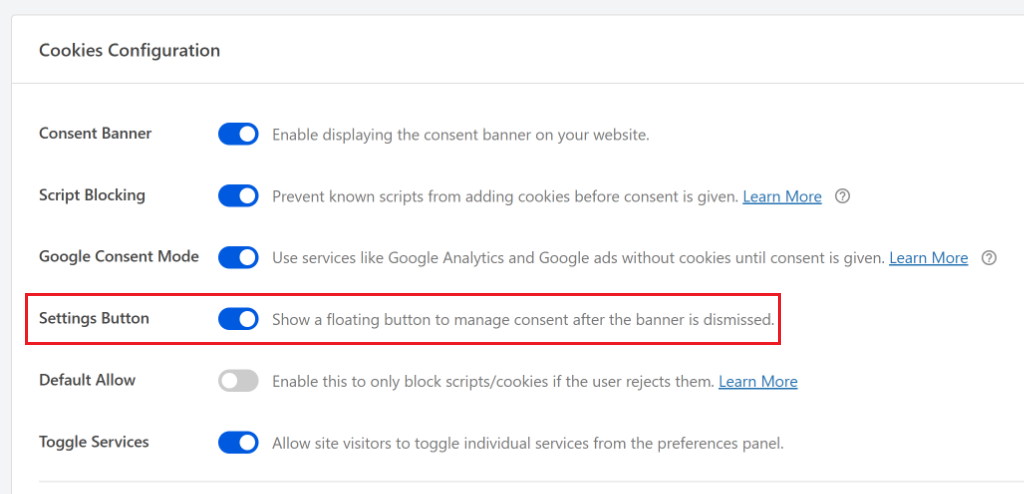
- Add a preferences button anywhere you like. WPConsent gives you a shortcode you can drop into a footer, a menu, or a privacy page, wherever your visitors will actually look for it.
- Turn a link you already have into one. If you already have a “Cookie Settings” link in your footer, WPConsent can hook into it so it opens the preferences panel instead of pointing somewhere else.
All three open the same panel. The floating button is the quickest to set up. You can also customize the Button Icon to the options available, or add your own image.
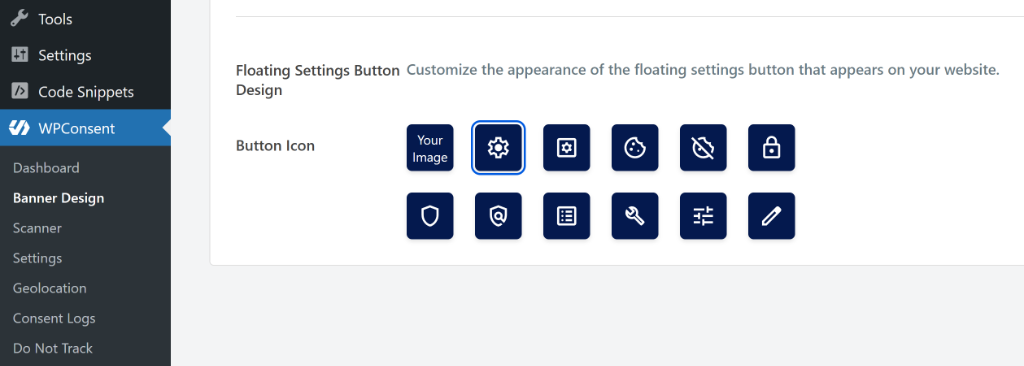
On the other hand, the other two give you more control over where it appears. Check out this guide on how to open the WPConsent Preferences Panel with a custom link for more detail.
Some Visitors May Arrive With a Privacy Signal
Some browsers can send a Global Privacy Control (GPC) signal to tell a website that a visitor wants to opt out of certain uses of their personal information.
For example, under the CCPA, covered businesses must honor GPC for applicable opt-out requests.
When WPConsent honors the signal, it automatically declines non-essential cookie categories for that visitor and shows the visitor a short message confirming it.
To enable this, go to WPConsent » Cookies » Advanced and switch on Respect Global Privacy Controls.
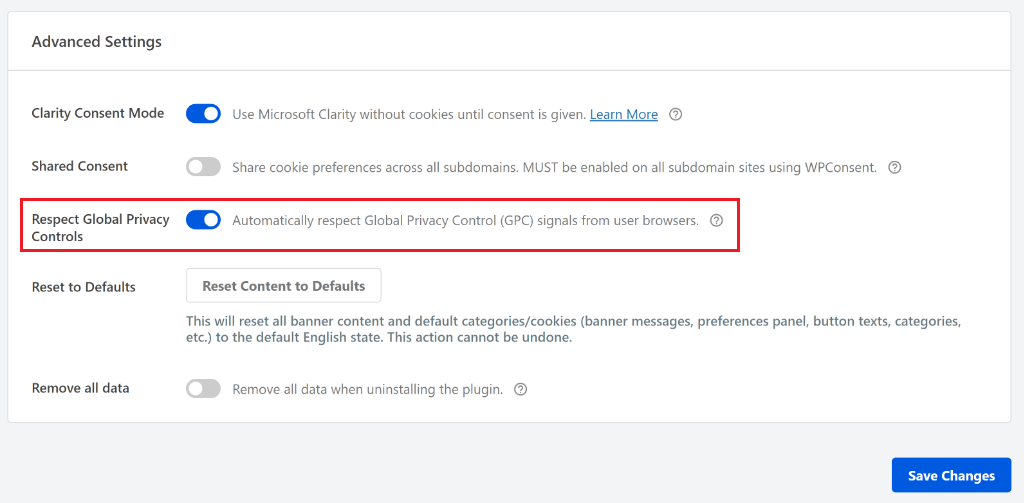
Once it’s on, you can edit that confirmation message under Banner Design » Content.
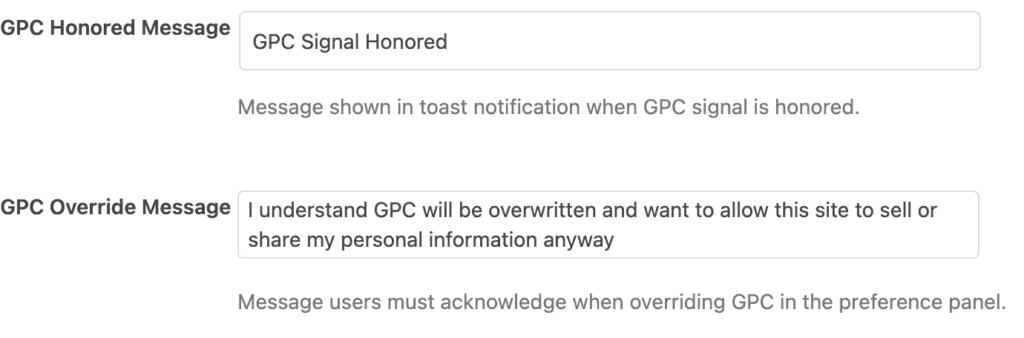
See the Global Privacy Control guide for more details.
Here’s what each state in this test sequence should look like, side by side:
| State | Essential Cookies | Analytics/Marketing Cookies |
|---|---|---|
| Before any choice | Present | Absent |
| After Accept | Present | Present |
| After Reject | Present | Absent |
| After Withdrawal | Present | Stop appearing on new page loads |
Step 8: Review Your Cookie Policy Against Reality
Pull up your actual cookie or privacy policy next to the inventory from Step 1.
Check that:
- Every service you found is listed, not just the ones you remember adding
- Categories match. A service you scanned as “marketing” shouldn’t be described as “essential” in your policy
- The “last updated” date is recent enough to be believable
- Visitors are told how to change their preferences, with a real link or instruction, not just a mention that they can
No cookie policy page yet? You don’t have to write one from scratch.
Go to WPConsent » Settings, scroll to the Cookie Policy section, and click Generate Cookie Policy Page. WPConsent creates the page with default policy text and the shortcode that lists your cookies already in place.
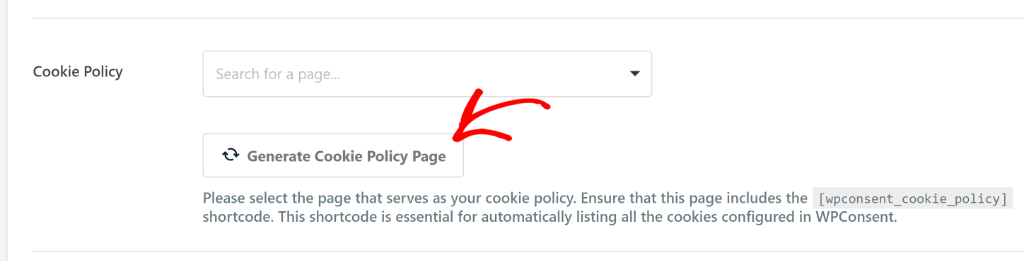
The page pulls its cookie tables from your WPConsent configuration, so you don’t have to update those tables by hand. That means that your cookie policy page only shows services you’ve actually configured.
If you skipped Automatically Configure Cookies back in Step 3, those services won’t appear here.
Already have a policy page you’d rather keep?
WPConsent also gives you the option to select another page to display the cookie policy. You can click the dropdown menu under Cookie Policy and choose your page.
However, you’ll need to add WPConsent’s cookie policy shortcode to that page, a small piece of WordPress code that tells the page where to display your configured cookie table.
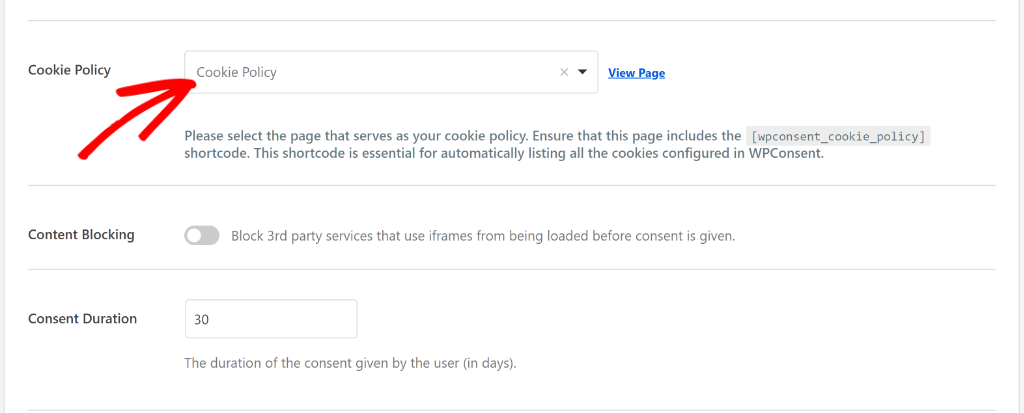
For the full walkthrough, see our guide to creating a cookie policy page.
Step 9: Set Up Ongoing Monitoring
As mentioned, the cookies listed on your cookie policy page only stay accurate as long as your cookie configuration does. At the same time, your configuration only stays accurate if it’s rescanned as your site changes.
That’s what Auto Scanning is for.
It runs the same scan from Step 3 in the background on a schedule you choose, daily, weekly, or monthly, so new services get spotted without you remembering to look.
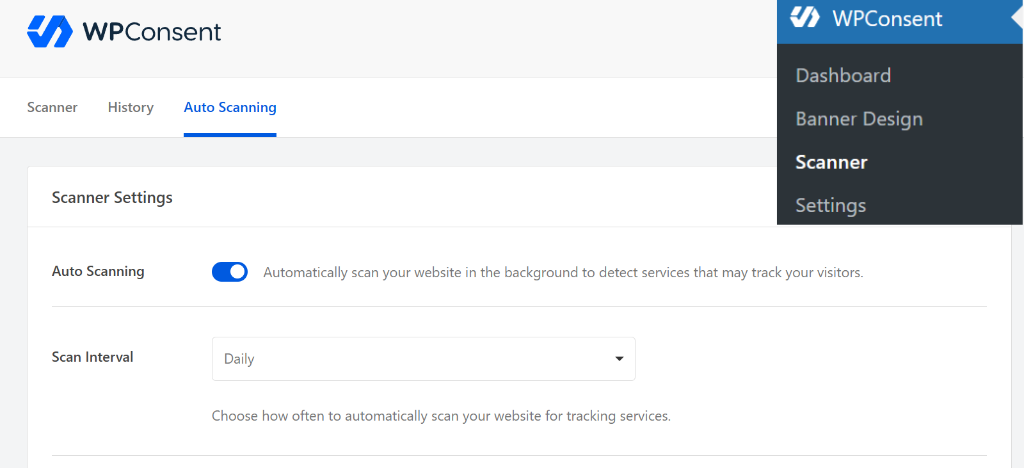
On the other hand, Auto-Update Services decides what happens with what it finds.
If Auto-Update Services is off, new services are added to the scan results for you to review and configure manually. If you turn it on, WPConsent automatically adds newly detected services to your cookie configuration after a scheduled scan.
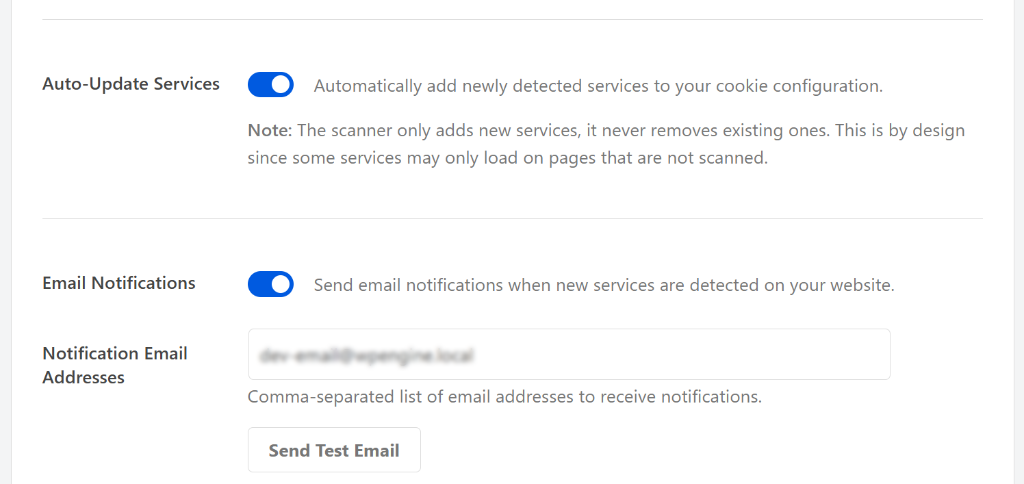
The two settings work as a pair: one finds what changed, the other decides whether to act on it without you. Turn on email notifications as well, so a new service doesn’t go unnoticed until your next manual check.
Check out this guide to learn how Auto Scanning and Auto-Update Services work.
It is important to point out that the scanner only adds new services; it never removes existing ones.
This is by design since some services may only load on pages that are not scanned. So if you drop a plugin, its cookies stay in your configuration until you remove them yourself.
What a Cookie Scanner Can’t Tell You
A scanner can tell you what it detected. It can’t tell you:
- Whether a service genuinely requires consent in every jurisdiction your visitors are in
- Whether your privacy policy accurately describes what that service actually does with the data
- If a custom, handwritten script is behaving the way you think it is
- Whether consent withdrawal is actually working, not just configured
- Whether a third-party service quietly changed its own behavior since your last scan
A cookie scan is the starting point of an audit, not the audit itself.
What If I Find Cookies I Don’t Recognize?
This happens on many sites, and it’s not a sign something’s wrong.
- Note the cookie name and which domain set it
- Check WPConsent’s Detailed Report; it often already identifies the service by name
- If it’s unrecognized there too, search the cookie name along with your plugin list. Most third-party cookies are documented somewhere
- Decide what category it belongs in: essential, statistics, or marketing
- Add it to your cookie configuration, or use Automatically Configure Cookies if WPConsent already recognizes it
- Test again to confirm it’s now categorized and blocked correctly before consent
Check out this article to learn how to manage cookies.
Common Problems
A specific script or iframe not being registered for blocking is one of the most common issues.
Our guide on blocking custom scripts and iframes covers that directly, including embeds like YouTube videos that load before consent by default.
Check out the table below for other common problems, likely causes, and how to check them.
| Symptom | Likely Cause | What to Check |
|---|---|---|
| Analytics cookie present before consent | Script isn’t registered with script blocking | Enable script blocking, confirm the service is recognized |
| YouTube or Maps embed sets a cookie immediately | Embed loads directly, bypassing consent | Use content blocking for iframes, not just scripts |
| Reject button is hard to find | Banner design choice | Review button order, size, and contrast against Accept |
| Cookie returns after withdrawal | Browser cached a session or existing cookie | Retest in a clean, fully cleared session |
| Scanner and DevTools show different results | Different pages or timing | Compare the exact same URL and session |
| A new service appears out of nowhere | A plugin update or integration change | Run another scan, check what changed recently |
Cookie Compliance Audit Checklist
The fastest way to work through everything you just read is by using the checklist below. Use it during your next audit or as a scheduled quick check.
How Often Should You Run a Cookie Compliance Audit?
There is no set window for how often you should run your audit. Every site is different. Check the list below for a starting point.
- Monthly: a five-minute spot-check, incognito visit, confirm the banner still works, confirm rejecting still blocks tracking
- Quarterly: the full audit above, all nine steps
- After any real change: a new plugin, a new integration, a theme update, a site redesign, don’t wait for the quarter to end
- Annually, for regulated or sensitive-data sites: a professional legal review on top of the technical audit, this guide checks behavior, not legal sufficiency
How Long Does a WordPress Cookie Audit Take?
It depends mostly on how many integrations your site runs, not how technical you are.
- Small brochure site: 15 to 30 minutes
- Business site with a handful of integrations: 30 to 60 minutes
- WooCommerce or membership site: an hour or two, mostly spent testing multiple pages and scenarios
The slow part usually isn’t clicking through DevTools. It’s figuring out why a specific script is running and whether it should be running before consent.
Congratulations! You can now do a complete cookie compliance audit for your WordPress site. If anything is unclear, check out the commonly asked questions below.
FAQs: WordPress Cookie Compliance Audit
Can a cookie audit tell me if my WordPress site is fully compliant?
Not on its own. An audit tells you what’s running and whether it’s behaving correctly. Whether that adds up to compliance depends on which privacy laws apply to your visitors. Check out our ultimate cookie consent requirements by country to learn more. No consent plugin can guarantee that on its own.
Does seeing a Google script before I accept cookies mean blocking is broken?
Not necessarily. If Google Consent Mode v2 is enabled, Google’s own scripts are allowed to load while reporting a denied consent state, instead of being blocked outright. Check whether the request reports denied and whether cookies like _ga are actually being set, not just whether the script loaded.
Why do my scanner results differ from what I see in DevTools?
A scanner usually crawls multiple pages and aggregates results, while DevTools shows you one page at one moment. Compare the exact same URL and session before assuming one tool is wrong.
What should I check after installing a new plugin?
Run another scan or a quick DevTools check on a couple of pages the plugin touches. New plugins are one of the most common ways an untracked cookie shows up.
Can I block cookies manually without a plugin?
Technically, yes, by wrapping scripts in your own conditional logic. In practice, it’s fragile. A theme or plugin update can silently overwrite it, and you won’t find out until your next audit.
Start Your Audit With a Free Scan
You now have a repeatable way to check your site, not just a banner you’re hoping is doing its job.
Scanner, Cookie Inspector, banner preview, Auto Scanning: you’ve seen each one solve a specific step in this exact audit.
Now, run through these nine steps once, and the checklist above will turn your next cookie compliance audit into a more manageable task. Start with the Scanner; it’s the fastest way to see exactly what’s already running on your site.
Get WPConsent free and run your first scan →
Compare WPConsent plans →
Additional Resources
Go deeper on the pieces this audit touches most:
- What Are Tracking Cookies?: the plain-language breakdown behind the categories your audit sorts cookies into
- How to Manage Cookie Consent Data in WordPress: keeping records of what visitors actually agreed to
- Beginner’s Guide to WordPress and GDPR Compliance: the broader legal picture this audit feeds into