Want to organize your cookies into logical groups? WPConsent uses services to group related cookies together under a single name, making your consent banner clear and easy for visitors to understand. Managing services keeps your cookie disclosures organized and transparent.
Table of contents
- Prerequisites
- Understanding how services work
- Viewing services on the Cookies tab
- Adding a service manually
- Editing a service
- Deleting a service
- Assigning services to categories
- Looking up cookie data with CookieLibrary.org
- Importing a service from the Cookie Library
- Understanding the Services Library
- Verifying your setup
- FAQ
- Conclusion
Prerequisites
Before you begin, make sure you have:
- WPConsent installed and activated. See our installation guide if you need help.
- Administrator access to your WordPress dashboard.
- For best results, run a website scan first. See our guide on scanning your website.
Understanding how services work
A service is a way to group related cookies under a single name. A service can be a third-party tool like Google Analytics or Facebook Pixel, a WordPress plugin like WooCommerce that sets its own cookies, or even custom functionality you built that uses cookies. Any feature or tool that sets cookies on your site can be represented as a service.
WPConsent stores services as child terms of cookie categories. Each cookie category (Essential, Statistics, Marketing) is a parent, and services are nested beneath them. This hierarchy groups related cookies together so visitors see a clear connection between a service and the cookies it sets.
Each service stores 4 pieces of data:
| Field | Description |
|---|---|
| Service Name | The display name shown in the banner and admin (for example, “Google Analytics”). |
| Description | A short explanation of what the service does. |
| Privacy Policy URL | An optional link to the service’s privacy policy page. |
| Category | The parent cookie category (Essential, Statistics, Marketing, or any custom category). |
Cookies are attached to a service rather than directly to the category. This means visitors see exactly which service sets each cookie.
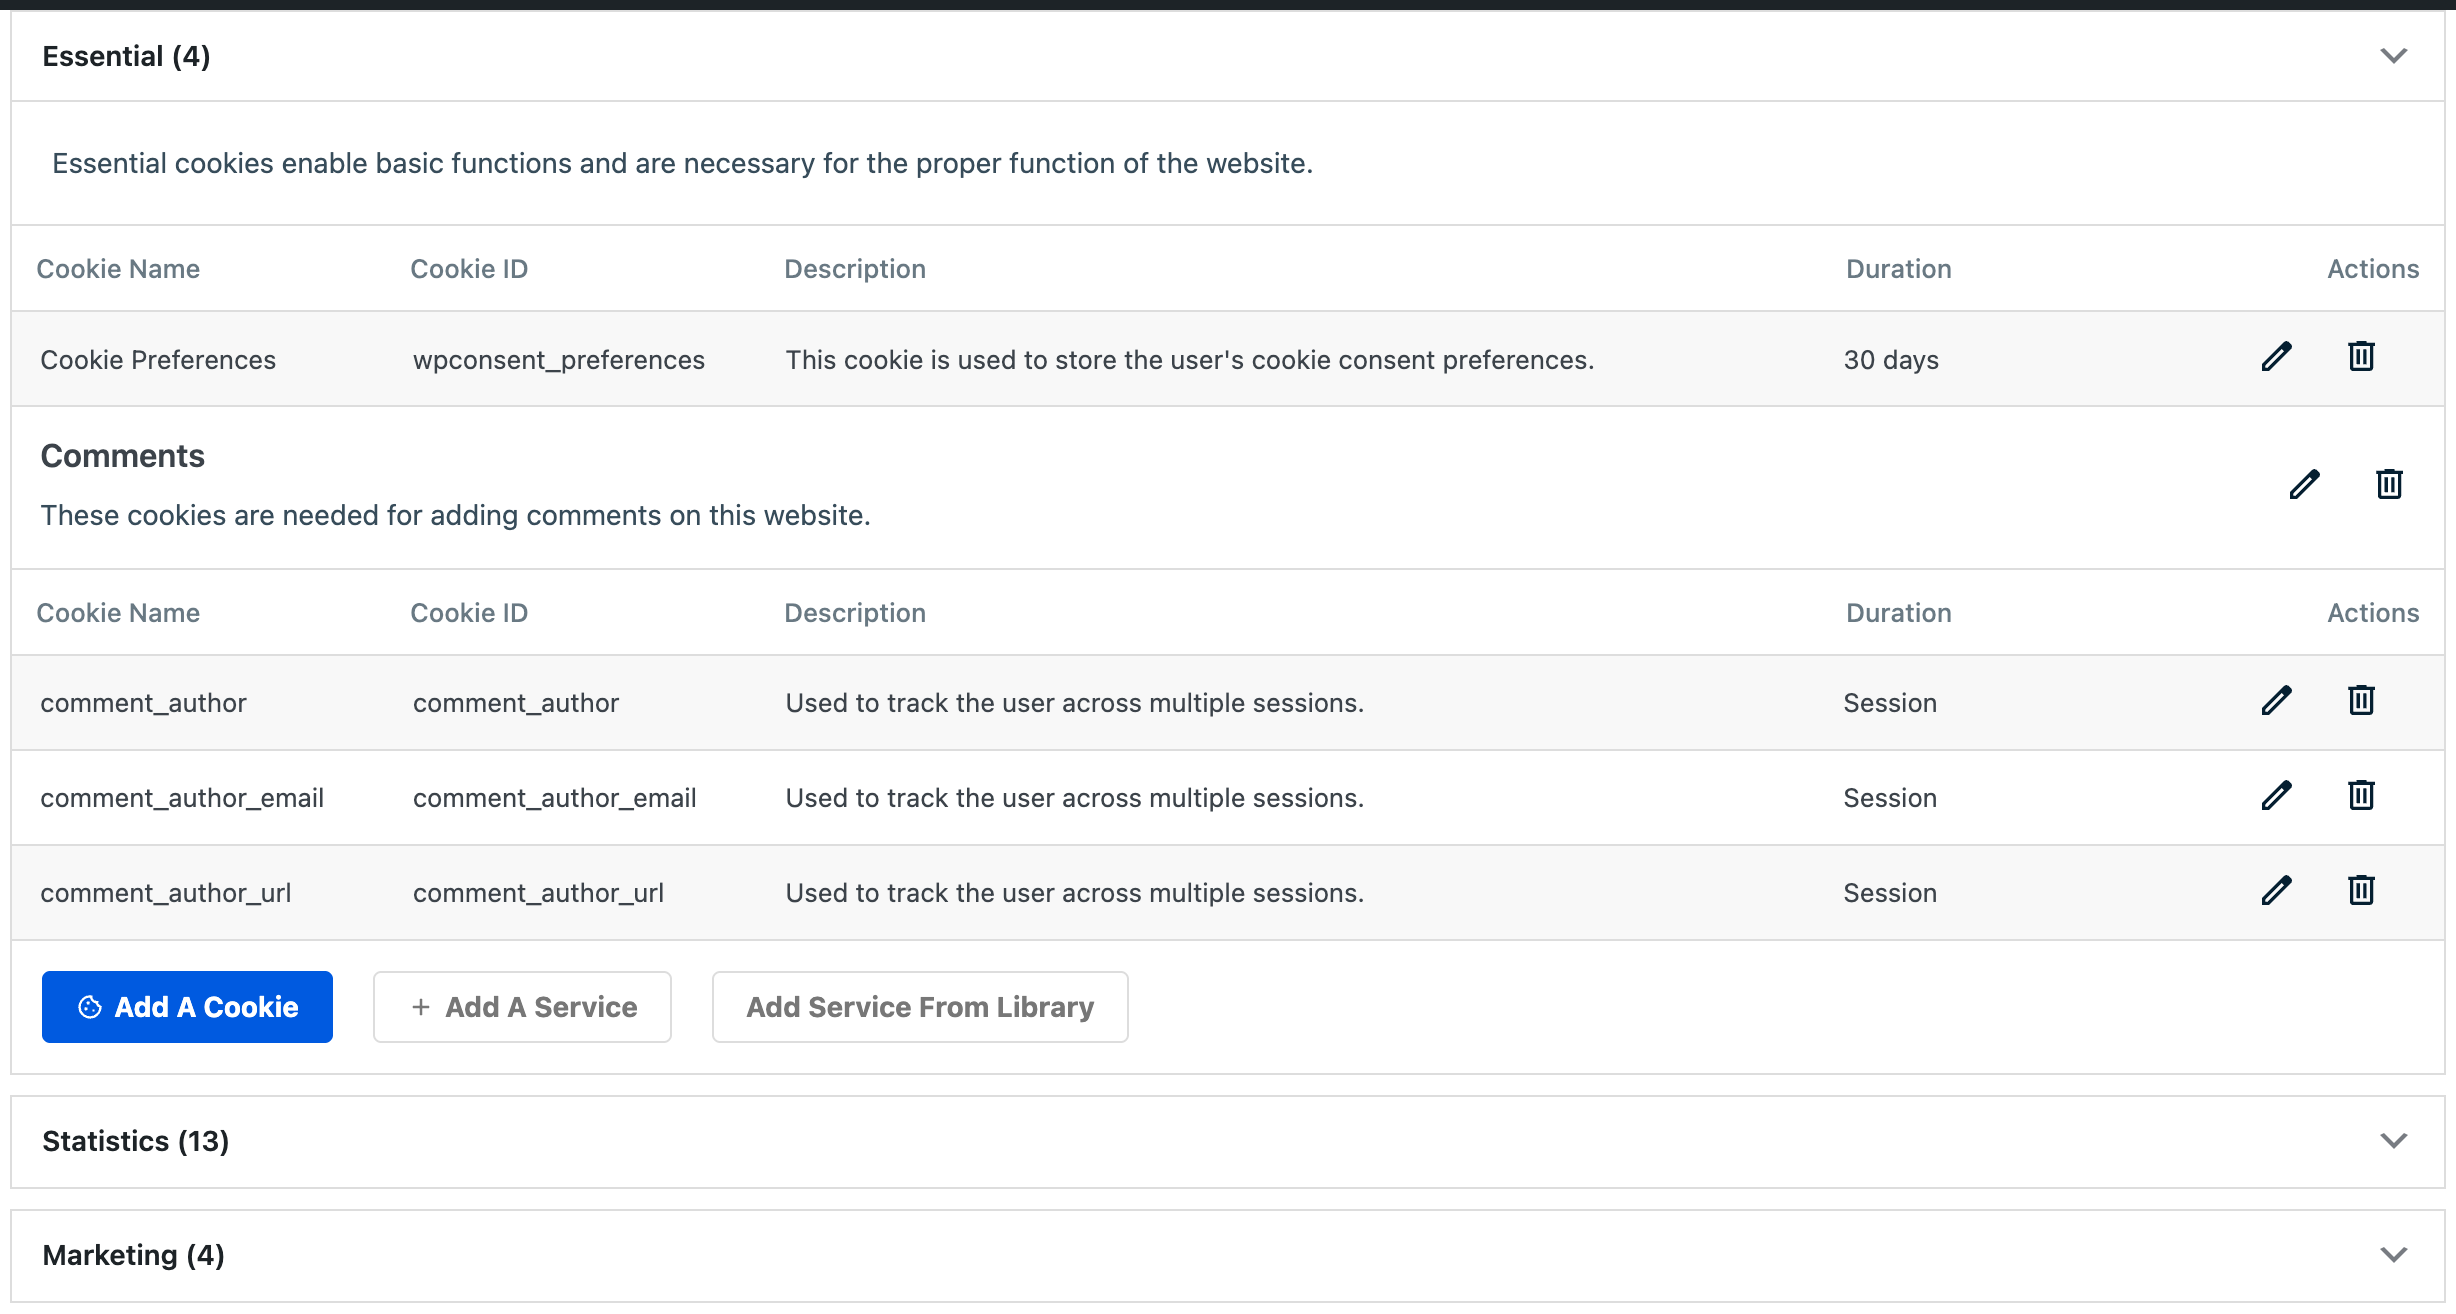
Viewing services on the Cookies tab
To view your services, navigate to WPConsent >> Settings and click the Cookies tab.
The Cookies tab displays services in a layered structure. Each category appears as a collapsible accordion section showing its name and total cookie count. Inside each category:
- Category-level cookies appear first. These are cookies attached directly to the category rather than a specific service.
- Services appear as grouped blocks. Each block shows the service name, description, and action buttons to edit or delete.
- Service cookies are listed inside each block, showing their Cookie Name, Cookie ID, Description, Duration, and action buttons.
At the bottom of each category section, you’ll find 3 action buttons:
- Add A Cookie: adds a cookie directly to the category or to a service within it.
- Add A Service: opens the manual service creation dialog.
- Add Service From Library: imports a pre-configured service (paid version only).
Adding a service manually
- To get started, navigate to WPConsent >> Settings and click the Cookies tab.
- Next, expand the cookie category where you want the service to appear.
- Then, click the Add A Service button at the bottom of the category section. A modal dialog opens with these fields:
– Category: pre-filled with the category you clicked from. You can change it if needed. – Service Name: enter the name of the service (for example, “Google Analytics”). – Description: provide a brief explanation of what the service does. – Privacy Policy URL: enter the URL to the service’s privacy policy page, if applicable.
- Finally, click Save.
The new service appears immediately inside the selected category. You can now add cookies to it.
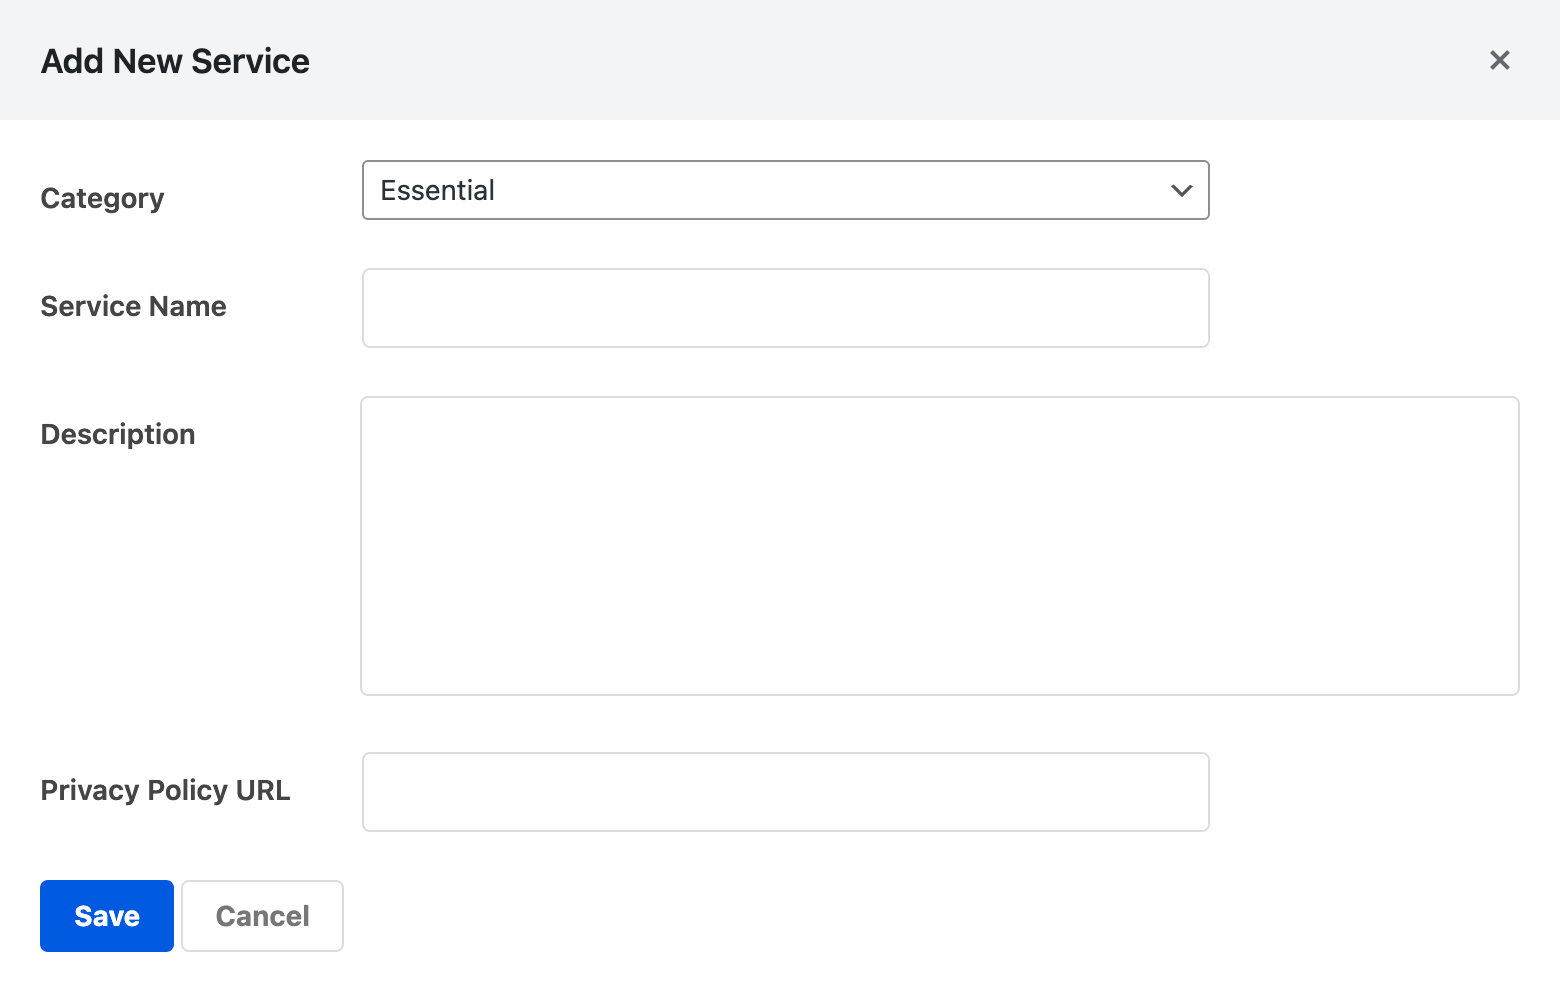
Editing a service
- On the Cookies tab, expand the category that contains the service you want to edit.
- Then, click the pencil (edit) icon next to the service name. The same modal dialog opens, pre-filled with the current values.
- Update any field: Category, Service Name, Description, or Privacy Policy URL.
- Finally, click Save.
Your changes take effect immediately. If you change the Category dropdown, the service moves to the new category.

Deleting a service
- On the Cookies tab, expand the category that contains the service.
- Then, click the trash (delete) icon next to the service name.
- Confirm the deletion when prompted.
Note: Deleting a service doesn’t automatically delete the cookies associated with it. If you want to remove those cookies too, delete them individually before or after removing the service.
Assigning services to categories
Every service belongs to exactly 1 cookie category. You assign the category when creating the service, and you can reassign it later by editing the service and changing the Category dropdown.
The category determines how the service appears in the preferences panel:
- Services under Essential are always active. Visitors can’t toggle them off.
- Services under Statistics, Marketing, or any custom category are optional. Visitors can toggle them on or off.
When the Toggle Services setting is enabled under WPConsent >> Settings, visitors can toggle individual services within a category. This provides granular consent control. See our guide to general settings for more on this option.
Looking up cookie data with CookieLibrary.org
If you’re using the free version of WPConsent and need cookie data for a service the scanner didn’t detect, you can look up that data manually on CookieLibrary.org.
CookieLibrary.org is a free, open resource maintained by the WPConsent team. It provides detailed cookie information for hundreds of popular services. Each entry includes the service name, description, privacy policy URL, and a full list of cookies with their IDs, purposes, and durations.
To use the Cookie Library for manual configuration:
- First, visit CookieLibrary.org and search for the service you need.
- Copy the service name, description, and privacy policy URL.
- In WPConsent, navigate to WPConsent >> Settings and click the Cookies tab.
- Then, click Add A Service in the appropriate category and paste the information.
- Finally, add each cookie for that service using the Add A Cookie button. Enter the cookie name, cookie ID, description, and duration from the library.
This manual approach works well for free version users who want accurate, standardized cookie data.
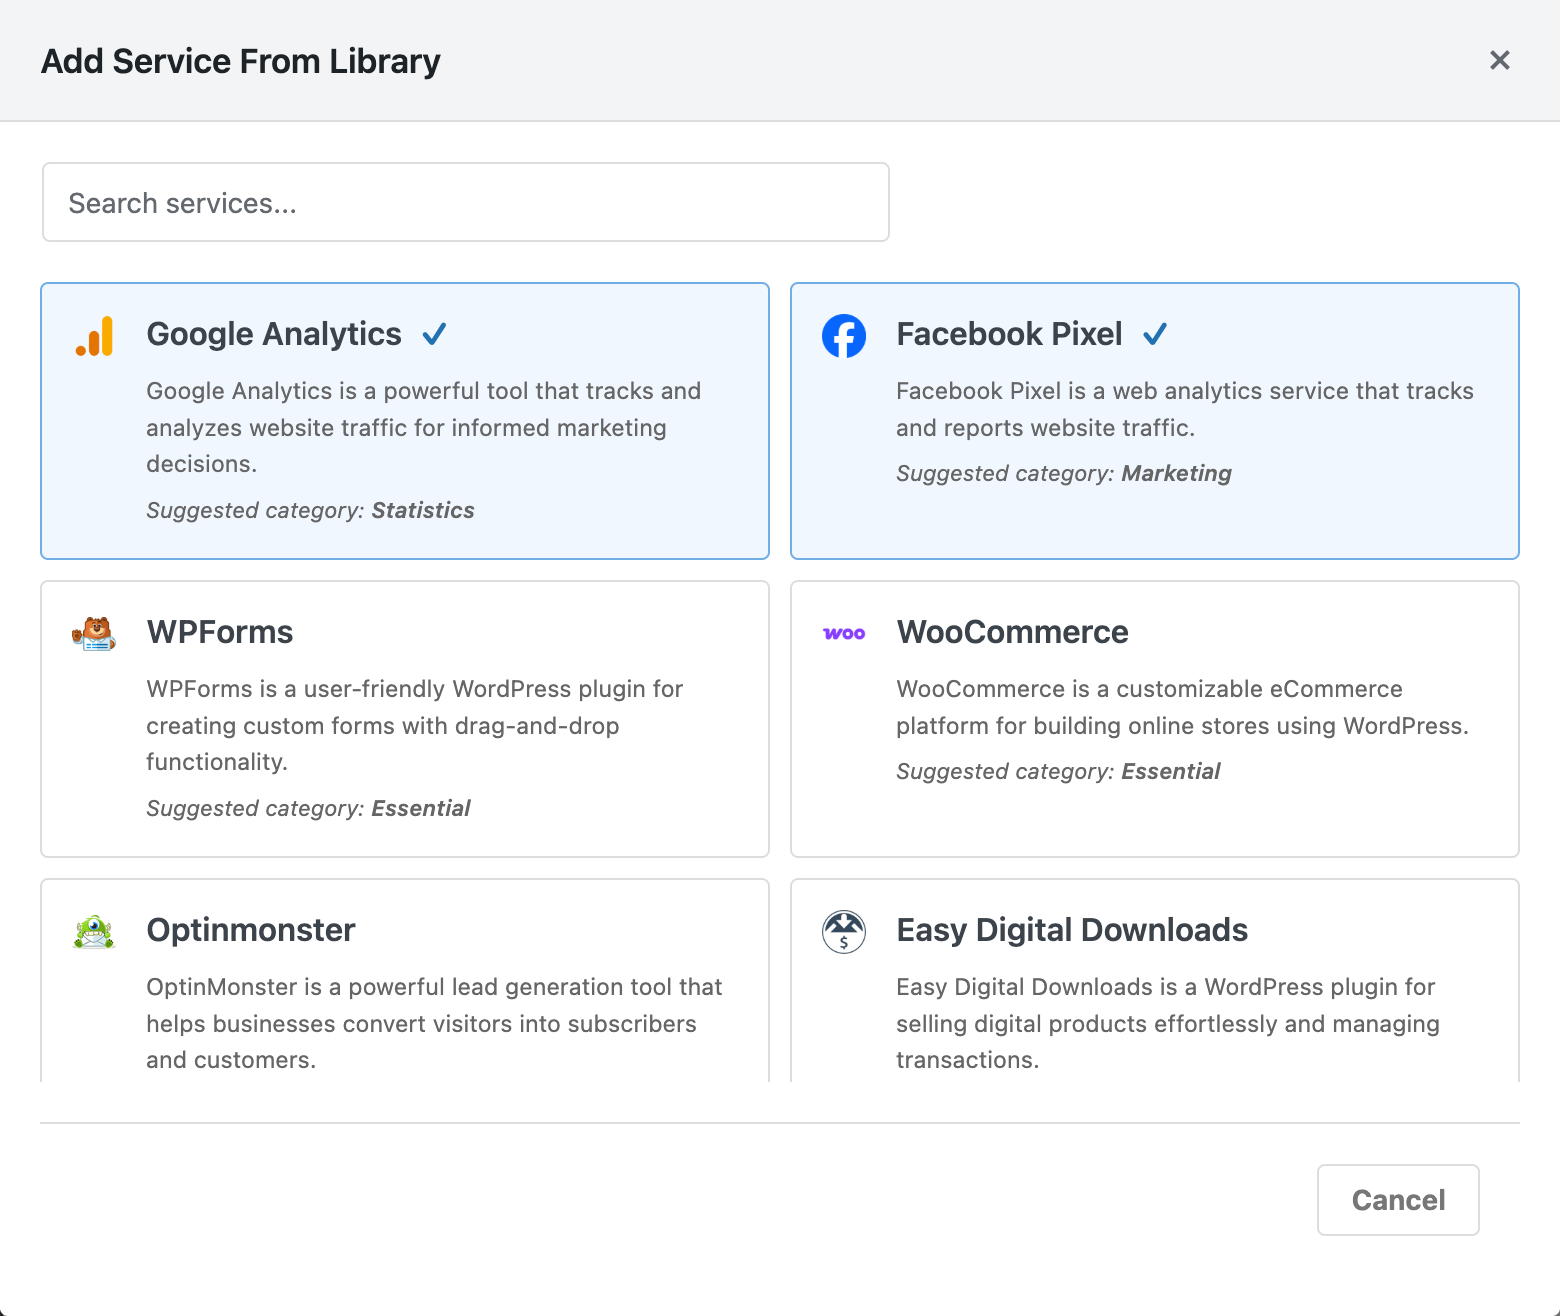
Importing a service from the Cookie Library
Pro Feature: This feature requires WPConsent Pro.
With WPConsent’s paid version, you can import services directly from the Cookie Library without leaving the plugin. This eliminates the need to copy and paste data manually.
- To get started, navigate to WPConsent >> Settings and click the Cookies tab.
- Next, expand the cookie category where you want the service.
- Then, click the Add Service From Library button. A modal dialog opens with a searchable list of all available services.
- Use the search bar to find the service you need.
- Click the service to import it.
WPConsent automatically creates the service entry with all its metadata (name, description, privacy policy URL) and adds all associated cookies with their correct IDs, descriptions, and durations. The imported service is marked as auto-added so WPConsent can track its origin.
Services that are already configured on your site appear with an “added” indicator, preventing duplicate imports.
Understanding the Services Library
Pro Feature: This feature requires WPConsent Pro.
The Services Library is a cloud-based database of pre-configured service templates maintained by the WPConsent team. It powers both the 1-click import feature described above and the paid version scanner’s extended detection capabilities.
The library data is fetched from CookieLibrary.org and cached locally for performance. WPConsent refreshes this cache automatically once per day.
Extended scanner detection
The paid version scanner leverages the Services Library to detect more services than the free version scanner. While the free version scanner identifies common scripts loaded directly on the page, the paid version scanner can also detect:
- WordPress plugins that set cookies (for example, WooCommerce, WPForms, and many others).
- Scripts loaded through Google Tag Manager (GTM) that aren’t visible as direct page scripts.
- Additional services covered in the extended library database.
As a result, paid version users see a more complete list of detected services after scanning, and each detected service comes with pre-configured cookie data ready to auto-configure. See our guide on scanning your website for more on how the scanner works.
Verifying your setup
To confirm your service changes are working:
- First, open your site in a private or incognito browser window.
- Then, open the preferences panel from the consent banner.
- Expand each category and verify that your services appear with the correct names and descriptions.
- If you enabled Toggle Services, confirm that individual service toggles appear within each category.
- Finally, check your cookie policy page (if using the
shortcode) to make sure all services and their cookies are listed.
FAQ
Why don’t my services appear in the preferences panel?
Services only appear if they have at least 1 cookie assigned. Add cookies to the service using the Add A Cookie button on the Cookies tab. For details, see our guide to managing cookies.
Can I move a service to a different category?
Yes. Edit the service by clicking the pencil icon, then change the Category dropdown and click Save. The service moves to the new category immediately.
What happens to cookies when I delete a service?
Deleting a service doesn’t delete its associated cookies. The cookies remain in the system. You’ll need to delete them individually if you want to remove them.
How do I know which services my site uses?
Run a website scan from WPConsent >> Scanner. The scanner detects scripts on your pages and creates services for them automatically. For plugins or custom functionality that the scanner doesn’t detect, you can add services manually. See our guide on scanning your website.
Why is a service marked as “auto-added”?
Services imported from the Cookie Library or created by the scanner are marked as auto-added. This helps WPConsent track their origin and update them when the library data changes.
Conclusion
You now know how to add, edit, delete, and organize services in WPConsent. Grouping cookies under services keeps your consent banner organized and easy for visitors to understand, whether those services are third-party tools, WordPress plugins, or custom site functionality. To learn how to manage the individual cookies within your services, we recommend reading about managing cookies next.