Tired of re-scanning your site every time you install a plugin or a new tracker sneaks onto a page? WPConsent's automatic scheduled scans run in the background on the interval you choose. They can also add any newly detected services to your cookie configuration for you, and email you when something changes. This guide walks you through enabling and configuring automatic scheduled scans.
Requirements: Automatic scheduled scans require a Basic license level or higher. See WPConsent pricing for details.
Before you begin, make sure WPConsent is installed and activated with a Basic license level or higher, your license key is active, and you have at least 1 completed manual scan. If you haven't scanned before, start with scanning your website and come back here.
Table of contents
- Enabling auto scanning
- Choosing a scan interval
- Auto-updating detected services
- Getting email notifications
- Controlling how long scan history is kept
- Saving your settings
- Reviewing scan results
- Viewing scan history
- How does background scanning work?
- Disabling auto scanning
- FAQ
Enabling auto scanning
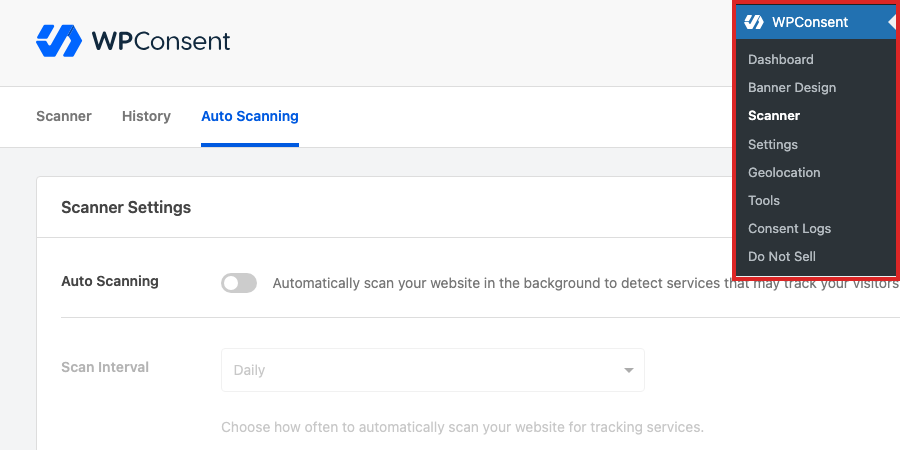
To get started, navigate to WPConsent » Scanner in your WordPress dashboard and click the Auto Scanning tab at the top of the page. At the top of this tab, toggle the Auto Scanning switch on. When it's on, the description reads "Automatically scan your website in the background to detect services that may track your visitors." The fields below become active as soon as this toggle is on.
Once the toggle is on, the rest of the settings on this tab activate. Configure them as described in the following sections, then click Save Settings to apply your choices.

Choosing a scan interval
Below the toggle, the Scan Interval dropdown controls how often a scheduled scan runs. Pick the option that best matches how much your site changes:
- Daily — Scans once every day. This is the default. Choose this if your site changes frequently, for example if you add plugins, deploy releases, or install new analytics tools often.
- Weekly — Scans once every 7 days. Choose this if your site changes a few times a month.
- Monthly — Scans once every 30 days. Choose this if your site is stable and rarely gets new tracking scripts.

Auto-updating detected services
Under the interval dropdown is the Auto-Update Services toggle. When it's on, WPConsent adds any newly detected service to your cookie configuration after each scheduled scan, without waiting for you to review. You can still see every new service in the scan report, but it is already live on the banner by the time you look.
Note: The scanner only adds new services. It never removes existing ones. This is intentional because some services only load on pages that are not scanned, so a service missing from one scan doesn't mean it's safe to remove. To remove a service, do it manually from WPConsent » Cookies » Services.
Leave this off if you prefer to review new services before they go live on the banner.

Getting email notifications
Below Auto-Update Services is the Email Notifications toggle. Turning it on tells WPConsent to send an email after each automatic scan that detects new services. Scans that find nothing new do not trigger a notification.
When email notifications are enabled, the Notification Email Addresses field appears below the toggle. Enter one email address, or separate multiple addresses with commas, and each recipient receives the same notification. Use the Send Test Email button to verify that the configured addresses actually receive mail before a real scan triggers a notification.
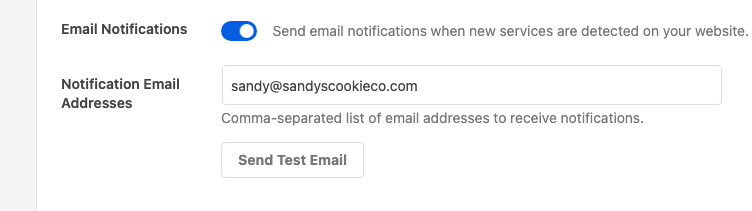
If the test email doesn't arrive, your WordPress site probably can't send mail reliably. When Email Notifications is enabled, the Auto Scanning tab shows a notice recommending WP Mail SMTP if no SMTP plugin is active on your site. Install and configure it to make sure notifications reach your inbox.
Controlling how long scan history is kept
At the bottom of the tab is the History Retention (Days) field. WPConsent keeps a record of every scan, manual and automatic, so you can look back at what changed over time. By default, records older than 90 days are pruned by a weekly cleanup task.
Increase this number to keep records for longer. Enter 0 to disable the cleanup and keep every scan record indefinitely. This is useful for audit-heavy environments. The maximum allowed value is 365.
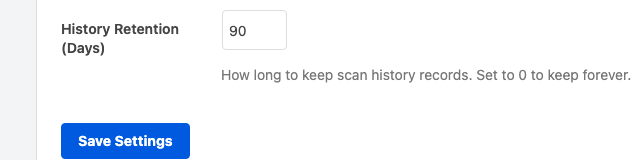
Saving your settings
When you're done configuring, click Save Settings at the bottom of the tab. WPConsent saves the settings and, if Auto Scanning is on, schedules the background scan check that was described earlier. If you switch the Auto Scanning toggle off and click Save, WPConsent clears the scheduled scan for you.
Reviewing scan results
After an automatic scan completes, go back to the Scanner tab on the same page. The Scan Overview section shows updated statistics:
- Last Successful Scan reflects the date of the most recent scan, whether manual or automatic.
- Next Scheduled Scan displays when the next automatic scan is expected to run based on your interval setting. When Auto Scanning is off, this indicator reads "Not Scheduled."
If the scan found new services and Auto-Update Services is off, the new services appear in the Detailed Report section. Click Automatically Configure Cookies to add them to your cookie configuration in bulk.
If Auto-Update Services is on, new services are already configured. The Scan Overview reflects that the scan completed and the banner updates immediately.
Viewing scan history
Click the History tab to see a list of every scan that has run, manual and automatic. Each row shows the date, the number of new services detected, the number of services removed since the previous scan, whether auto-update ran, and whether an email notification was sent. Use this view to audit when a specific service first appeared on your site.
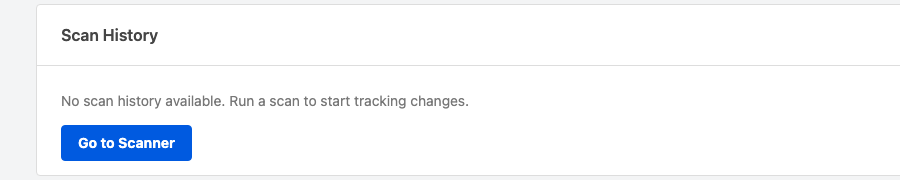
Before any scans have run, this tab shows an empty state with a link back to the Scanner tab. Once scans start running, each one becomes a row in the list. Click a row to open the scan details overlay, which shows the full list of new and removed services compared to the previous scan. Records older than the History Retention (Days) value are removed automatically by the weekly cleanup task.
How Does Background Scanning Work?
WPConsent uses WordPress cron to manage automatic scans. When Auto Scanning is enabled, a daily cron event fires and checks whether enough time has passed since the last scan based on your interval. This daily check is lightweight. Only when a scan is actually due does it kick off the full scan process.
When a scan is due, the process works like this:
- WPConsent retrieves the same page URLs you configured in the Select content to scan section on the Scanner tab.
- It sends each page to the WPConsent scanning API for analysis.
- Results from all pages are aggregated, and duplicate services are removed.
- The final results are saved, and the Scan Overview statistics update.
- New services, if any, are compared against the previous scan. If Auto-Update Services is on, they are configured automatically.
- If Email Notifications is on and new services were found, recipients are notified.
- The full result is stored in scan history.
Because automatic scans use the same detection engine as manual scans, you get the same tracking service detection either way. As you install or remove plugins, scheduled scans capture those changes automatically.
Disabling auto scanning
To stop automatic scans, go to WPConsent » Scanner, click the Auto Scanning tab, toggle Auto Scanning off, and click Save Settings. WPConsent clears the scheduled cron event immediately after the save, and the Next Scheduled Scan indicator on the Scanner tab updates to "Not Scheduled." Any existing scan history is preserved.
FAQ
Why isn't my next scheduled scan date updating?
WordPress cron is triggered by site visits. If your site has very low traffic, cron events may not fire on time. Consider setting up a real cron job on your server to trigger wp-cron.php at regular intervals. Contact your hosting provider for help with this.
Why aren't my automatic scans detecting new services?
Automatic scans process the same pages listed in the Select content to scan section on the Scanner tab. If a new service loads only on a page that isn't in that list, the scan won't detect it. Add the relevant pages on the Scanner tab before the next scheduled scan.
Test emails aren't arriving. What should I check?
Make sure your WordPress site can send mail at all. When Email Notifications is enabled, the Auto Scanning tab shows a notice recommending WP Mail SMTP if no SMTP plugin is active. Without a proper SMTP configuration, notification emails often get caught by spam filters or dropped by your host.
What's the difference between Auto-Update Services and manually configuring cookies?
Auto-Update only adds services it finds in a scheduled scan. It won't touch the services you've already configured, and it won't remove anything, even if a service wasn't detected in the latest scan. Manual configuration, either via the Automatically Configure Cookies button on the Scanner tab or through WPConsent » Cookies » Services, gives you full control including removals.
Can I run a manual scan while automatic scans are enabled?
Yes. Manual and automatic scans are independent. Running a manual scan won't interfere with your scheduled scans. Both update the same scan results on the Scanner tab and both appear in the History tab.
How do I find out exactly when a specific service first appeared on my site?
Open the History tab. Each row represents a scan. Click one to open the scan details overlay, which shows the list of services detected and the comparison against the previous scan. Row-level history is retained for the number of days configured in History Retention (Days).
That's it! You've now configured automatic scheduled scans to keep your cookie data up to date. WPConsent runs background scans at your chosen interval, optionally keeps your banner in sync with newly detected services, and can notify you by email when something changes. Next, read about scanning your website to learn how to tune which pages are scanned.