
Want to get cookie consent up and running on your WordPress site? WPConsent is available as a free plugin from the WordPress repository, and WPConsent Pro is a standalone paid version that includes all the free features plus many more. In this tutorial, we'll walk you through installing WPConsent, activating it, and setting up your license key.
Table of contents
- Prerequisites
- Installing from the WordPress plugin repository
- Installing by uploading the plugin manually
- Activating the plugin
- Upgrading to WPConsent Pro
- Activating your Pro license key
- Verifying your setup
- FAQ
- Conclusion
Prerequisites
Before you begin, make sure you have:
- A WordPress site running version 5.6 or higher
- PHP 7.0 or higher
- Administrator access to your WordPress dashboard
Installing from the WordPress plugin repository
This is the quickest way to get WPConsent on your site.
- To get started, log in to your WordPress admin dashboard.
- Next, head over to Plugins >> Add New.
- In the search field, type WPConsent.
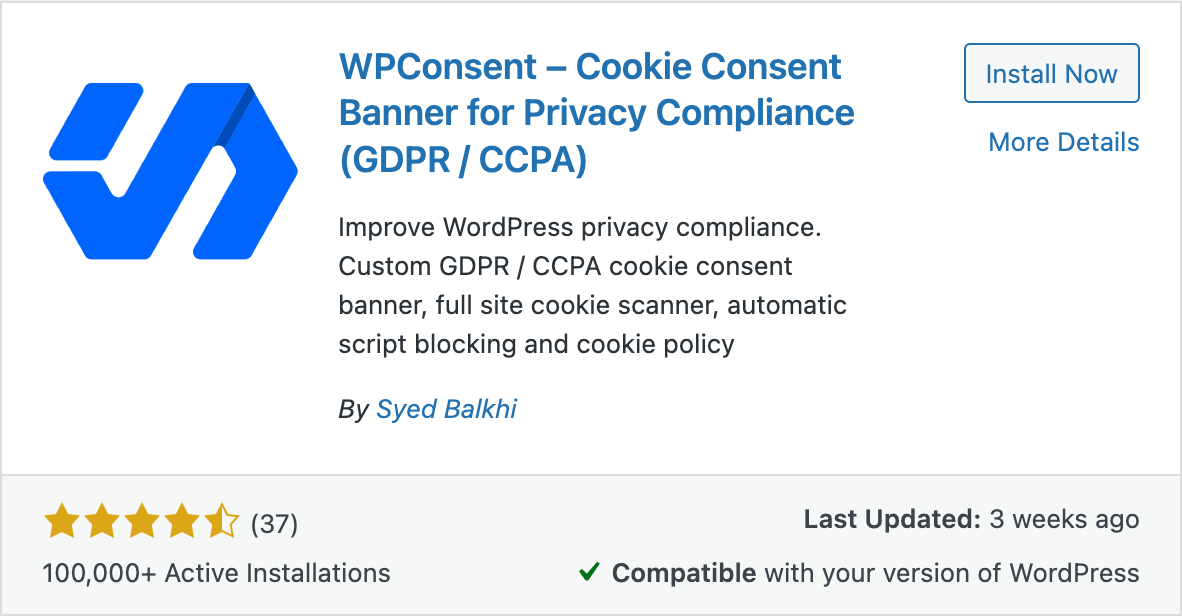
- Look for the plugin listed as "WPConsent – Cookie Consent Banner for Privacy Compliance (GDPR / CCPA)" in the results.
- Then, click the Install Now button.
- After installation completes, click Activate.
After activation, WPConsent automatically redirects you to the setup wizard. You'll use this wizard to configure your banner and run your first scan. For a detailed walkthrough, check out our setup wizard guide.
Installing by uploading the plugin manually
Use this method if you downloaded the plugin as a .zip file from wordpress.org or from your WPConsent account.
- First, log in to your WordPress admin dashboard.
- Then, head over to Plugins >> Add New.
- At the top of the page, click the Upload Plugin button.
- Next, click Choose File and select the WPConsent
.zipfile from your computer. - Click Install Now.
- Once the upload finishes, click Activate Plugin.
Note: The free version installs to
wp-content/plugins/wpconsent-cookies-banner-privacy-suite/. WPConsent Pro installs towp-content/plugins/wpconsent-premium/.
Activating the plugin
If you didn't activate the plugin during installation, you can do it from the plugins list.
- Head over to Plugins >> Installed Plugins.
- Find WPConsent in the list.
- Then, click Activate.
On first activation, WPConsent automatically redirects you to the onboarding wizard. This guided flow helps you configure your banner, run a scan, and set up script blocking.

Upgrading to WPConsent Pro
WPConsent Pro is a standalone plugin that includes everything in the free version plus advanced features like geolocation, consent logs, multilanguage support, IAB TCF v2.3, and an enhanced scanner. It replaces the free version entirely.
- First, purchase a Pro license from wpconsent.com/pricing.
- Download the
wpconsent-premium.zipfile from your WPConsent account. - In your WordPress admin, head over to Plugins >> Add New >> Upload Plugin.
- Select the
wpconsent-premium.zipfile and click Install Now. - Finally, click Activate Plugin.
When you activate WPConsent Pro, it automatically deactivates the free version. All your existing settings, banner configuration, and scan data carry over seamlessly. After activation, you can either delete the free version or leave it deactivated.
Activating your Pro license key
An active license key unlocks Pro features and enables automatic plugin updates.
- Head over to WPConsent >> Settings in your WordPress admin.
- Find the License Key field.
- Paste your license key into the field. You can find your key in your WPConsent account under Licenses.
- Then, click the Verify Key button.
- A confirmation message appears: "Congratulations! Your WPConsent license is activated & this site is now receiving automatic updates."
After verification, the page displays your license level (Basic, Plus, Pro, or Elite).
You can also define your license key as a constant in wp-config.php if you'd prefer not to store it in the database:
define( 'WPCONSENT_LICENSE_KEY', 'your-license-key-here' );To deactivate a license (for example, when moving to a different domain), return to the license key field and click Deactivate Key.
Verifying your setup
Once everything is installed, here's how to confirm it's working:
- Head over to Plugins >> Installed Plugins and verify WPConsent shows as Active.
- If you're using Pro, confirm the License Key field on WPConsent >> Settings shows a green verification message.
- Visit your site's front end in a new browser tab or incognito window. You should see the cookie consent banner appear.
FAQ
Why don't I see the setup wizard after activating the plugin?
The onboarding redirect only triggers on the very first activation. If you deactivated and reactivated the plugin, the automatic redirect won't fire again. You can follow our setup wizard guide to complete the setup steps manually.
Why do I see a notice when I try to activate the free version?
This means WPConsent Pro is already active. Since Pro includes all the free features, there's no reason to run both. To switch back to the free version, head over to Plugins >> Installed Plugins, deactivate WPConsent Pro first, then activate the free version.
Why does my license key verification fail?
There are a few things to check:
- Make sure you copied the full license key without extra spaces.
- Verify that your server can reach
https://licensing.wpconsent.com. Some hosting providers block outgoing requests. - If the error persists, try again after a few minutes. The licensing server may be temporarily unavailable.
Why can't I find the plugin in the search results?
Search for WPConsent (1 word, capital C). The plugin's full listing name is "WPConsent – Cookie Consent Banner for Privacy Compliance (GDPR / CCPA)." If it still doesn't appear, you can install it manually by downloading the .zip from wordpress.org.
Conclusion
You now have WPConsent installed, activated, and ready to go on your WordPress site. If you're using the paid version, your license is verified and automatic updates are enabled. To continue setting up your site, we recommend walking through the setup wizard next.