TL;DR:
Create a GTM container at tagmanager.google.com, install it on WordPress using WPCode or the GTM4WP plugin, then install WPConsent free. Import the WPConsent template from the GTM Template Gallery. Set it to fire on Consent Initialization, so your Google Analytics 4 and Google Ads tags respect visitor choices. WPConsent’s banner reads the visitor’s decision and updates Consent Mode inside Google Tag Manager automatically.
Since March 2024, advertisers using Google Ads for visitors in the European Economic Area (EEA) must comply with Google’s EU User Consent Policy.
For most WordPress sites, Google Consent Mode V2 is the recommended way to send the required consent signals.
If you manage your tracking through Google Tag Manager, the setup is a little different from users who installed Google Analytics 4 directly on their site.
This tutorial shows you how to install Google Tag Manager on WordPress (three ways), then activate Google Consent Mode V2 in one step using WPConsent.
Without Google Consent Mode V2 (GCM V2), Google Ads may lose conversion modeling and measurement for visitors who decline tracking. Plus, you have no record of consent for compliance purposes.
The consent side is identical regardless of how you install GTM. The difference is only in Step 2.
By the end of this tutorial, Google Tag Manager will be installed on your WordPress site, and Google Consent Mode V2 will fire automatically every time a visitor responds to your banner.
Key Takeaways
- Install Google Tag Manager on WordPress using WPCode, GTM4WP, or manually with a child theme if you need full control.
- This tutorial covers Google tags (GA4, Google Ads) via the WPConsent GTM template.
- Google Tag Manager manages your tracking tags, while WPConsent handles visitor consent and pushes the consent decision to GTM’s dataLayer. The WPConsent template reads that event and updates Consent Mode for you.
- Google Consent Mode is enabled by default in WPConsent. If you use GTM, you still need to add the WPConsent template inside your container so those signals actually control your tags.
- Non-Google tags without built-in Consent Mode support, like Meta Pixel or TikTok, need a separate custom trigger based on WPConsent’s consent event.
Google Tag Manager vs Google Analytics 4: Which One Do You Need for Setting Up Google Consent Mode V2?
If you are not sure whether GTM is the right path for your site, the answer usually comes down to one question: Do you manage more than just Google Analytics through a tag manager?
If yes, GTM makes sense.
If Google Analytics is your only tracking tool, the direct GA4 method is simpler and skips the Google Tag Manager install entirely. But all the same, WPConsent handles GCM V2 the same way in both setups.
| Google Tag Manager (this article) | Google Analytics 4 Direct | |
|---|---|---|
| Use this if… | You manage multiple tags (ads, analytics, heatmaps) in one place | Google Analytics is your only tracking tool |
| Setup steps | Create GTM account, install on WordPress, add GA4 tag inside GTM | Install GA4 plugin or paste snippet directly on site |
| GCM V2 with WPConsent | ✓ Covered here | See Google Analytics 4 guide |
Before You Start
You need a Google Analytics 4 property before you begin. GTM carries your GA4 tag to your site, but you need the GA4 Measurement ID (format: G-XXXXXXXXXX) to set up the tag inside GTM. Find it in GA4 under Admin » Data Streams.
You can use the table of contents below to skip directly to the steps of setting up Google Consent Mode V2 with Google Tag Manager you want.
- Step 1: Create a Google Tag Manager Account
- Step 2: Install Google Tag Manager on WordPress
- Step 3: Install and Activate WPConsent
- Step 4: Set Up the WPConsent GTM Template
- Step 5: Enable Google Consent Mode V2
- Step 6: Set Up Your Cookie Banner
- Troubleshooting: Setting Up Google Consent Mode V2 with Google Tag Manager
- Frequently Asked Questions
- WPConsent Free vs Pro
- Add Google Consent Mode V2 Through GTM in Minutes
- Additional Resources
Pick one of the three GTM installation methods below. You only need one.
Step 1: Create a Google Tag Manager Account
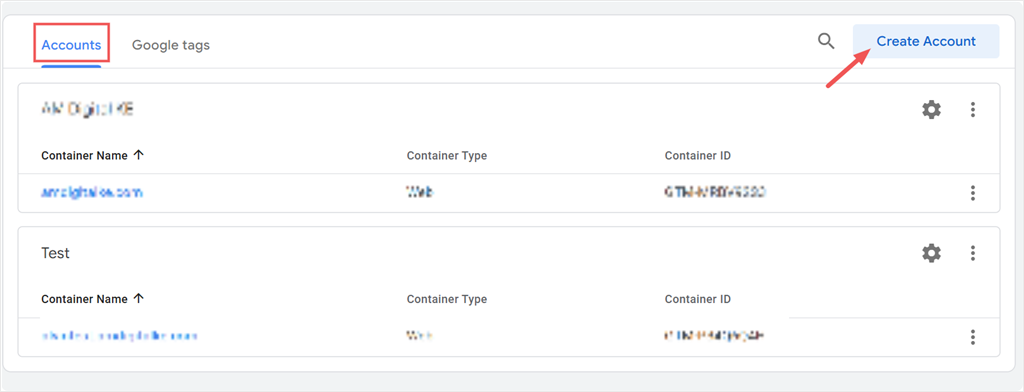
Go to tagmanager.google.com. If you already have an account with a container for your site, skip to Step 2.
Here, click Create Account in the top right corner.
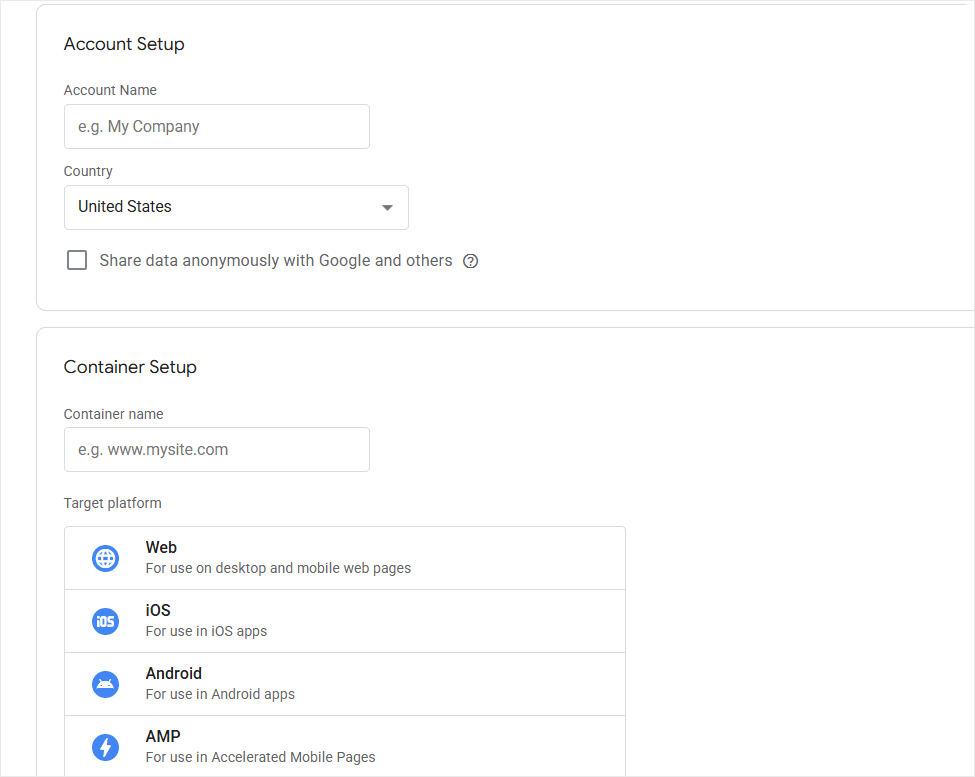
Next, fill in your account name. Your company name works fine. Set your country, then scroll down to “Container Setup.”
Enter your domain as the container name and select Web as the target platform. Then, click Create, then accept the Terms of Service.
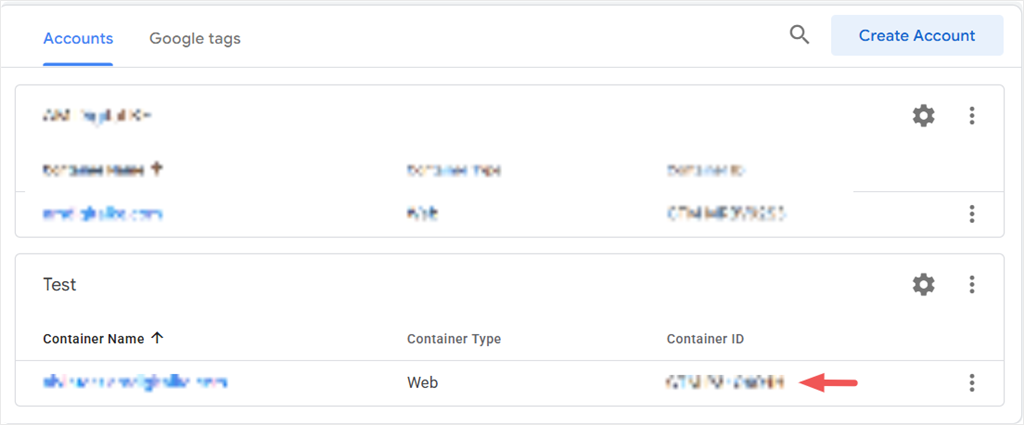
At this point, your GTM account is now live, and you will be redirected to the Accounts screen, where your new container appears.
The Container ID (format: GTM-XXXXXXX) is shown next to your container name. Copy it and keep this handy for the next step.
Step 2: Install Google Tag Manager on WordPress
Here’s how the three Google Tag Manager installation methods for WordPress compare. Select the one that fits your needs best.
| Method | What you need | Difficulty |
|---|---|---|
| WPCode | Copy + paste two code blocks | Easiest |
| GTM4WP plugin | Paste Container ID only | Easy |
| Manual (functions.php) | FTP or file manager + child theme | Advanced |
Method 1: WPCode (Recommended)
This approach uses WPCode to place the GTM code into your site header and body.
WPCode works if you prefer not to add another plugin, which can lead to your site bloating, or if WPCode is already installed on your site.
Start by getting your GTM code.
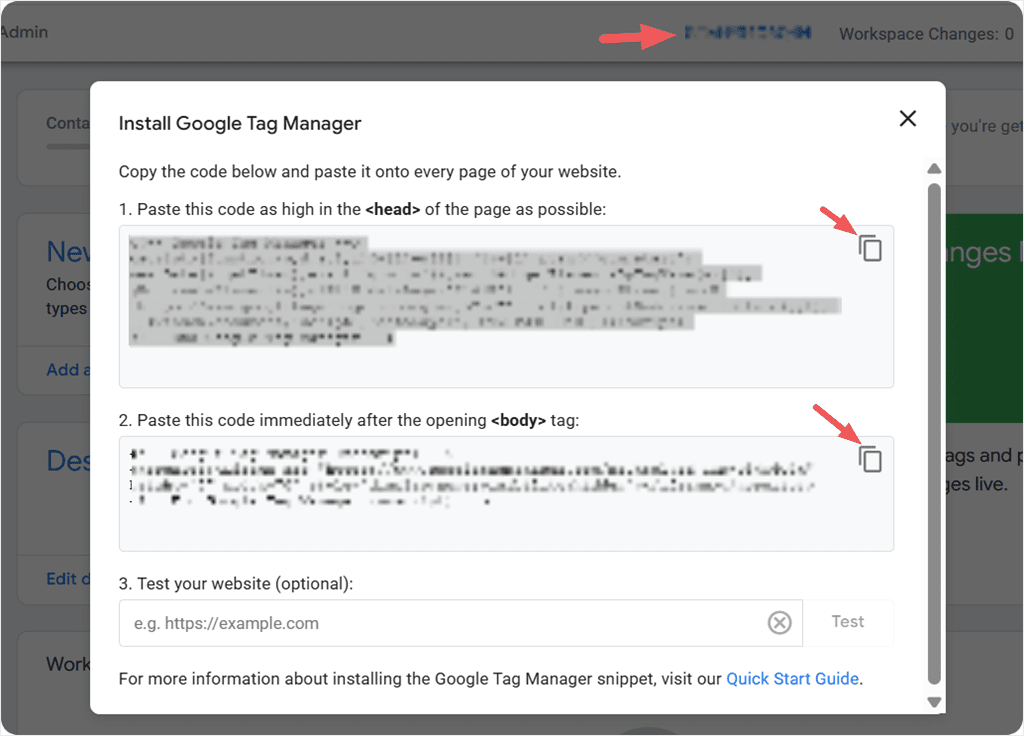
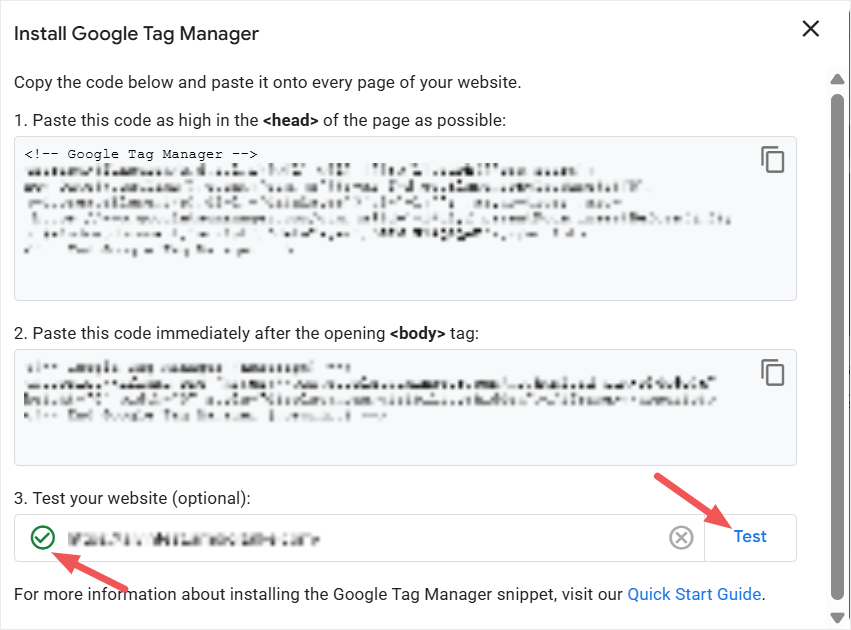
To find this, go to your GTM workspace, click Admin in the top navigation, then select Install Google Tag Manager. After this, a popup appears with two code blocks. You will need both codes, so keep this page open.
Then, in WordPress, go to Code Snippets » Headers & Footers.
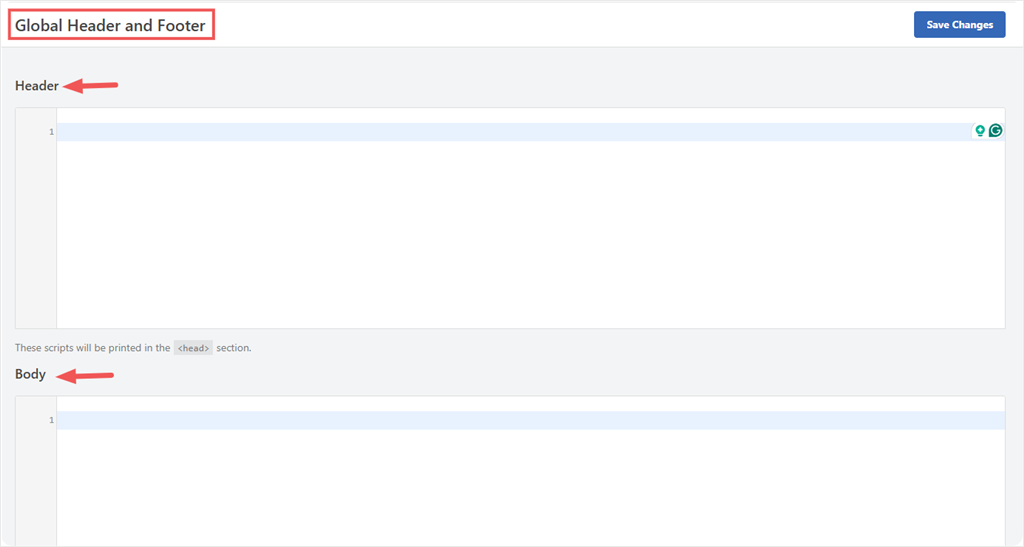
Copy the first code block from the GTM popup (the one labelled “paste as high in the <head> as possible”) and paste it into the Header field in WPCode.
Then copy the second block (the <noscript> labelled “paste immediately after the opening <body> tag”) and paste it into the Body field.
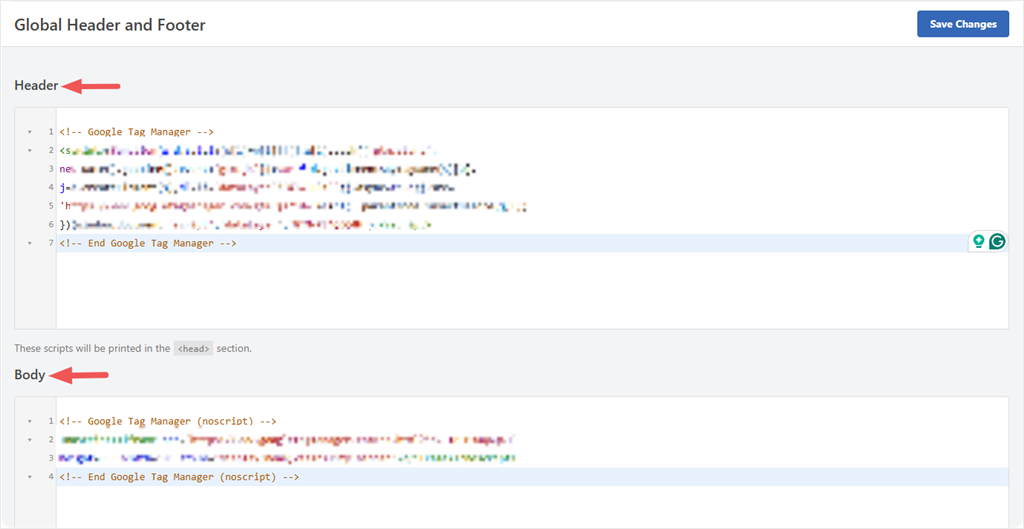
That’s it. You have just set up Google Tag Manager with WPCode.
To confirm GTM is live, go back to the Install popup. Enter your site URL in the Test field and click Test. A green tick means GTM is detecting your site correctly.
Check out this guide if you need help with how to add code snippets to your header with WPCode.
Once you confirm it works, click Save Changes in WPCode.
Method 2: GTM4WP Plugin
The GTM4WP plugin handles both parts of the Google Tag Manager snippet automatically. You enter your Container ID once, and the plugin places the code correctly in your site head and body. This means nothing to copy or paste.
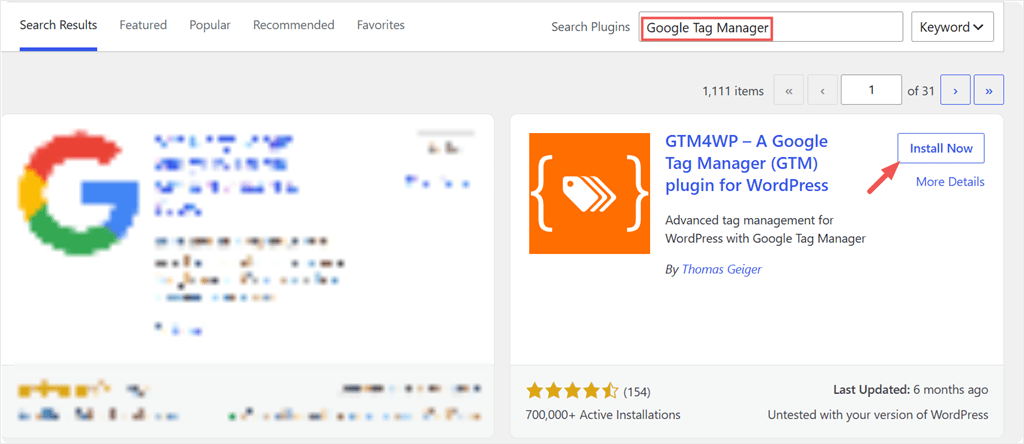
To use it, go to Plugins » Add New Plugin and search for “Google Tag Manager for WordPress.” Find the plugin by Thomas Geiger, click Install Now, then Activate.
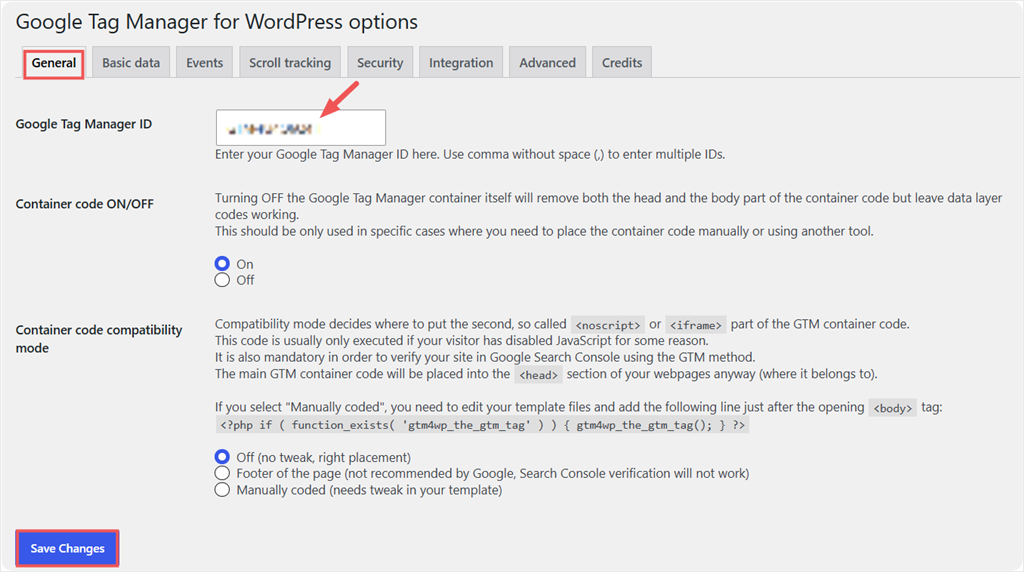
Once installed and activated, go to Settings » Google Tag Manager.
In the Google Tag Manager ID field, enter your Container ID. Leave Container code set to On and the compatibility mode set to Off (tweak, right placement). Then, click Save Changes.
GTM is now installed. Skip to Step 3.
Method 3: Manual via functions.php (Experienced users)
This method requires FTP or cPanel file manager access and PHP knowledge. To make sure you keep your changes after a theme update, set this up in a child theme.
You can’t paste the raw GTM snippet directly into functions.php. It’s a PHP file, and pasting in HTML/JavaScript as-is will cause a fatal error on your site. Instead, wrap each code block in a PHP function hooked to the right place on your page.
To do this, open functions.php in your host’s file manager and scroll to the very end, after all existing code.
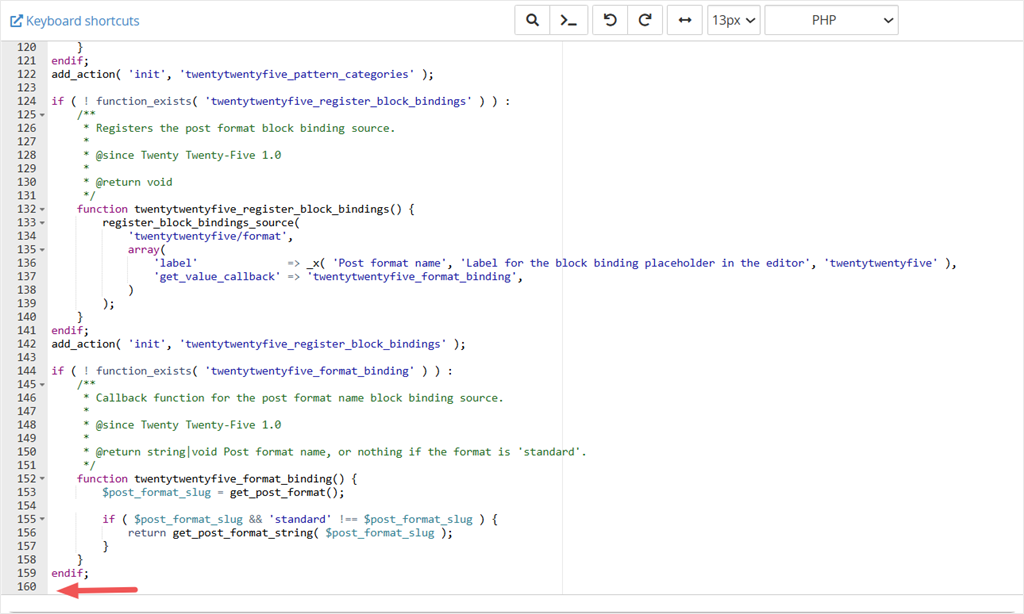
Then, add the following PHP snippet at the end of your child theme’s functions.php file, replacing GTM-XXXXXXX with your own Container ID:
function isitwp_add_gtm_head() {
    ?>
    <!-- Google Tag Manager -->
    <script>(function(w,d,s,l,i){w[l]=w[l]||[];w[l].push({'gtm.start':
    new Date().getTime(),event:'gtm.js'});var f=d.getElementsByTagName(s)[0],
    j=d.createElement(s),dl=l!='dataLayer'?'&l='+l:'';j.async=true;j.src=
    'https://www.googletagmanager.com/gtm.js?id='+i+dl;f.parentNode.insertBefore(j,f);
    })(window,document,'script','dataLayer','GTM-XXXXXXX');</script>
    <!-- End Google Tag Manager -->
    <?php
}
add_action( 'wp_head', 'isitwp_add_gtm_head' );

function isitwp_add_gtm_body() {
    ?>
    <!-- Google Tag Manager (noscript) -->
    <noscript><iframe src="https://www.googletagmanager.com/ns.html?id=GTM-XXXXXXX"
    height="0" width="0" style="display:none;visibility:hidden"></iframe></noscript>
    <!-- End Google Tag Manager (noscript) -->
    <?php
}
add_action( 'wp_body_open', 'isitwp_add_gtm_body' );
The first function hooks into wp_head to place the main script in your page’s <head>. The second hooks into wp_body_open to place the noscript fallback right after your opening <body> tag.
Remember, wp_body_open needs theme support (most modern themes include it since WordPress 5.2). If your noscript tag doesn’t appear after saving, your theme may not call it, and you’d need WPCode or GTM4WP instead.
Step 3: Install and Activate WPConsent
Regardless of which installation method you choose, WPConsent is what activates Google Consent Mode V2. It’s the consent banner and the signal handler in one plugin.
It handles the consent banner, reads visitor choices, and sends GCM V2 signals to GA4 and Google Ads automatically.
The free version of WPConsent covers everything in this tutorial, so we will use it.
Go to Plugins » Add New Plugin, search for “WPConsent,” click Install Now, then Activate.
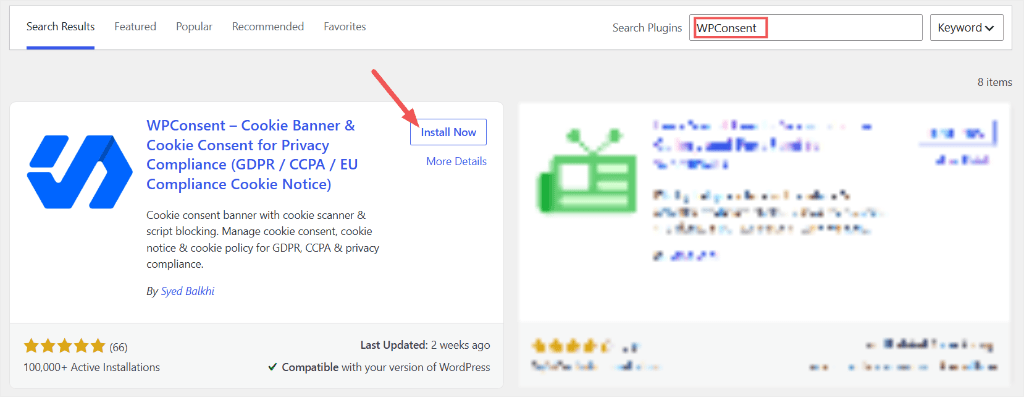
If you’re on Pro, download the zip from your WPConsent account and upload it at Plugins » Add New » Upload Plugin.
If you face any issues, use this guide to help you set up WPConsent.
Once activated, WPConsent opens its setup wizard. This will help you set up everything about WPConsent in one go.
As part of the setup wizard, WPConsent runs a cookie scan on your site and helps you confirm your consent categories.
If you do not use the setup wizard, you can also run this scan manually by going to WPConsent » Scanner and selecting “Scan Your Website.”
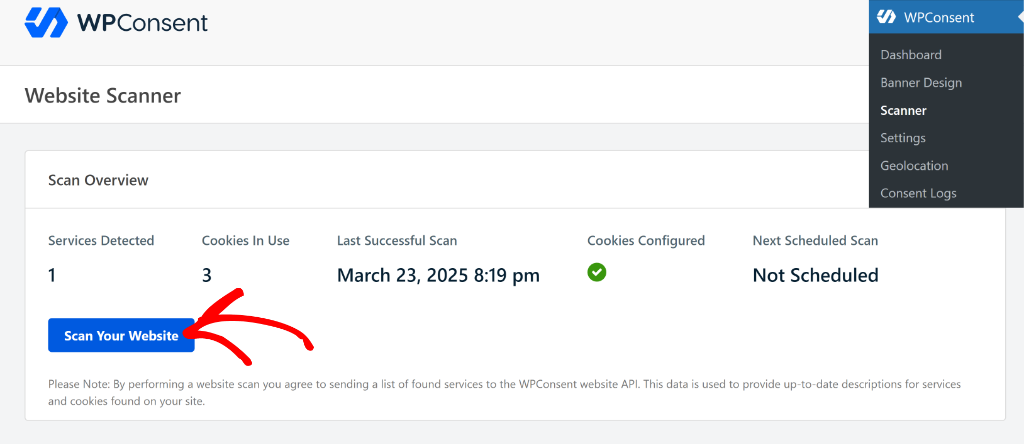
The scanner checks your site for cookies and tracking scripts already in use, then groups them into categories like Essential, Statistics, and Marketing so you don’t have to build your consent banner from scratch.
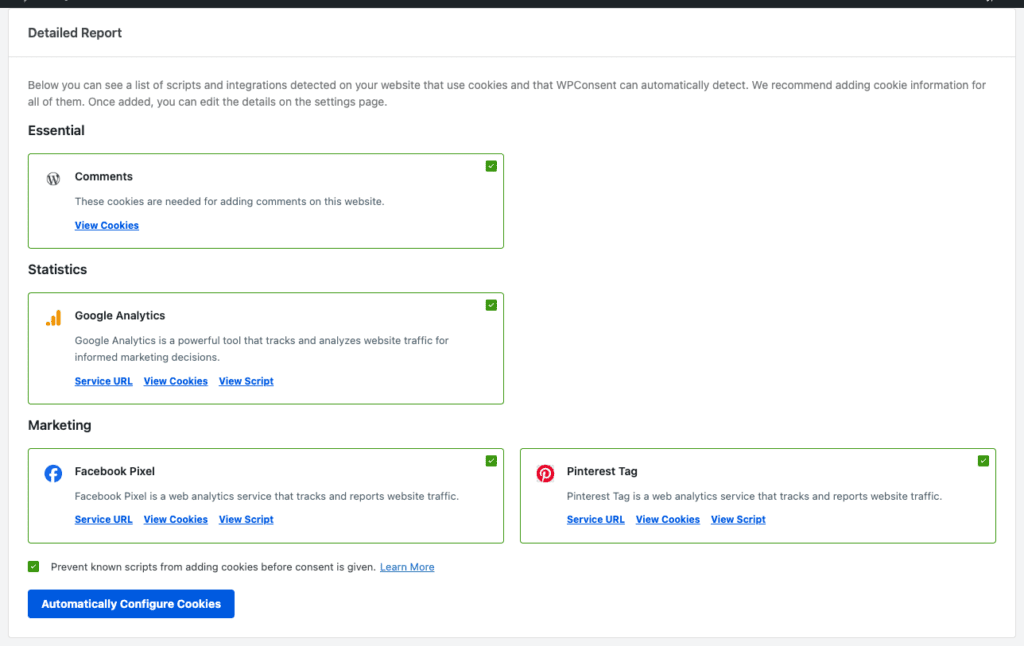
If you want to check which cookies your site uses before setup, our guide on finding which cookies your WordPress site uses walks through exactly that.
If you do not want to install WPConsent to run the scan, you can use our free online cookie scanner. No email or signup required.
Step 4: Set Up the WPConsent GTM Template
This is the step that actually makes Consent Mode V2 reliable inside Google Tag Manager.
The GCM V2 toggle in WPConsent controls consent on direct integrations, but for GTM, you need the WPConsent template inside your container so your tags read the visitor’s choice.
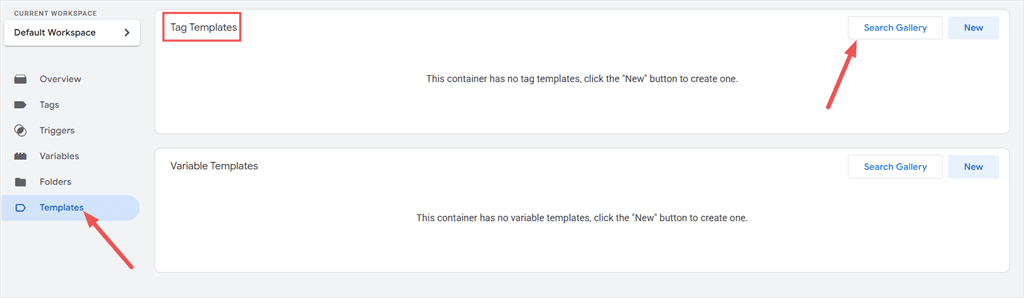
In your GTM workspace, click Templates in the left sidebar. Then, under Tag Templates, click Search Gallery.
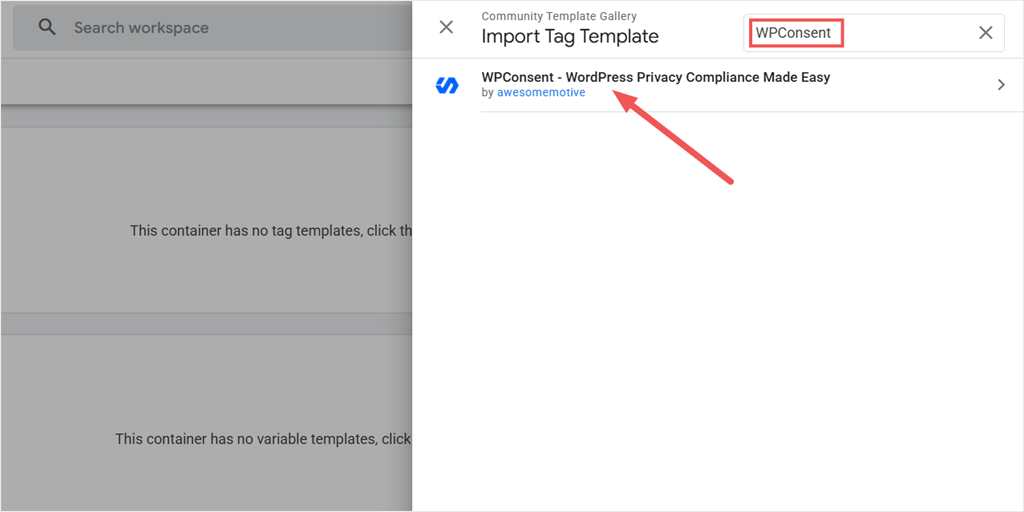
Next, in the Community Template Gallery, search “WPConsent” and click the WPConsent – WordPress Privacy Compliance Made Easy result by awesomemotive.
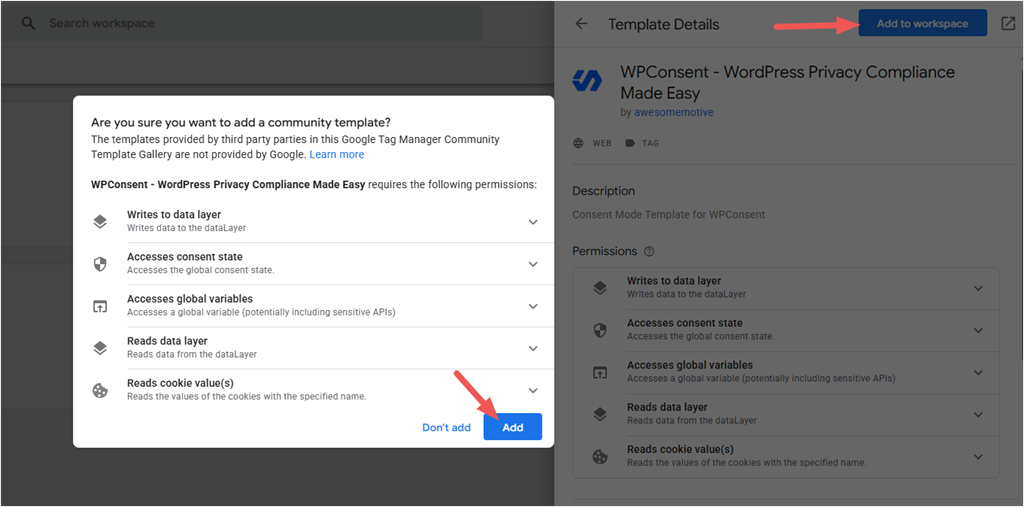
On the Template Details panel, click Add to workspace. A confirmation prompt lists the permissions the template needs, including writing to the dataLayer and reading the consent state.
Once you confirm this, select Add. The template now appears in your Tag Templates list, ready to use.
Importing the template makes it available, but it doesn’t fire anything on its own. You still need to create a tag from it.
To set this up, go to Tags and click New.

Then, name the tag “WPConsent Tag,” or something similar and select Tag Configuration.
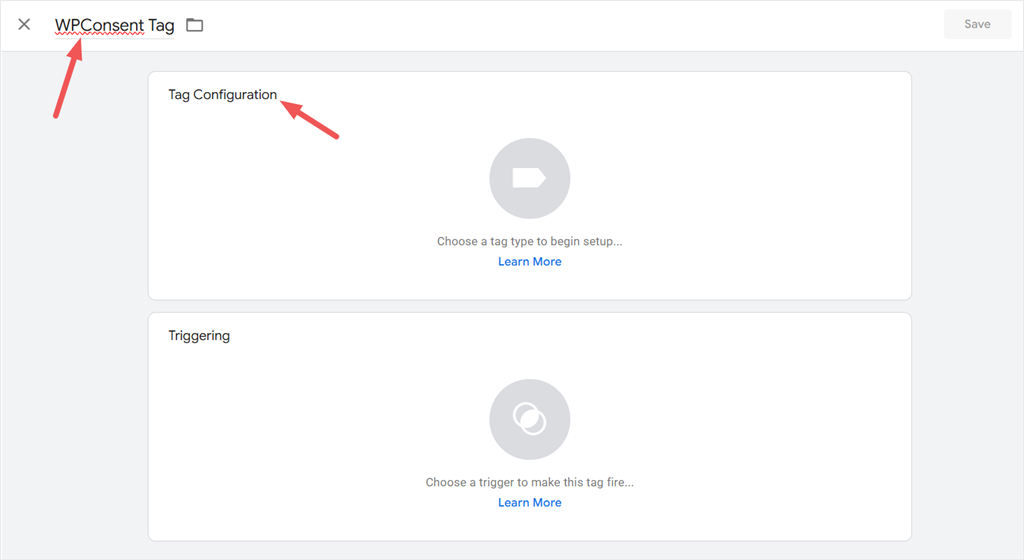
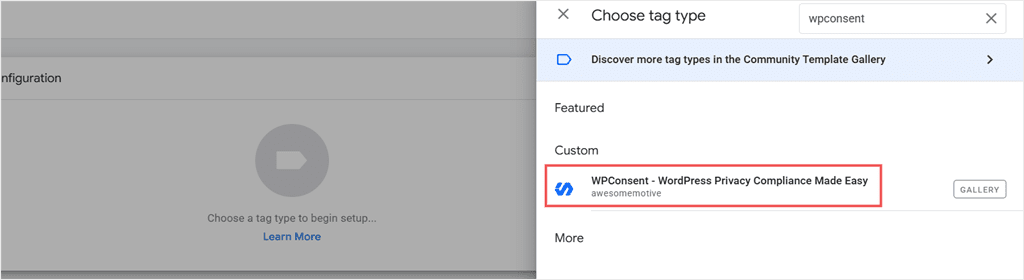
On the slide in screen that appears next, search “wpconsent” and select WPConsent – WordPress Privacy Compliance Made Easy under Custom.
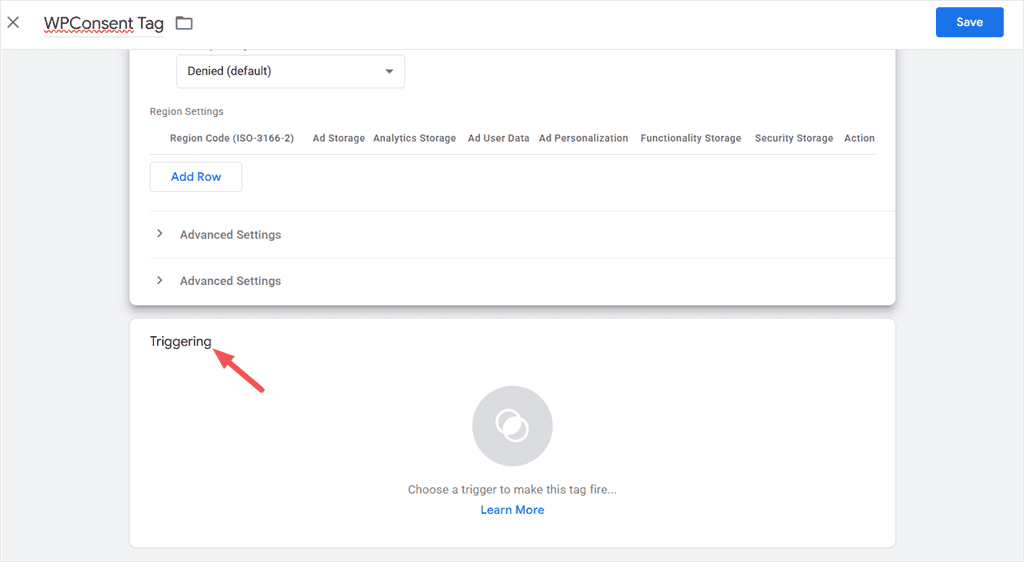
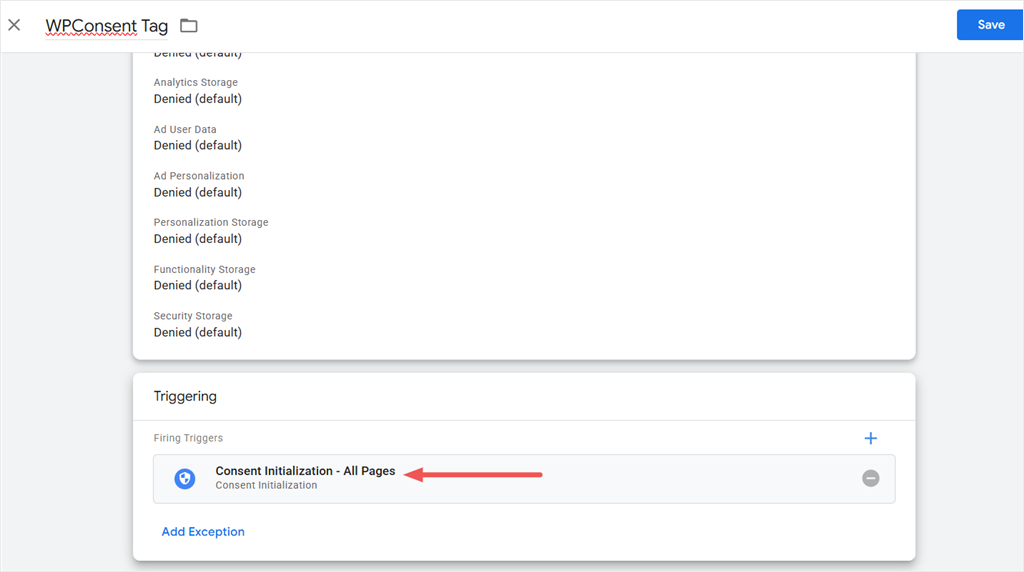
Leave the default consent fields as they are: Ad Storage, Analytics Storage, Ad User Data, Ad Personalization, Personalization Storage, Functionality Storage, and Security Storage all start at Denied.
This way, tags stay blocked until a visitor actually grants consent, instead of firing by default.
Plus, this matches Google’s recommended default-denied starting state for Consent Mode V2. Skip Region Settings and Advanced Settings unless you need country-specific overrides. Below this, click Triggering.
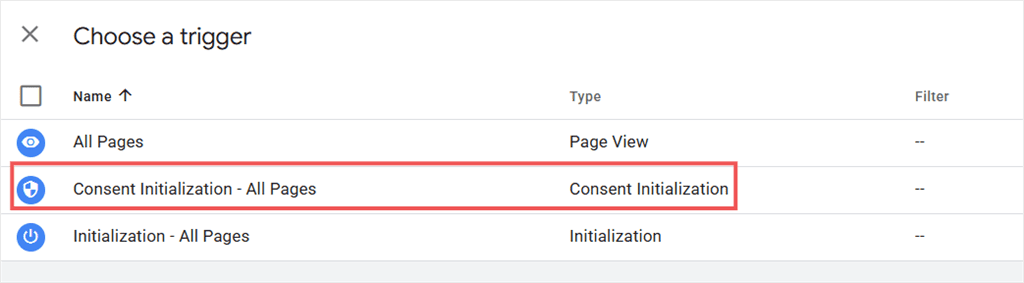
On the slide-in screen, choose Consent Initialization – All Pages as the trigger.
Google Tag Manager uses this trigger type to set consent defaults before any other tag evaluates. So if it fires late, tags may load before your denied defaults are in place and send data before the visitor has made a choice.
Finally, confirm the trigger is set, then click Save.
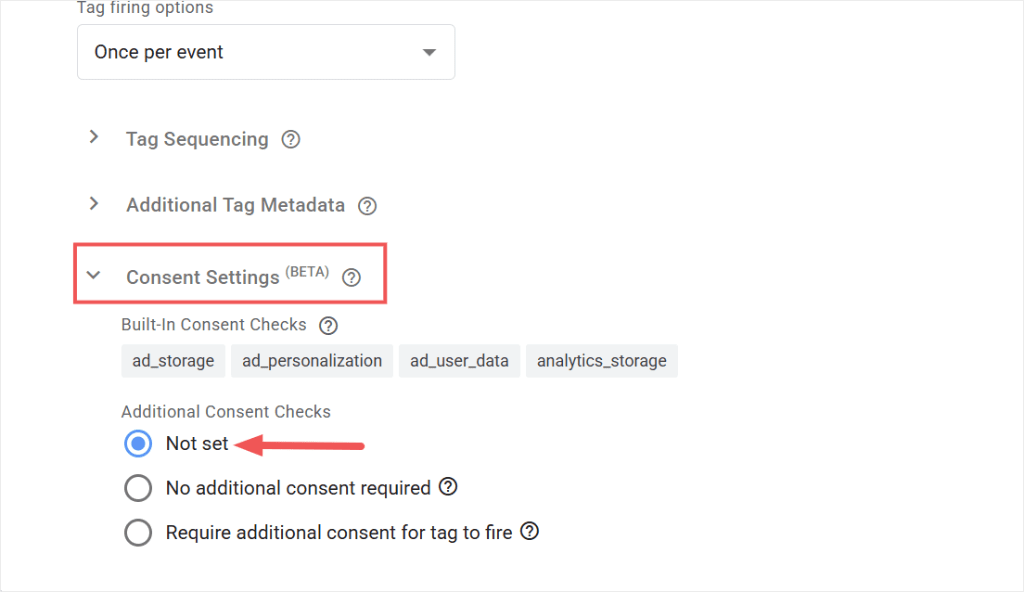
Your GA4 and Google Ads tags don’t need any extra configuration here. Open them and check Advanced Settings » Consent Settings.
Google already lists the consent types each tag respects under Built-In Consent Checks, and that’s all a Google tag needs. So leave it as “Not set.”
This is what makes Consent Mode V2 work in Advanced Mode: Google Analytics 4 and Google Ads fire right away in a cookieless, ping-only state, then update automatically the moment a visitor makes a choice.
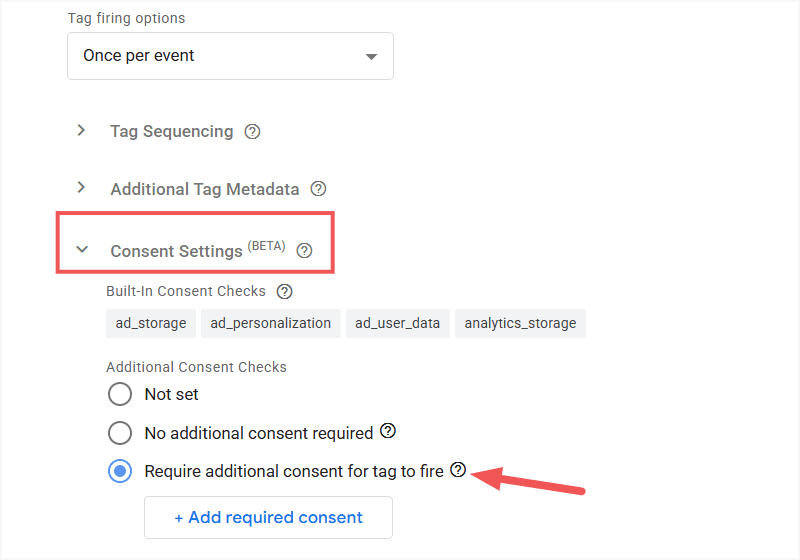
⚠️ Important: Don’t check “Require additional consent for tag to fire” on these. That setting blocks the tag from firing at all until consent is granted, which is Basic Mode behavior, and it undoes the setup you just built.
For non-Google tags like Meta Pixel, TikTok Pixel, or LinkedIn Insight Tag, use “Additional Consent Checks” to hold them back until a visitor grants marketing consent.
See our guide on triggering GTM tags based on consent for that setup.
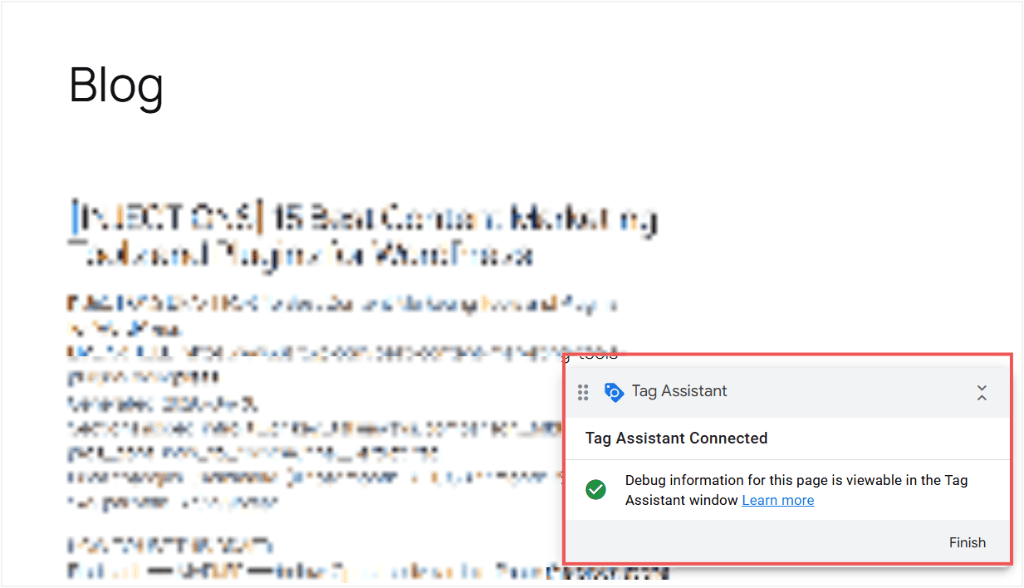
Click Preview to test: confirm the banner appears, and that GA4 and Ads still send data in a cookieless ping even before a visitor responds, then send full signals once they consent.
Once it checks out, click Submit to publish.
WPConsent’s scanner also reads your GTM container directly and lists the tags and services running inside it, so you can confirm which ones still need a consent setting before you publish.
Step 5: Enable Google Consent Mode V2
Go to WPConsent » Settings and scroll to the Cookie Configuration section.
You’ll see the Google Consent Mode toggle. By default, it’s already active. Confirm it’s switched on.
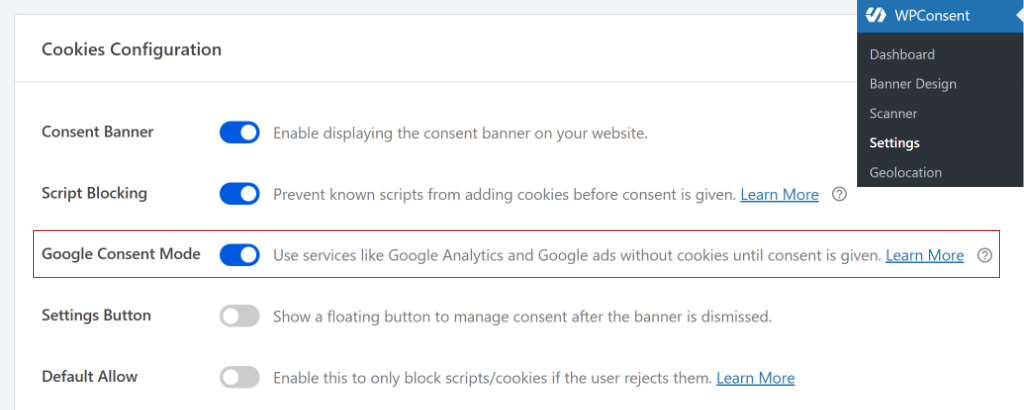
For sites using Google Analytics 4 or Google Ads directly (without GTM), this toggle alone is enough. Since you’re using GTM, this works alongside the WPConsent tag you set up, not instead of it.
WPConsent stores all consent data on your own server, rather than in a third-party consent platform, while your GTM tag still relays the required consent signal to Google.
Step 6: Set Up Your Cookie Banner
GCM V2 is configured, but it needs a banner to work. Without one, visitors have no way to make a consent choice, and no signals fire.
Go to WPConsent » Banner Design. Choose your layout, adjust your colours to match your site, and update the button text if needed. Click Save.
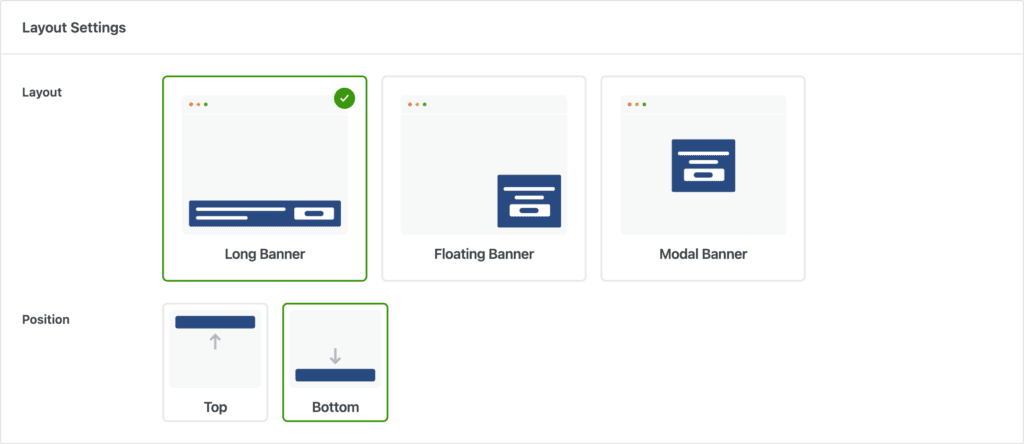
Here is how the banner looks to visitors on the front end of your site. It appears before any tracking scripts load.
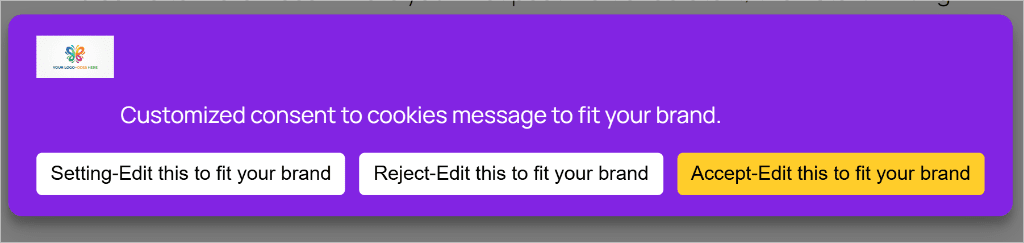
For a complete walk-through of every banner option, see our guide on how to add a cookie consent banner to your WordPress site.
Troubleshooting: Setting Up Google Consent Mode V2 with Google Tag Manager
GTM is installed, but GCM V2 signals aren’t firing
- First, confirm the WPConsent GCM V2 toggle under WPConsent » Settings » Cookie Configuration is on. Then check that your banner is visible to logged-out visitors.
- The banner does not show for logged-in admins by default. Test in a private browser window.
- Confirm the WPConsent tag exists in your GTM container’s Tags list, with the trigger set to Consent Initialization – All Pages. Without this trigger, the tag won’t fire before your other tags load.
- Check that your GTM container is published, not just saved. Signals won’t reach live visitors from an unpublished workspace.
GTM4WP: container shows as off
- Go to Settings » Google Tag Manager and confirm the Container code is set to On.
- If it’s already on and GTM still isn’t firing, clear your site cache and test again in a private browser.
GCM signals aren’t showing in Google Analytics
- In GA4, go to Admin » Data collection and modification » Data streams, open your stream, and check the Consent overview section.
- It should show consent mode as active. Allow up to 24 hours after first setup. Consent data takes time to appear in reports.
WPCode method: GTM test fails
- Clear your site cache immediately after saving in WPCode, then retest. Caching plugins sometimes serve a cached version of your page without the new GTM code.
- Test in a private browser to rule out browser cache as well.
Frequently Asked Questions
Do I need Google Tag Manager to use Google Consent Mode V2?
No. GTM is one way to manage tags in WordPress, but not the only path. If you use Google Analytics directly via a plugin, see our guide on how to set up Google Consent Mode V2 for Google Analytics instead.
Does WPConsent work with Google Tag Manager?
Yes. WPConsent pushes the visitor’s consent decision to GTM’s dataLayer. For Google tags, add the WPConsent template from the GTM Template Gallery so GA4 and Google Ads read that signal automatically. For non-Google tags without native Consent Mode support, like Meta Pixel or TikTok, you’ll need a separate custom trigger based on WPConsent’s consent event. The WP Consent API is a WordPress-side API for plugin compatibility and isn’t what carries signals to GTM.
Is GTM4WP the same as Google Tag Manager?
GTM4WP is a WordPress plugin that installs the GTM snippet on your site. Google Tag Manager itself is Google’s platform for managing tags. GTM4WP just handles the WordPress-side installation. All your actual tag management still happens in your GTM workspace at tagmanager.google.com.
Is setting up Google Consent Mode V2 with Google Tag Manager free?
Yes. GTM is free. GTM4WP is free. WPConsent’s GCM V2 toggle is available in the free version. No Pro plan needed. WPConsent Pro adds geolocation-based display rules, consent logging for audits, and IAB TCF v2.3 support.
What about tags that don’t support Google Consent Mode, like Meta Pixel?
The WPConsent template only covers Google tags. For pixels without native Consent Mode support, build a custom trigger in GTM off WPConsent’s consent event and attach it to those tags. See our guide on triggering GTM tags based on consent.
WPConsent Free vs Pro
Everything in this tutorial runs on the free version. But if you want to use the premium version of WPConsent, here is what Pro adds when your compliance needs grow.
| Feature | Free | Pro |
|---|---|---|
| Cookie banner | ✓ Included | ✓ Included |
| Google Consent Mode V2 | ✓ Included | ✓ Included |
| Cookie scanner | ✓ Included | ✓ Included |
| Cookie policy page | ✓ Included | ✓ Included |
| Consent logging (audit trail) | ✗ Not included | ✓ Included |
| Geolocation banner rules | ✗ Not included | ✓ Included |
| IAB TCF v2.3 support | ✗ Not included | ✓ Included |
| Starting price | Free | From $49.50/year |
Add Google Consent Mode V2 Through GTM in Minutes
Your site now handles GCM V2 signals automatically. Every time a visitor responds to your banner, WPConsent reads the choice and tells GA4 and Google Ads exactly what tracking is allowed.
Once your GTM template and consent settings are configured, WPConsent automatically updates consent whenever visitors interact with your banner.
From here, the next step most site owners miss is the consent log. If your site has visitors from the EU, GDPR audits can happen. WPConsent Pro keeps a timestamped record of every consent decision, ready to export if you’re ever asked to prove compliance.
The free version handles everything in this tutorial. When you’re ready to go further, WPConsent Pro covers the audit trail, geolocation banner rules, and IAB TCF v2.3 support.
Get WPConsent free →
See WPConsent Pro →
Additional Resources
Now that GCM V2 is active, here is what to set up next to complete your compliance foundation.
- How to Create a Privacy Policy in WordPress – your banner tells visitors you use cookies; your Privacy Policy explains what each one does and why.
- Best WordPress cookie consent plugins – This list will help you compare consent management options. See what’s available and how they differ.
- GDPR Compliance Checklist for WordPress Sites – a step-by-step list of everything your site needs beyond the cookie banner to meet GDPR requirements.
- Google Analytics and GDPR: What WordPress Site Owners Need to Know – covers what GA4 data collection looks like under GDPR and how consent mode affects your reports.