Want your Google Tag Manager tags to fire only after visitors grant consent? WPConsent pushes a custom event and preferences object to the GTM dataLayer, letting you build triggers that respect each visitor’s choices. This guide walks you through triggering GTM tags based on consent with WPConsent.
Table of contents
- Prerequisites
- Understanding the dataLayer event
- Creating the custom event trigger
- Creating data layer variables
- Creating service-level variables (optional)
- Configuring tag firing conditions
- Handling returning visitors
- Choosing between Consent Mode and GTM triggers
- Verifying your setup
- FAQ
- Conclusion
Prerequisites
Before you begin, make sure you have:
- A Google Tag Manager container installed on your site
- WPConsent installed with the cookie banner enabled
- Script blocking enabled in WPConsent >> Settings
- Basic familiarity with GTM triggers and variables
Understanding the dataLayer event
Every time consent is processed, WPConsent pushes the following object to the dataLayer:
{
  'event': 'wpconsent_consent_processed',
  'wpconsentPreferences': {
    'essential': true,
    'statistics': true,
    'marketing': false
  }
}
The event name is always wpconsent_consent_processed. The wpconsentPreferences object contains 1 boolean property per cookie category. A value of true means the visitor accepted that category. A value of false means they rejected it.
The essential category is always true because essential cookies can’t be disabled.
This event fires in 2 situations:
- When a visitor interacts with the banner for the first time (accepts, rejects, or saves preferences)
- On subsequent page loads when saved preferences already exist in the cookie
Service-level preferences
When Toggle Services is enabled in WPConsent >> Settings >> Cookies, the wpconsentPreferences object also includes individual service slugs alongside the category slugs:
{
  'event': 'wpconsent_consent_processed',
  'wpconsentPreferences': {
    'essential': true,
    'statistics': true,
    'marketing': false,
    'google-analytics': true,
    'facebook-pixel': false
  }
}
Service slugs are the sanitized names of each service in your cookie database. This gives you fine-grained control: you can trigger a tag only when its specific service is accepted, rather than when the entire category is accepted.
Additional events
WPConsent also dispatches a DOM CustomEvent named wpconsent_consent_processed on the document object. This is separate from the dataLayer push and is useful if you write custom JavaScript outside of GTM. For GTM configuration, you only need the dataLayer event.
Creating the custom event trigger
First, open your GTM container and create a trigger that listens for the WPConsent consent event.
- Navigate to Triggers and click New.
- Name the trigger
WPConsent - Consent Processed. - Click Trigger Configuration and select Custom Event.
- Set Event name to
wpconsent_consent_processed. - Set This trigger fires on to All Custom Events.
- Finally, click Save.
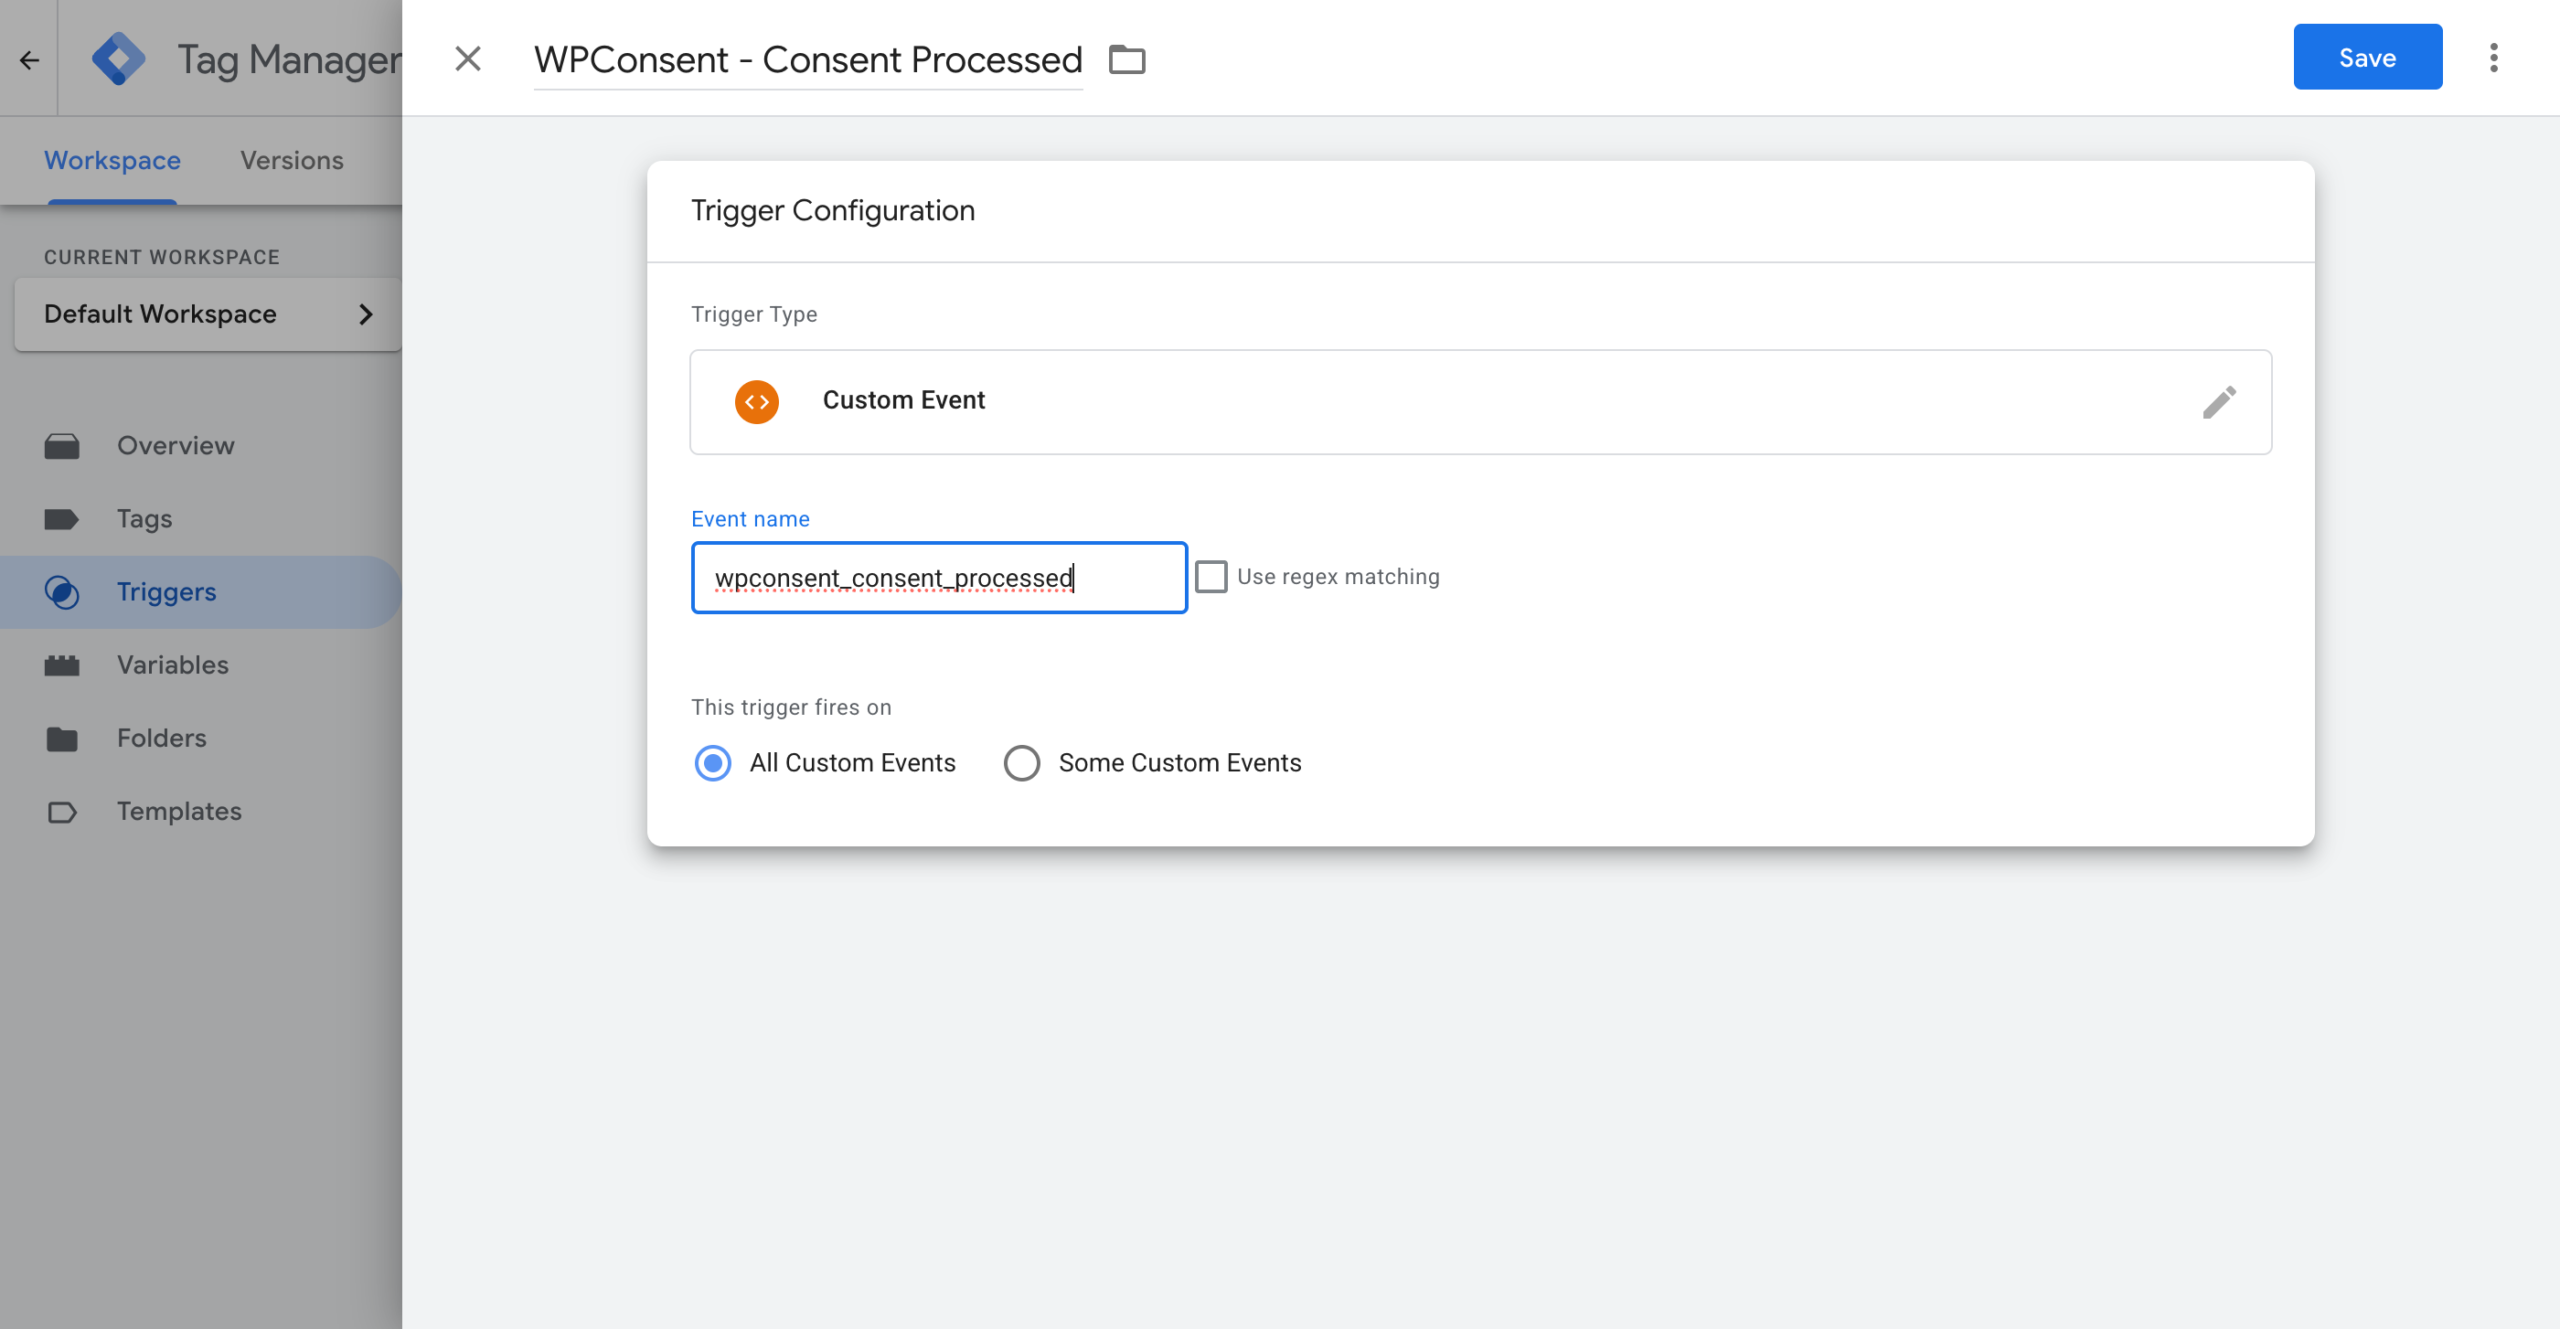
This trigger fires every time WPConsent pushes the consent event to the dataLayer.
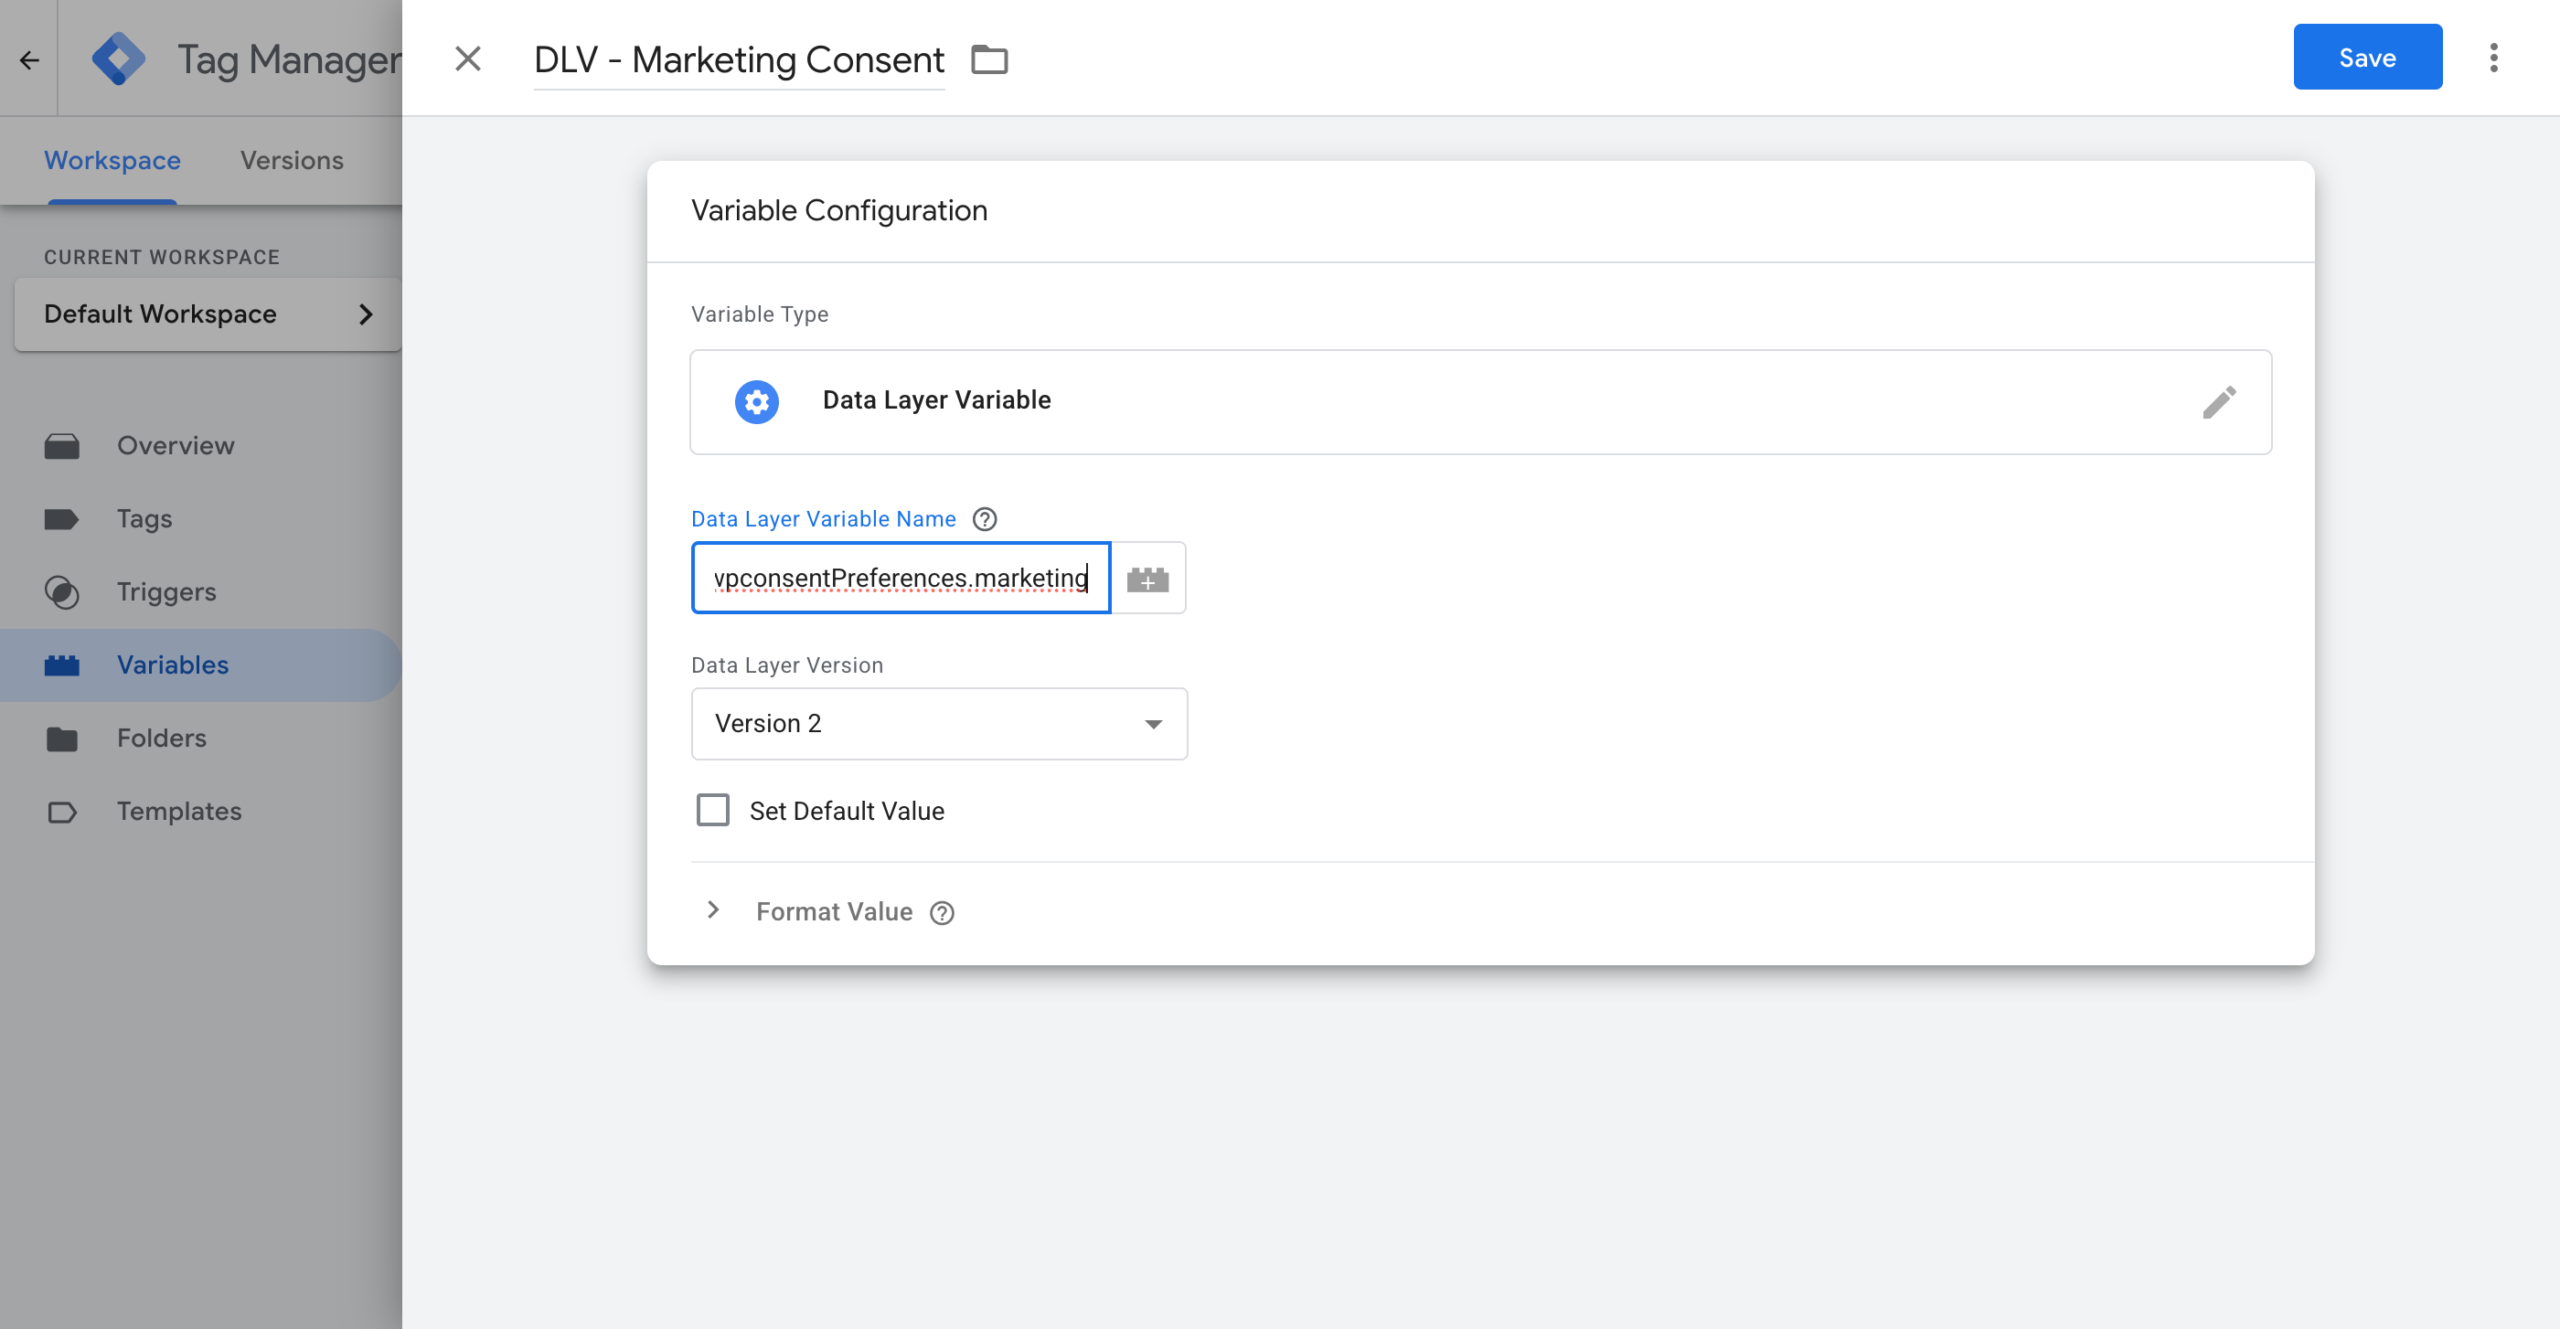
Creating data layer variables
Next, create a GTM variable for each consent category you want to check in your tag conditions.
Marketing consent variable:
- Go to Variables and click New under User-Defined Variables.
- Name it
DLV - Marketing Consent. - Click Variable Configuration and select Data Layer Variable.
- Set Data Layer Variable Name to
wpconsentPreferences.marketing. - Leave Data Layer Version as Version 2.
- Then click Save.
Statistics consent variable:
Repeat the same steps with these values:
- Name:
DLV - Statistics Consent - Data Layer Variable Name:
wpconsentPreferences.statistics
You now have 2 variables that return true or false depending on the visitor’s consent choices.
Creating service-level variables (optional)
Service-level variables require Toggle Services to be enabled in WPConsent >> Settings.
If you need to check consent for a specific service rather than an entire category, create a variable using the service slug.
For example, to check Google Analytics consent specifically:
- Create a new Data Layer Variable.
- Name it
DLV - Google Analytics Consent. - Set Data Layer Variable Name to
wpconsentPreferences.google-analytics. - Then click Save.
Replace google-analytics with the slug of any service in your WPConsent cookie database. Common slugs include facebook-pixel, google-ads, and hotjar.
Configuring tag firing conditions
Now attach the trigger and a consent condition to each tag that needs consent.
Example: Meta Pixel tag
- Open your Meta Pixel tag in GTM.
- Under Triggering, remove any existing triggers (like All Pages).
- Click the + icon to add a new trigger.
- Select your
WPConsent - Consent Processedtrigger. - Change This trigger fires on from All Custom Events to Some Custom Events.
- Add the condition:
DLV - Marketing Consentequalstrue. - Finally, click Save.
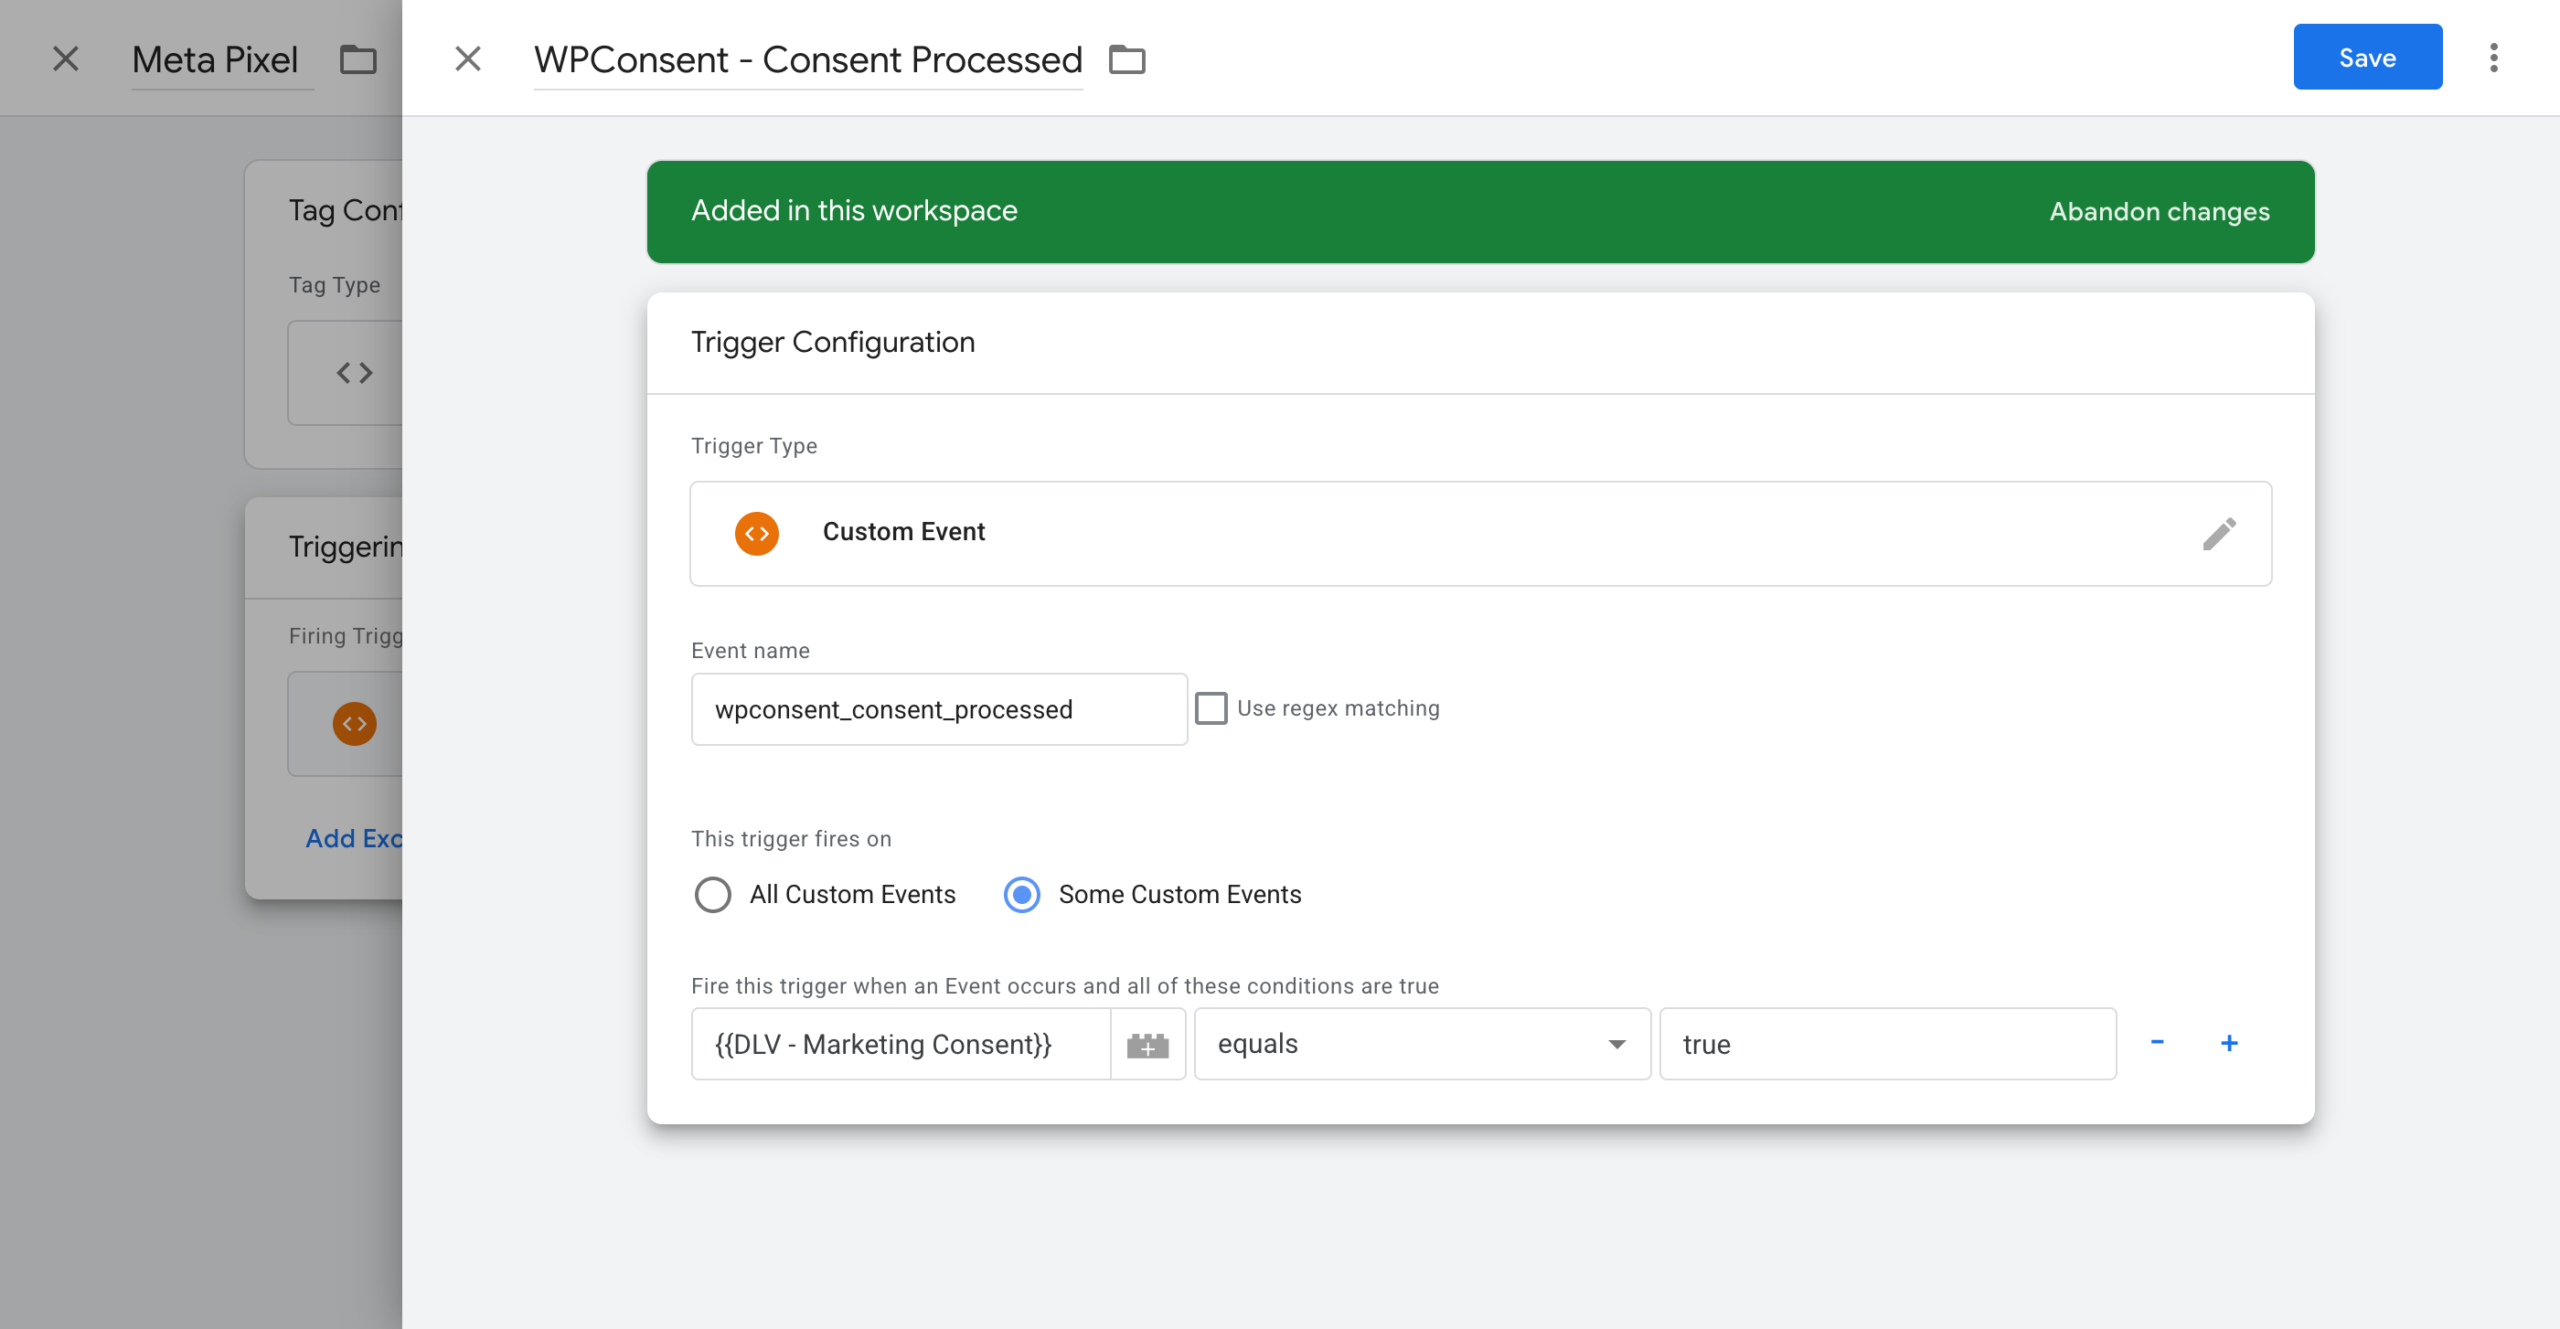
The Meta Pixel tag now fires only when both conditions are met:
- The
wpconsent_consent_processedevent appears in the dataLayer. - The visitor has granted marketing consent.
Example: Google Analytics tag (without Consent Mode)
If you aren’t using Google Consent Mode and want to control GA4 purely through GTM triggers:
- Open your GA4 Configuration tag.
- Replace its trigger with
WPConsent - Consent Processed. - Set it to fire on Some Custom Events where
DLV - Statistics Consentequalstrue. - Then click Save.
Tip: If you already use Google Consent Mode v2, you don’t need GTM triggers for GA4 or Google Ads tags. Consent Mode handles those automatically.
Handling returning visitors
The wpconsent_consent_processed event fires on every page load when saved preferences exist, not just on the initial banner interaction. This means your tag configuration from the previous step already handles returning visitors correctly.
When a visitor returns to your site with existing consent preferences:
- WPConsent reads the saved preferences cookie.
- It pushes the
wpconsent_consent_processedevent with the stored preferences. - GTM evaluates your trigger conditions and fires the appropriate tags.
No additional Page View triggers are needed.
Choosing between Consent Mode and GTM triggers
WPConsent supports 2 approaches for controlling tags, and you can use them together.
Google Consent Mode
Google Consent Mode v2 automatically controls built-in Google tags. When enabled, WPConsent sets default consent states to denied and updates them to granted when visitors accept cookies. Google tags then adjust their behavior automatically.
Best for: GA4, Google Ads, and other Google services that natively support Consent Mode.
GTM triggers (this guide)
Custom GTM triggers give you explicit control over when any tag fires. You decide the exact conditions.
Best for:
- Non-Google tags (Meta Pixel, LinkedIn, TikTok, HubSpot, etc.)
- Service-level control where you need to check individual services, not categories
- Tags from vendors that don’t support Google Consent Mode
- Situations where you want to see exactly when tags fire in GTM Preview mode
Using both together
The recommended setup for most sites is:
- Enable Google Consent Mode v2 for Google tags.
- Use GTM triggers from this guide for all non-Google tags.
Google tags benefit from Consent Mode’s cookieless measurement, which collects anonymized data even before consent. Non-Google tags need explicit triggers because they don’t understand Consent Mode signals.
Verifying your setup
Test your setup using GTM Preview mode before publishing.
- Click Preview in your GTM workspace.
- Open your site in the GTM debug browser tab.
- Clear your site cookies to simulate a new visitor.
- Reload the page. Your tracking tags shouldn’t fire yet.
- Accept all cookies in the WPConsent banner.
- In the GTM debugger, look for the
wpconsent_consent_processedevent in the Summary panel on the left. - Click the event. In the Data Layer tab, verify the
wpconsentPreferencesobject shows the correct values. - Check the Tags Fired section to confirm your tags fired after the consent event.
Testing the rejection flow:
- Clear your site cookies again and reload the page.
- Reject all cookies (or reject specific categories) in the banner.
- Verify your marketing tags didn’t fire.
- Verify statistics tags fired only if you accepted the statistics category.
Testing a returning visitor:
- Accept cookies, then navigate to a different page on your site.
- Confirm the
wpconsent_consent_processedevent fires on the new page load. - Confirm your tags fire based on the stored preferences.
Troubleshooting
Tags fire before consent is given
Make sure your tag uses the WPConsent - Consent Processed trigger with a consent condition. If the tag still has an All Pages trigger attached, it fires on page load before consent is processed. Remove the All Pages trigger.
Data layer variables show “undefined”
The wpconsentPreferences object only exists in the dataLayer after consent is processed. If you check the variable before the visitor interacts with the banner (and no saved preferences exist), it returns undefined. This is expected behavior.
The consent event doesn’t appear in GTM Preview
Verify that WPConsent’s cookie banner is enabled and that script blocking is active. If the banner is disabled, the frontend JavaScript doesn’t load, and no dataLayer events are pushed.
Also check that Google Tag Manager isn’t being blocked by WPConsent’s automatic script blocking. GTM is excluded from blocking when Google Consent Mode is enabled.
Service-level variables are missing
Service-level slugs only appear in the wpconsentPreferences object when Toggle Services is enabled in WPConsent >> Settings >> Cookies. Without this setting, the object only contains category-level properties (essential, statistics, marketing).
Tags fire on page load but not on consent event (or vice versa)
The wpconsent_consent_processed event fires both on initial consent and on subsequent page loads with saved preferences. If you notice tags firing only in 1 scenario, check your trigger configuration. The trigger needs to be set to All Custom Events or Some Custom Events with a consent condition, not limited to a specific page.
FAQ
Can I use this approach for non-Google tags like Meta Pixel or TikTok?
Yes. This guide works for any tag in GTM. The dataLayer event and variables aren’t specific to Google. You can use them to control Meta Pixel, LinkedIn Insight, TikTok Pixel, HubSpot, and any other tag.
Do I need GTM triggers if I already have Google Consent Mode enabled?
For Google tags (GA4, Google Ads), Consent Mode handles consent automatically, so you don’t need GTM triggers. For non-Google tags, you still need the GTM trigger approach from this guide because those vendors don’t support Consent Mode signals.
Why do my data layer variables show “undefined” before the banner appears?
The wpconsentPreferences object only exists in the dataLayer after consent is processed. Before a visitor interacts with the banner (and if no saved preferences exist), the variable returns undefined. Your tags won’t fire because the trigger condition isn’t met.
How do I check consent for a specific service instead of a whole category?
Enable Toggle Services in WPConsent >> Settings. Then create a data layer variable using the service slug, such as wpconsentPreferences.google-analytics. See the creating service-level variables section for details.
Conclusion
You’ve set up custom GTM triggers that fire tags only after visitors grant consent through WPConsent. Your tracking tags now respect each visitor’s cookie preferences, keeping your site compliant while still collecting the data you need.
To learn how WPConsent handles Google tags automatically, see the guide on setting up Google Consent Mode v2. For details on how WPConsent blocks scripts before consent, check out the automatic script blocking guide.