Want to keep your consent banner and cookie policy accurate? WPConsent lets you add, edit, and delete individual cookie entries so visitors always see up-to-date information. Managing cookies ensures your site stays transparent and compliant.
Table of contents
- Prerequisites
- Opening the cookies tab
- Understanding the cookie list layout
- Adding a cookie manually
- Assigning a cookie to a service
- Editing an existing cookie
- Deleting a cookie
- Working with scanner-detected cookies
- Writing effective cookie descriptions
- Verifying your setup
- FAQ
- Conclusion
Prerequisites
Before you begin, make sure you have:
- WPConsent installed and activated on your site. See our installation guide if you need help.
- Administrator access to your WordPress dashboard.
Opening the cookies tab
To get started, navigate to WPConsent >> Settings in your WordPress admin menu. Then, click the Cookies tab at the top of the page.
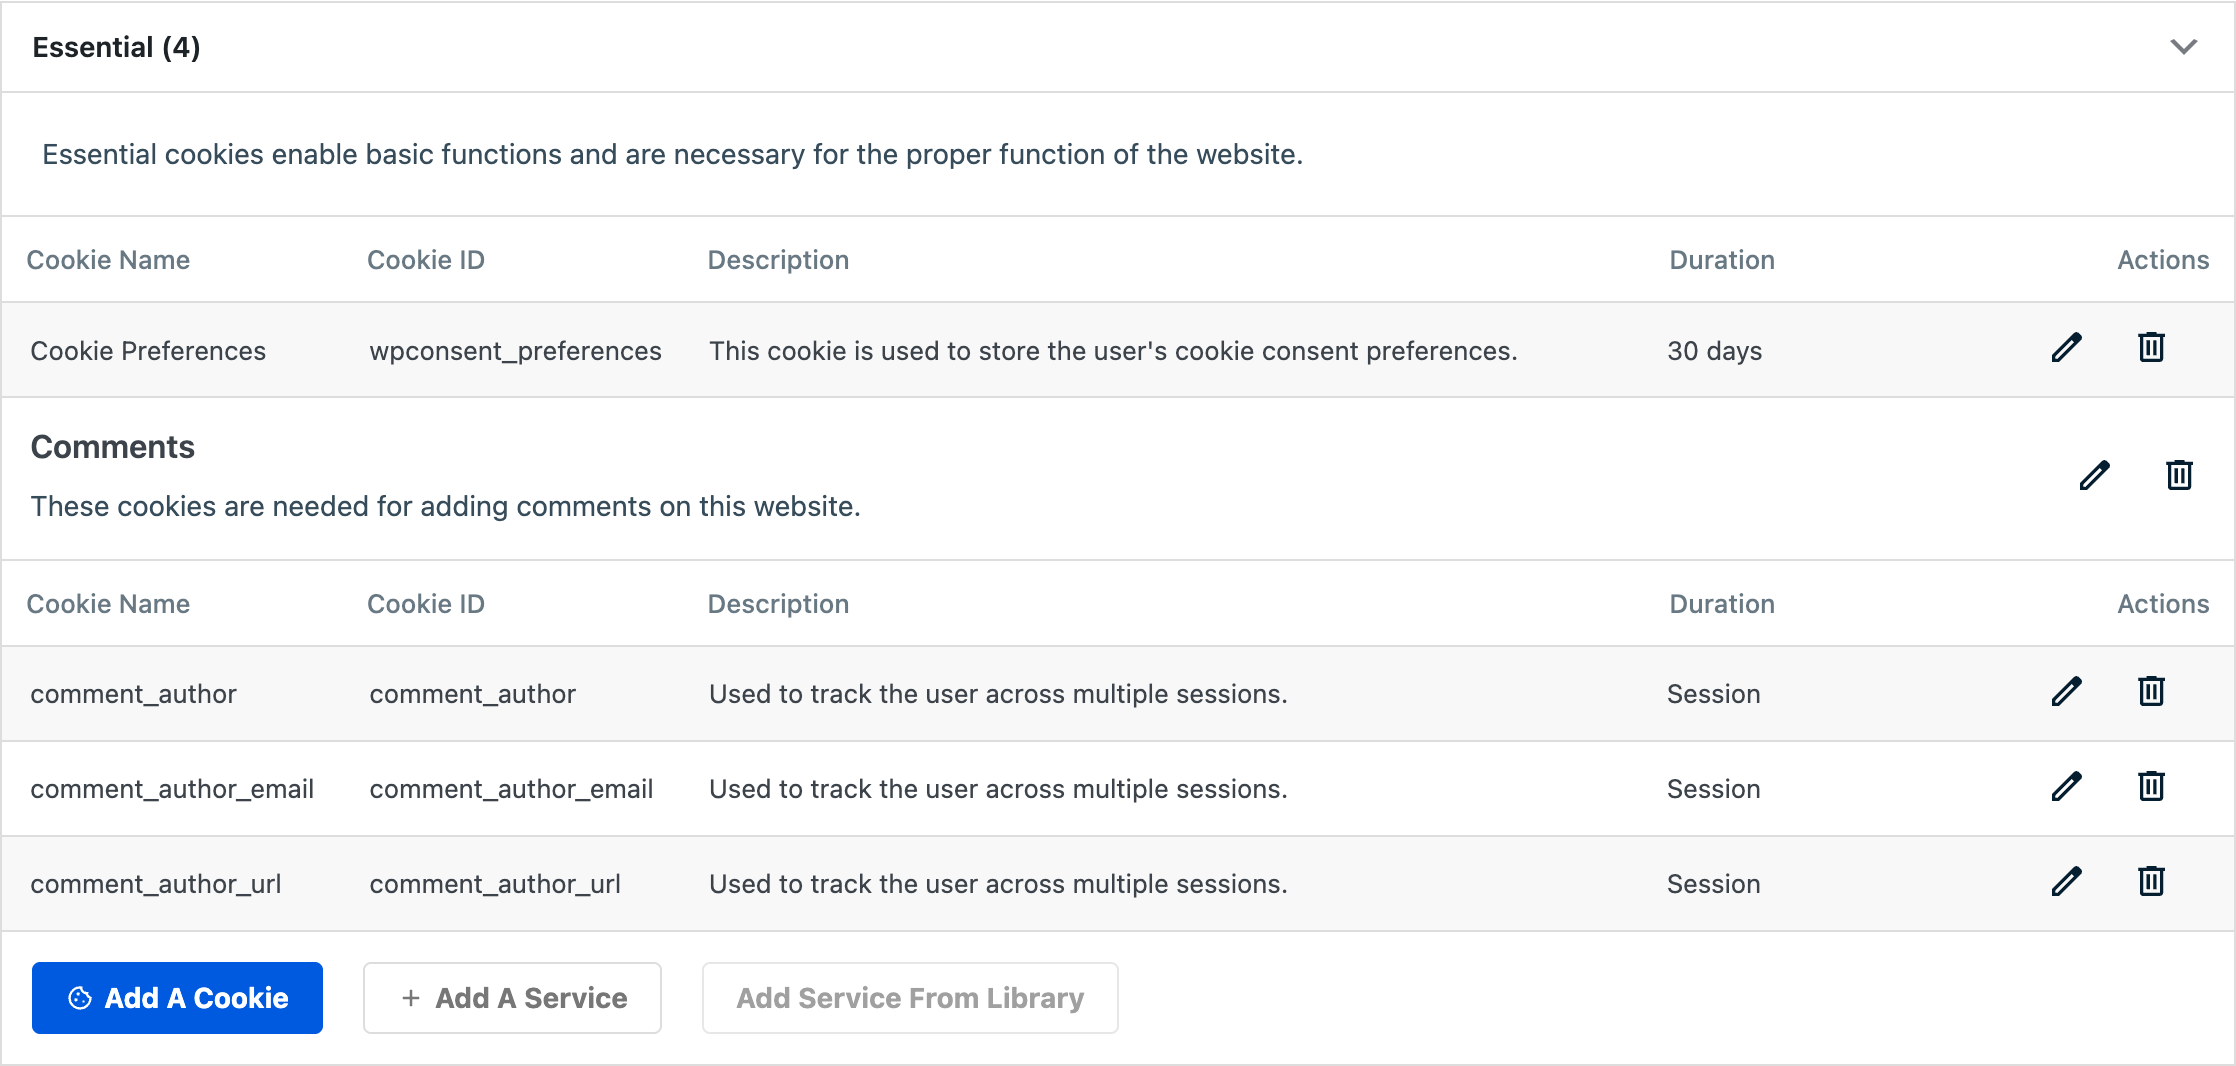
You’ll see an accordion listing your cookie categories. Each accordion header shows the category name and the number of cookies it contains in parentheses, for example, Essential (1). The first category is expanded by default.

Understanding the cookie list layout
Inside each expanded category, cookies appear in a table with 5 columns:
| Column | Description |
|---|---|
| Cookie Name | The human-readable name displayed to visitors. |
| Cookie ID | The technical identifier stored in the browser. |
| Description | A brief explanation of what the cookie does. |
| Duration | How long the cookie persists (for example, “30 days”). |
| Actions | Edit and delete buttons for the cookie. |
If the category contains services, each service appears as a labeled group within the category. Cookies belonging to a service are listed under that service’s header. Cookies not assigned to any service appear directly under the category header.
Adding a cookie manually
- First, expand the category where you want to add the cookie.
- Then, click the Add A Cookie button at the bottom of that category’s section.
- A modal dialog titled Add New Cookie opens with the following fields:
| Field | Required | Description |
|---|---|---|
| Service | No | A dropdown listing available services in this category. Defaults to “No service,” which assigns the cookie directly to the category. |
| Cookie Name | Yes | The display name visitors see (for example, “Google Analytics”). |
| Cookie ID | No | The technical cookie identifier stored in the browser (for example, _ga). |
| Description | No | A plain-language explanation of the cookie’s purpose. |
| Duration | No | How long the cookie lasts (for example, “2 years” or “Session”). |
- Fill in the fields and click Save.
The new cookie appears immediately in the list without a page reload. WPConsent saves it via AJAX and adds a new row to the table.
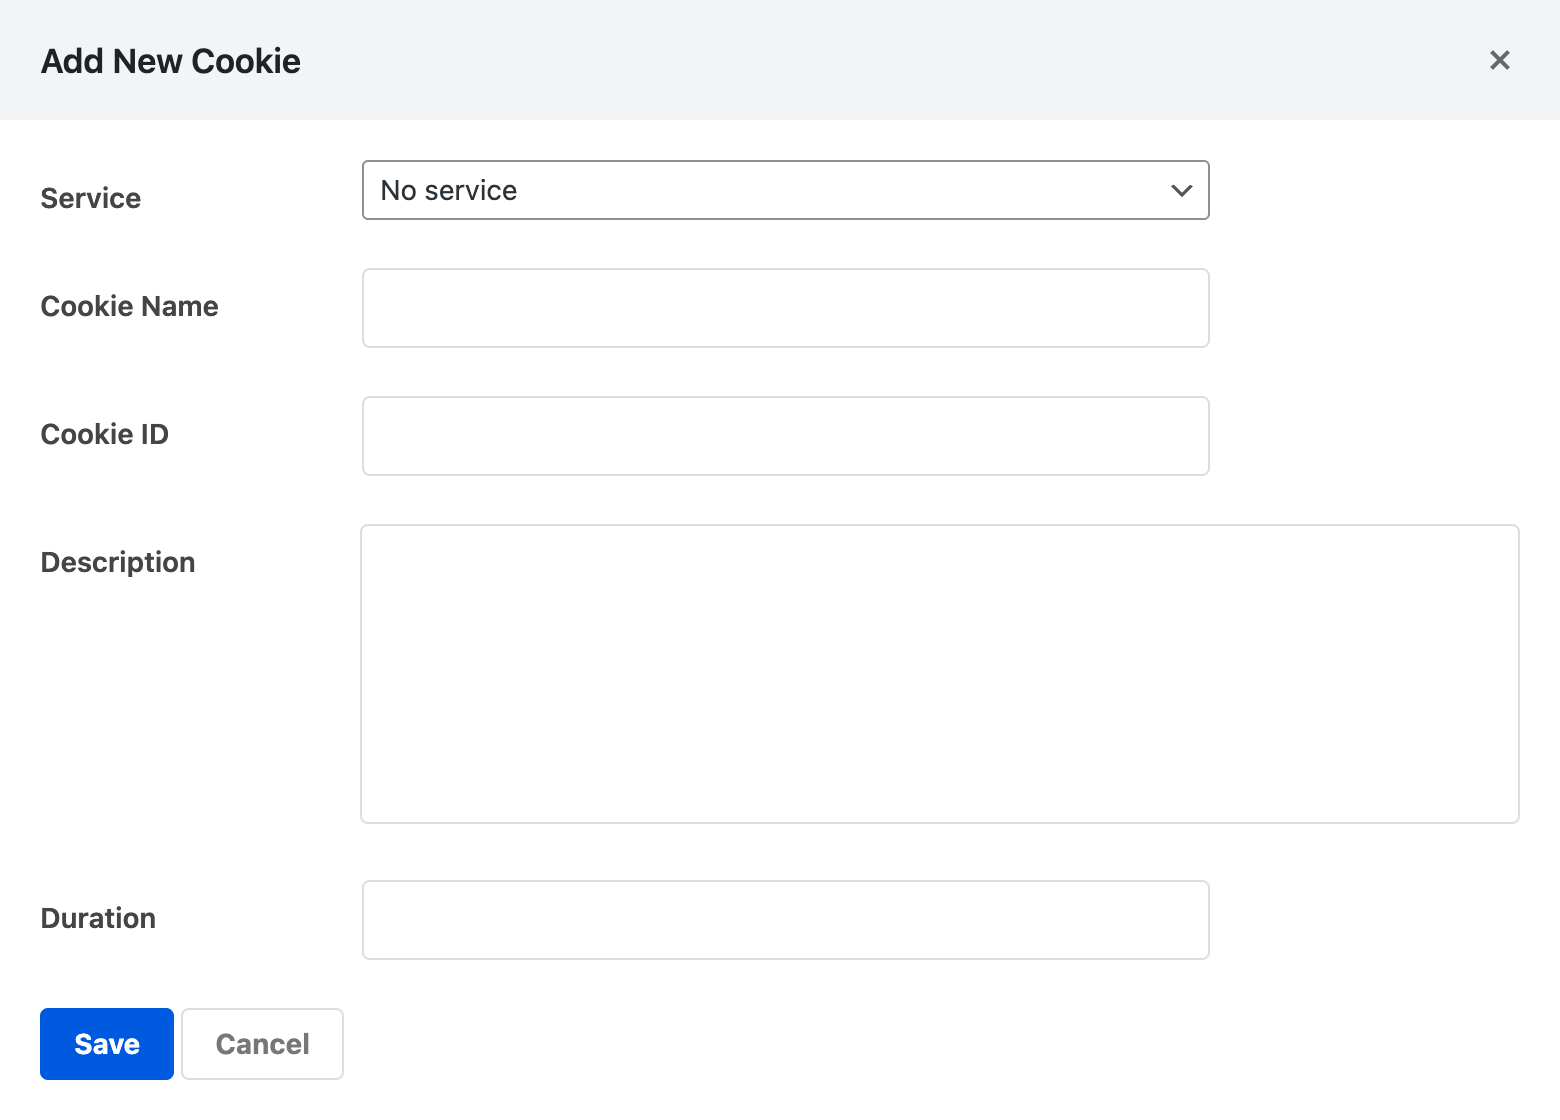
Note: The Cookie Name field is required. If you leave it empty, WPConsent displays an error and doesn’t save the cookie.
Assigning a cookie to a service
When you add or edit a cookie, the Service dropdown lists all services that belong to the current category. Select a service from the dropdown to group the cookie under that service in the list.
If you choose No service, the cookie is assigned directly to the cookie category instead. This is appropriate for cookies that your own website sets rather than a third-party service.
The Service dropdown updates dynamically based on the category. It only shows services that belong to that specific category. If you haven’t created any services in a category, the dropdown shows only the “No service” option.
To learn how to create and manage services, see our guide on managing services.
Editing an existing cookie
- First, find the cookie you want to edit in the list.
- Then, click the edit icon (pencil) in the Actions column.
- The Edit Cookie modal appears, pre-filled with the cookie’s current values.
- Update any field: Service, Cookie Name, Cookie ID, Description, or Duration.
- Finally, click Save.
The changes appear immediately in the cookie list.
Deleting a cookie
- First, find the cookie you want to remove.
- Then, click the delete icon (trash) in the Actions column.
- A confirmation dialog asks “Are you sure you want to delete this cookie?”
- Click OK to confirm.
The cookie is permanently removed from the database and disappears from the list.
Important: Deleting a cookie can’t be undone. The cookie entry is permanently removed. If you need it again, you’ll have to add it manually or re-run a scan.
Working with scanner-detected cookies
When you run a website scan and configure the detected services, WPConsent automatically creates cookie entries for each recognized service. These cookies are marked internally as auto-added.
You can edit auto-added cookies the same way you edit manual ones. Feel free to change the name, description, or duration to better match your preferences.
If you re-scan your site later and configure the results again, WPConsent skips cookies that already exist. It doesn’t overwrite your manual edits.
For more details on scanning, see our guide on scanning your website.
Writing effective cookie descriptions
Good cookie descriptions help your visitors make informed consent decisions. They also demonstrate compliance to regulators. Follow these guidelines:
- Be specific about purpose. Write “Stores your cookie consent preferences for this website” instead of “Used for functionality.”
- Mention data collected. If the cookie tracks page views or user behavior, say so. For example: “Collects anonymous statistics about how visitors navigate the website.”
- Use plain language. Avoid technical jargon. Your visitors aren’t developers.
- Include the service name. When a cookie belongs to a third-party service, mention it. For example: “Set by Google Analytics to distinguish unique users.”
- State the duration clearly. Use human-readable formats like “2 years,” “30 days,” or “Session” (for cookies that expire when the browser closes).
- Keep it concise. 1 to 2 sentences is enough. Descriptions appear in the preferences panel and cookie policy page where space is limited.
The free Cookie Library is a useful resource for looking up accurate descriptions and durations for common third-party cookies.
Pro Feature: With the paid version, you can import services and their cookies directly from the Cookie Library with 1 click using the Add Service From Library button. This saves you from looking up and entering cookie data manually.
Verifying your setup
To confirm your cookies are set up correctly:
- First, visit the cookie policy page on your site (the page with the
shortcode). Verify that your cookies appear under the correct categories and services. - Then, open the consent banner on your site and click Preferences. Check that each category lists the cookies you configured.
- Finally, in the Cookies tab, expand each category and verify that cookie names, IDs, descriptions, and durations are accurate.
FAQ
Why doesn’t my new cookie appear in the list?
Make sure you filled in the Cookie Name field. This field is required. If the save action failed, check your browser console for JavaScript errors and confirm your WordPress admin AJAX is working correctly.
Why does the Service dropdown show only “No service”?
The dropdown only lists services that already exist in the selected cookie category. If you need a service, create one first. Click Add A Service in the same category, or see our guide on managing services.
Why do scanner-detected cookies have generic descriptions?
The scanner populates cookies with default descriptions from the WPConsent service database. You can edit any cookie to improve its description. Click the edit icon and update the Description field with more specific language.
Can I undo a deleted cookie?
Deleted cookies can’t be recovered. You’ll need to add the cookie again manually or re-run a website scan to repopulate it. See our guide on scanning your website for help.
Conclusion
You now know how to add, edit, delete, and verify individual cookies in WPConsent. Accurate cookie records keep your consent banner and cookie policy trustworthy for visitors. To learn how to group cookies under third-party tools, we recommend reading about managing services next.