TL;DR:
Install WPConsent and let its scanner rebuild your cookie inventory, without turning on its banner yet. Compare that scan against what Cookiebot was blocking, then deactivate Cookiebot. Turn on the WPConsent banner and test it in a private window. Install takes a minute or two; the whole switch takes well under 15 minutes.
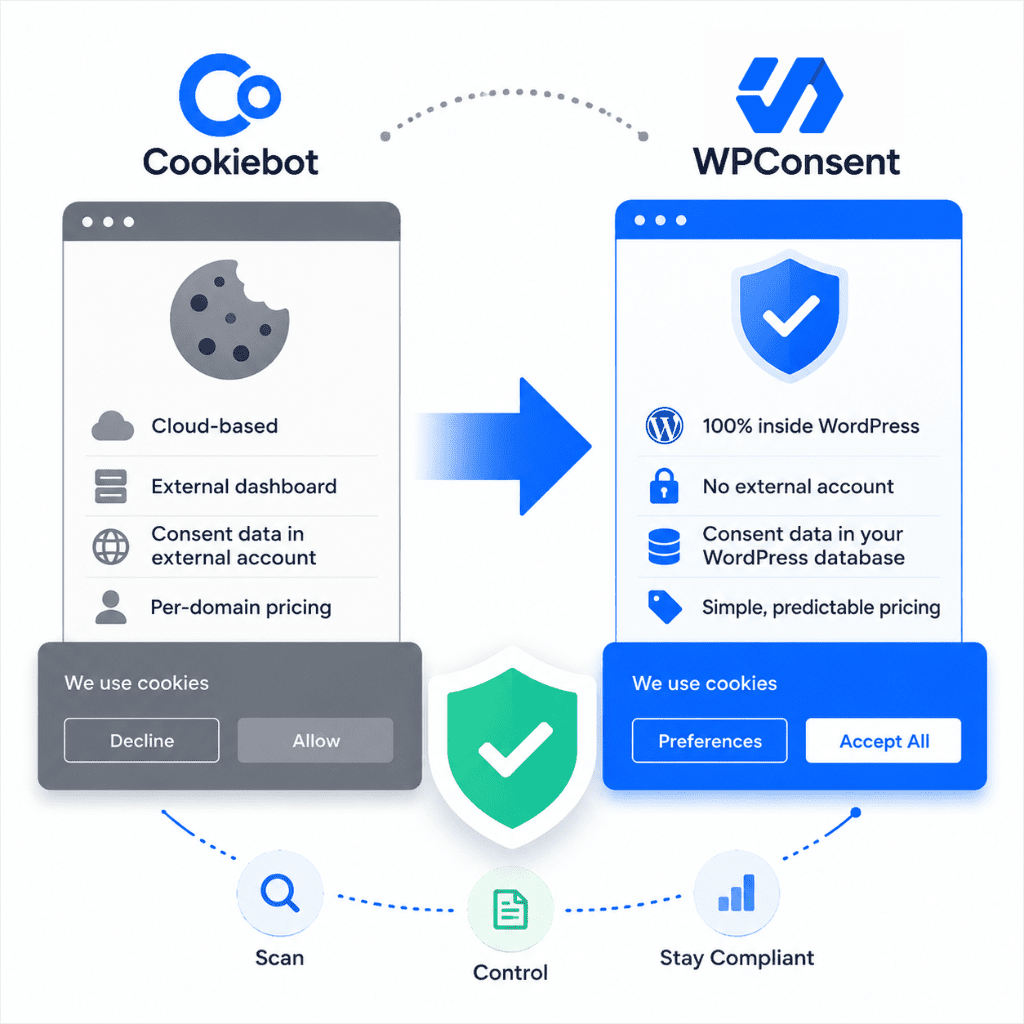
The main reason many people are looking to switch from Cookiebot to WPConsent is that WPConsent runs entirely inside WordPress.
The banner, the scanner, script blocking, Google Consent Mode v2, and your consent records all live in your own dashboard and your own database, not an external account.
Predictable pricing is the second reason WordPress users are quietly moving. Cookiebot’s per-domain plans have changed more than once without much warning.
If that’s what you’re after and you’re currently on Cookiebot, moving over is a straightforward switch.
The part that actually needs care isn’t the decision to switch.
It’s avoiding a stretch where no banner is live on your site, or two banners show at once while both plugins are briefly active.
We tested that exact scenario on a live site, deliberately, to see what actually breaks. By the end of this guide, you’ll have WPConsent fully configured and Cookiebot completely removed, with zero downtime in between.
Key Takeaways
- This is a fresh scan, not a data import. By design, WPConsent doesn’t pull Cookiebot’s settings or consent logs; it rebuilds your cookie inventory from scratch.
- Install WPConsent and run its scanner before touching the banner. Turning both banners on at once shows visitors two stacked consent dialogs.
- Deactivating Cookiebot and activating WPConsent’s banner are two separate, deliberate steps, done in that order.
- The free version of WPConsent covers everything this migration needs. Get WPConsent Pro for geolocation, auto re-scanning, or eCommerce setup.
- Your old Cookiebot consent records stay in your Cookiebot account, not in WordPress. Export them first if you need them for a compliance audit.
Cookiebot vs WPConsent
Before you switch, it helps to see the two side by side.
Not as a feature shootout, but as two different approaches to WordPress consent. Here’s where they actually differ for a migration like this one.
WPConsent Overview
WPConsent is a WordPress-native cookie consent plugin: banner, scanner, script blocking, and Google Consent Mode v2 all live inside your WordPress admin.
This means no external account or per-domain SaaS billing. The free version of WPConsent covers the essentials.
On the other hand, WPConsent Pro adds geolocation rules, automatic re-scanning, and eCommerce consent setup for sites that need them.
Check out this detailed WPConsent review for more details.
Cookiebot Overview
Cookiebot is a SaaS cookie consent platform.
Your banner and script-blocking rules are configured in the external cookiebot.com dashboard. Then, connected to your site with a domain group ID.
Consent data lives in Usercentrics’ cloud, not your WordPress database. The free plan caps out at one domain and 50 subpages.
Cookiebot vs WPConsent at a Glance
Here are the differences between these two top cookie consent plugins side by side.
| Factor | Cookiebot | WPConsent |
|---|---|---|
| Setup | External account required (cookiebot.com signup + domain group ID) | Native WordPress plugin, no external account |
| Where consent data lives | Usercentrics cloud | Your own WordPress database |
| Free tier | Capped at 1 domain / 50 subpages | Banner, scanner, script blocking, and GCM v2 all free, no domain cap |
| Migrating between the two | No import or export between CMPs, in either direction | Same, no import. The scanner rebuilds your inventory fresh instead |
| Banner templates | Pre-built per-law templates picked during onboarding | GDPR or CCPA templates, or fully custom, editable anytime in wp-admin |
Looking for more options? Check out our list of the best cookie consent plugins for WordPress.
How to Migrate from Cookiebot to WPConsent
Now that you understand the differences between WPConsent and Cookiebot, let’s show you how to migrate. We have broken this tutorial into easy-to-follow steps. Use the table of contents below to skip to the step you want to read.
- Before You Start
- Step 1: Install WPConsent
- Step 2: Run the Scanner Before Touching the Banner
- Step 3: Compare the New Scan Against What Cookiebot Was Blocking
- Step 4: Choose Your Banner Setup, Then Build It
- Step 5: Deactivate Cookiebot
- Step 6: Activate the WPConsent Banner
- What Happens to Your Old Cookiebot Consent Records
- FAQs: Moving from Cookiebot to WPConsent
- Migrate from Cookiebot to WPConsent, Free in Under 15 Minutes
- Additional Resources
With that out of the way, let’s dive in.
Before You Start
- What you need: WPConsent installed and active. We use WPConsent Lite in this tutorial to show that anyone can make the switch with zero downtime.
- Follow along with this tutorial: This guide is written for a first run. Every screen you’ll touch is reachable from the WPConsent menu in your WordPress sidebar.
- WPConsent Scan speed: Takes seconds.
- Cookie policy page: Keep yours handy, or regenerate it. If your current one is old or Cookiebot-generated, WPConsent can build a fresh one from the actual scan results. See how to create a cookie policy page in WordPress.
🔎 Not a Data Import: WPConsent doesn’t pull your existing cookie categories, consent logs, or banner settings from Cookiebot. Its scanner builds a fresh inventory of your site instead.
Step 1: Install WPConsent
Here’s how to get WPConsent installed, whichever version you’re using. Neither is required for the migration itself; install whichever you’re actually going to run.
Install WPConsent (Free)
If WPConsent isn’t on your site yet, this takes about a minute.
From your WordPress dashboard, go to Plugins » Add New Plugin. Type “WPConsent” into the search box in the top right.
Find the card for WPConsent and click Install Now, then once it finishes, click Activate.
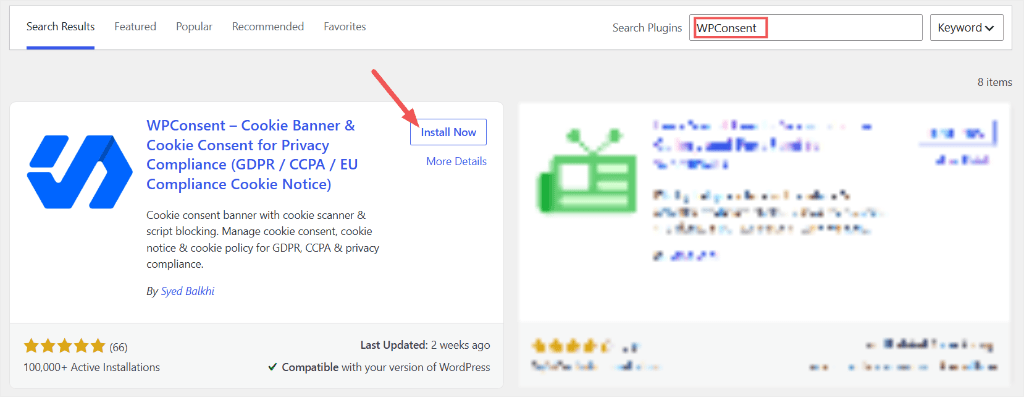
That’s the whole install.
The moment it activates, you have the full free version: the banner, the scanner, script blocking, Google Consent Mode v2, and the cookie policy generator. None of that sits behind a paywall or needs a license key to switch on.
Here is a detailed tutorial on how to set up WPConsent Lite.
Installing WPConsent Pro
You don’t need the pro version of WPConsent for this migration.
But if you manage more than one site, want geolocation display rules, automatic re-scanning, eCommerce consent setup, or the Do Not Sell addon you can start with it.
The installation process for the Pro version is slightly different.
After purchase, log into your WPConsent dashboard and navigate to the Downloads tab. Here, download the plugin file and copy the “License Key.” You will need it to activate the consent plugin.
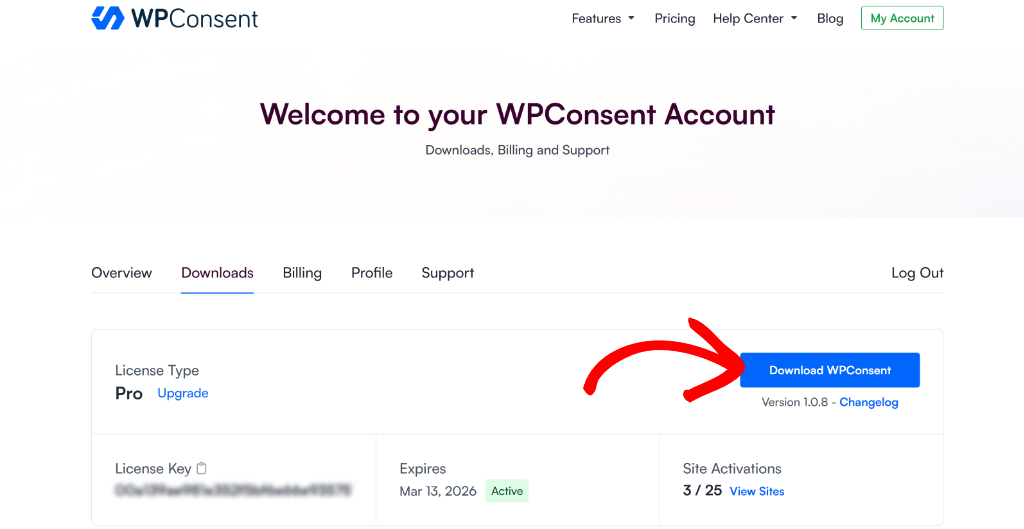
Then head back to your WordPress dashboard and install and activate the plugin like any other.
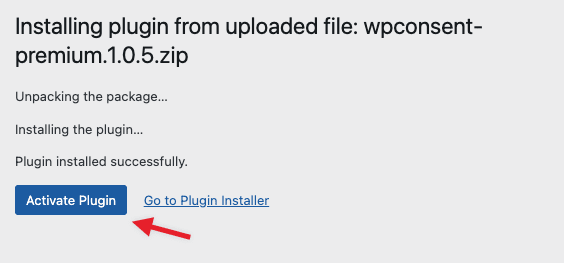
Here is a tutorial on how to set up WPConsent Pro.
That’s it. Either way, the banner stays off for now. Nothing shows on your site yet.
Step 2: Run the Scanner Before Touching the Banner
The moment WPConsent activates, it opens its own setup wizard automatically.
That’s a great shortcut if this is a brand new site or you don’t have another consent banner installed. It walks straight from scan to a live banner in a few clicks. This creates the double-banner issue while Cookiebot is still active.
So for this particular scenario, skip the setup wizard during migration.
Full wizard walkthrough: using the WPConsent setup wizard.
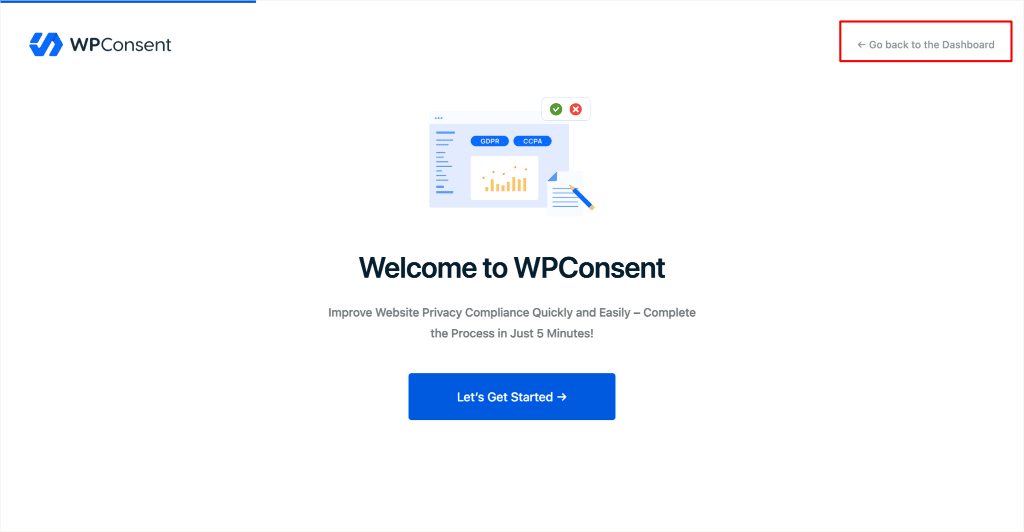
When the setup wizard pops up, hit the “Go back to the Dashboard” button at the top right of the screen.
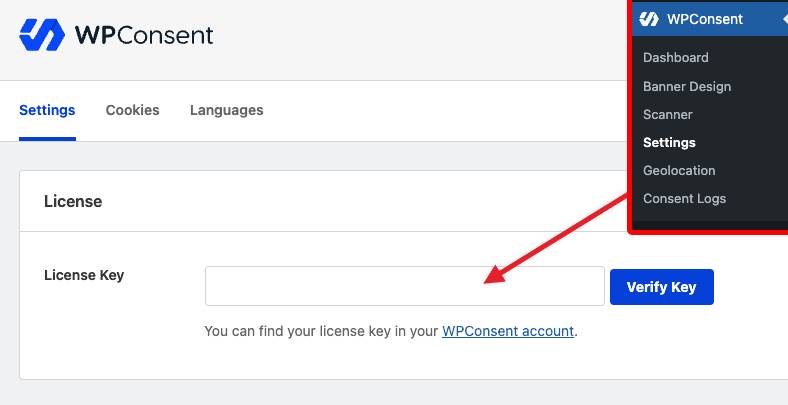
If you are on the Pro version, you will need to activate WPConsent manually instead of through the wizard. To do this, go to WPConsent » Settings. Paste the code and select “Verify Key.”
If on the free version, skip this step. Your plugin is fully active after initial installation and activation.
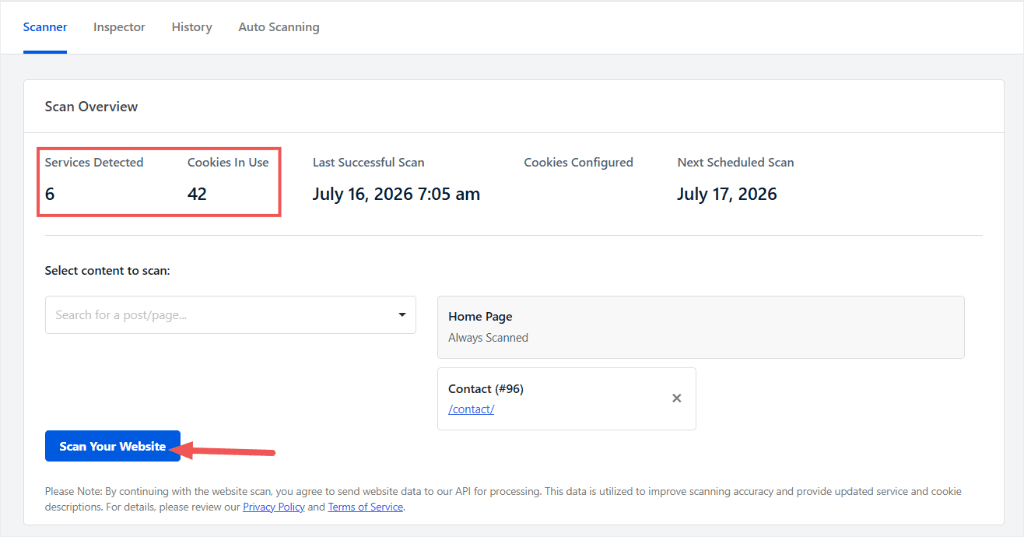
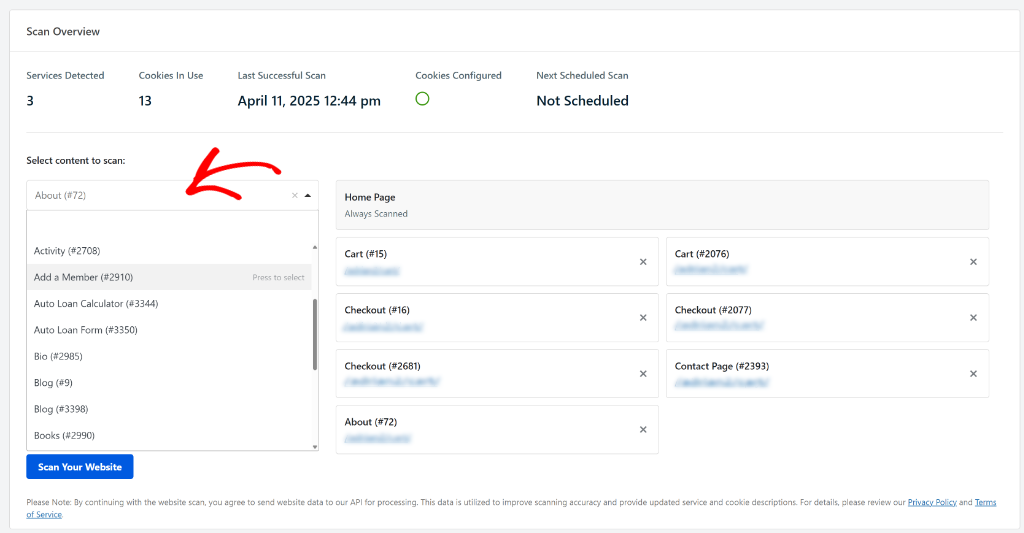
Next, go to WPConsent » Scanner and click Scan Your Website and let it run. After that, WPConsent will display the number of services detected, cookies in use, and other details.
This step matters because WPConsent doesn’t read anything Cookiebot has configured.
It crawls your live site and lists every script it finds that sets a cookie. On our test site, a fresh scan with Cookiebot’s script still running detected 6 services and 42 cookies.
It’s not copying Cookiebot’s list. It’s independently confirming what’s actually running on the page right now, including Cookiebot’s own script.
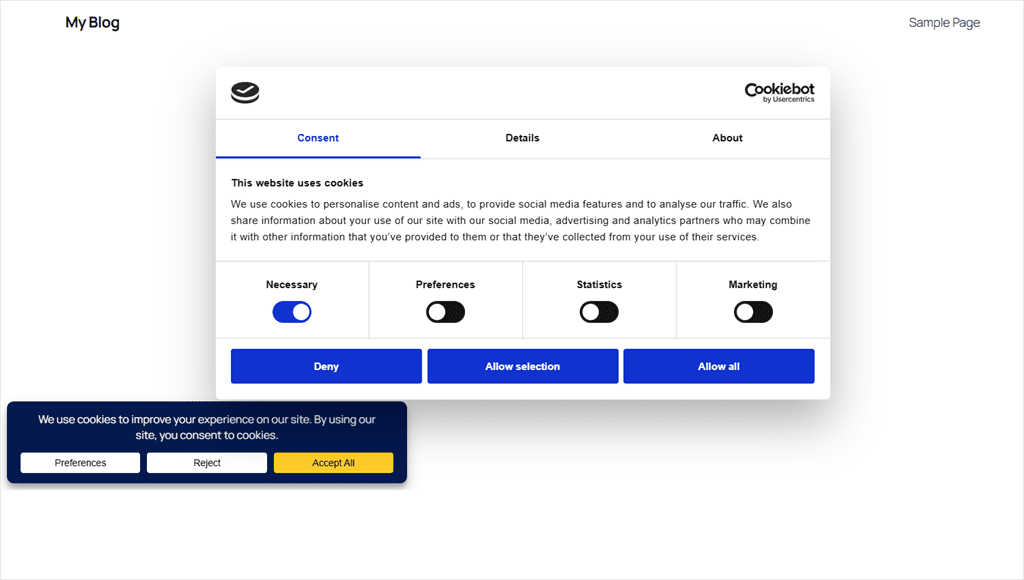
⚠️ Don’t Activate the Banner Yet: If Cookiebot’s banner is still live, turning WPConsent’s banner on now means visitors see both banners stacked on top of each other until you deactivate Cookiebot. We tested this too as you can see in the screenshot below.
It’s not a rendering glitch. Both plugins genuinely try to take control of the same consent flow at once.
Step 3: Compare the New Scan Against What Cookiebot Was Blocking
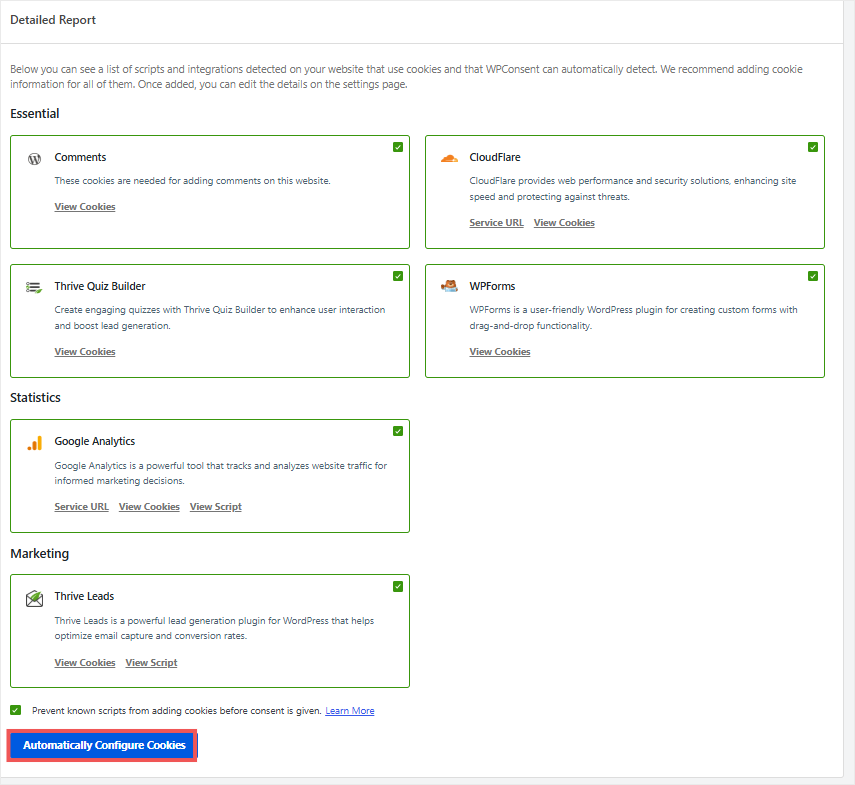
Still on the same “Scanner” tab page, scroll down to the Detailed Report section. WPConsent groups what it found into categories: Essential, Statistics, Marketing, and so on.
Check this against whatever Cookiebot was blocking under its own categories.
Remember, you’re not looking for an exact match; you’re checking that nothing Cookiebot was catching (analytics, ad pixels, embedded video) is missing from WPConsent’s list.
If something’s absent, scan the specific page it loads on. WPConsent’s home page scan is automatic, but other pages need to be added manually under “Select content to scan.”
Once you’re confident the coverage matches or exceeds Cookiebot’s, click Automatically Configure Cookies, so WPConsent can assign categories on its own.
Step 4: Choose Your Banner Setup, Then Build It
Before you touch the Banner Design screen, it helps to know what you’re actually setting up.
If your visitors are mostly in one region, choose which law your banner should follow: GDPR for Europe, CCPA for California, LGPD for Brazil, or a custom setup if the templates don’t apply.
That’s handled under WPConsent » Geolocation, and it’s a Pro feature, so it’s worth knowing it’s there even if you don’t set it up for this migration.
WPConsent already has ready-made templates with location-based rules for the three options, so you’re not building from scratch.
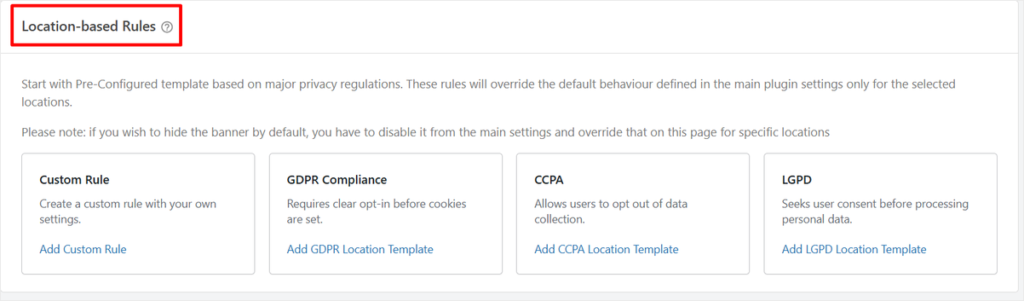
If your visitors are spread across regions, you can go a step further and show a different banner depending on where someone’s browsing from.
Check out this guide on how to set up location-based cookie consent in WordPress to get started. And the ultimate WordPress cookie consent requirements by country to see what templates to use and where.
Regardless of the geolocation rules you set up and the number of templates you use, the display banner design remains the same.
Let’s build the display banner next.
Go to WPConsent » Banner Design. This is where you shape the banner your visitors will see.
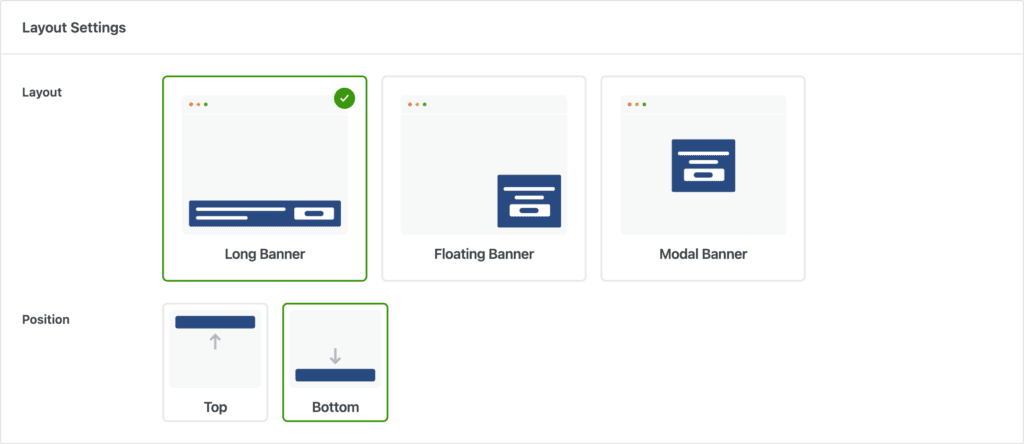
On the first page, set up the “Layout” from the options available using a checkbox.
You can place your banner as a Long Banner, Floating Banner, or Modal Banner.
Depending on the Layout you pick, you can also select different positions. For our example, we picked the Long Banner. In this case, our “Position” options are Top or Bottom.
Once done, go to the “Style” page.
Here, set up the colors, button size, type, and position. Check the screenshot below for a full breakdown of the customization options you have.
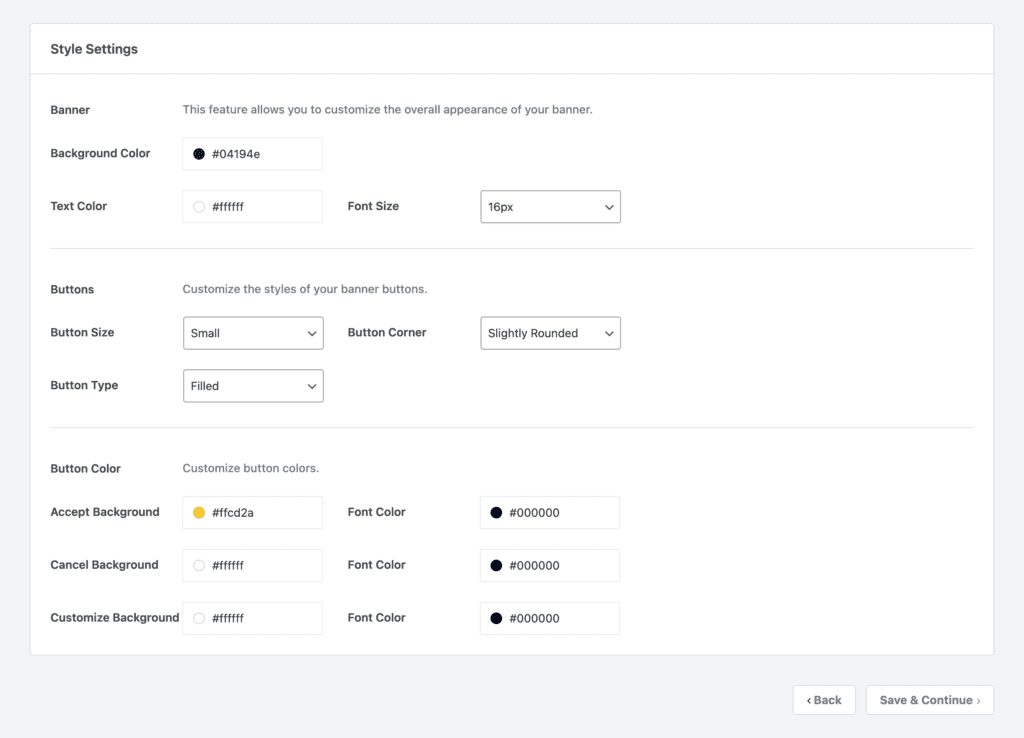
Finally, go to the “Content” screen.
In the Message box, you can customize the text to fit your audience or leave it with the default content.
You can customize the buttons’ position, disable the close button, add a logo, and more. Apart from that, you can edit the Preferences Panel Settings.
Check the screenshot below for more details.
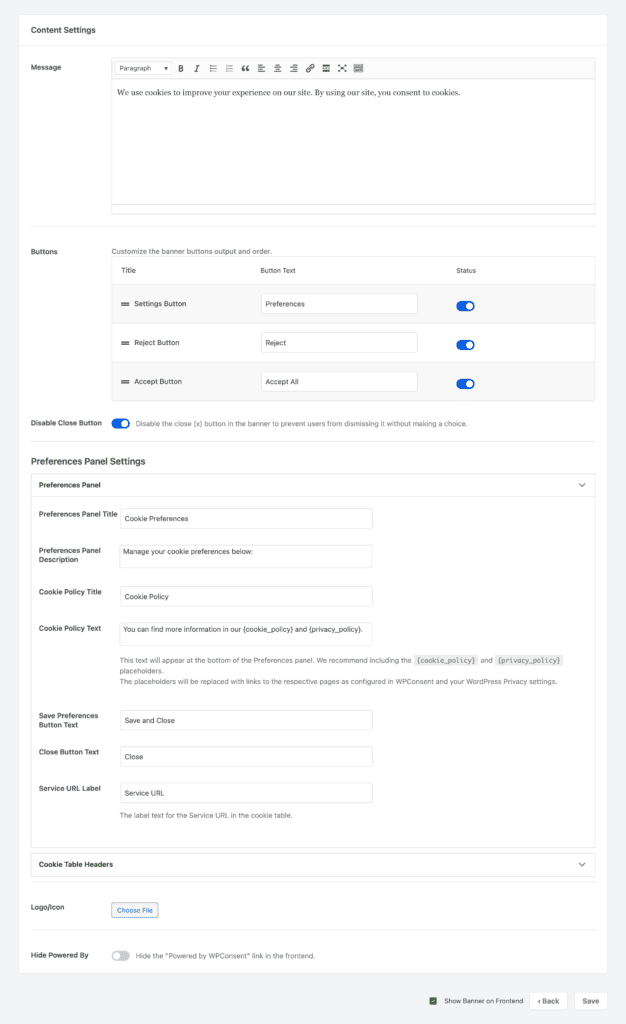
Want to test the banner before you deploy?
Once you design your banner, use the built-in preview to see how it will look live before removing Cookiebot. You can make more adjustments until you find what works for you.
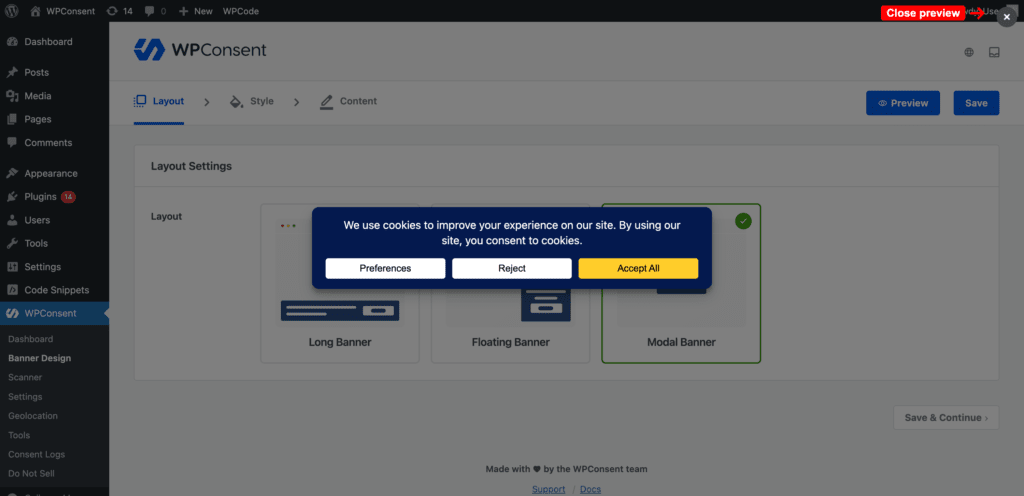
If you’ve come from Cookiebot, creating the banner used to live in an external dashboard. Here it’s a WordPress screen like any other.
There is a lot more you can do with your banner design. But the default settings are enough for this migration. You can always customize the banner later.
When you want to go deeper on every option, how to add a cookie consent banner on your WordPress website covers the full build.
That’s the banner built and ready. It stays off through Step 5; you’ll switch it on yourself in Step 6.
🔎 Carrying Over Google Consent Mode v2: If you had Google Consent Mode v2 running through Cookiebot, check WPConsent » Settings to confirm it’s active there too; it’s a separate toggle, not something that carries over automatically.
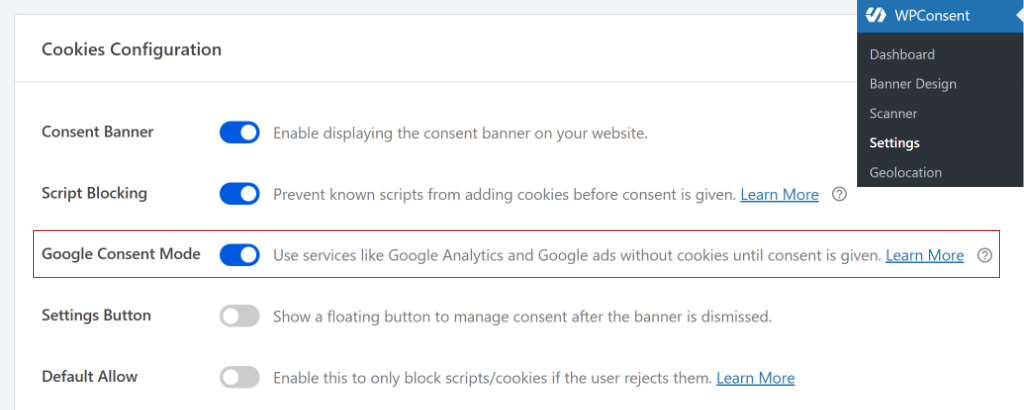
Here are tutorials on how to set up Google Consent Mode V2:
Step 5: Deactivate Cookiebot
With the WPConsent scan complete and the banner designed, go to Plugins » Installed Plugins and deactivate Cookiebot.
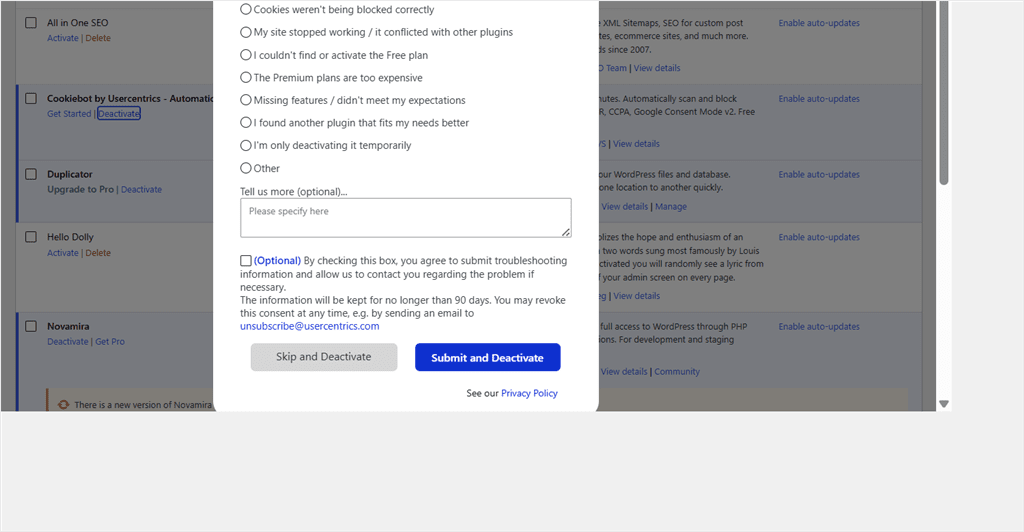
This is the step that actually matters for the double-banner problem from Step 2. With Cookiebot off, its script stops loading, and its banner disappears from the front end.
⚠️ Installed Cookiebot Manually?
If you added Cookiebot’s script yourself instead of through the plugin, pasted straight into your theme’s <head>, added via Google Tag Manager, or dropped in through a code-snippet plugin, deactivating “a plugin” won’t remove it. There’s no plugin to deactivate in that setup.
Go back to wherever you added it, delete the script tag directly, then clear your site’s cache (and any CDN cache) so a cached page doesn’t keep serving the old script.
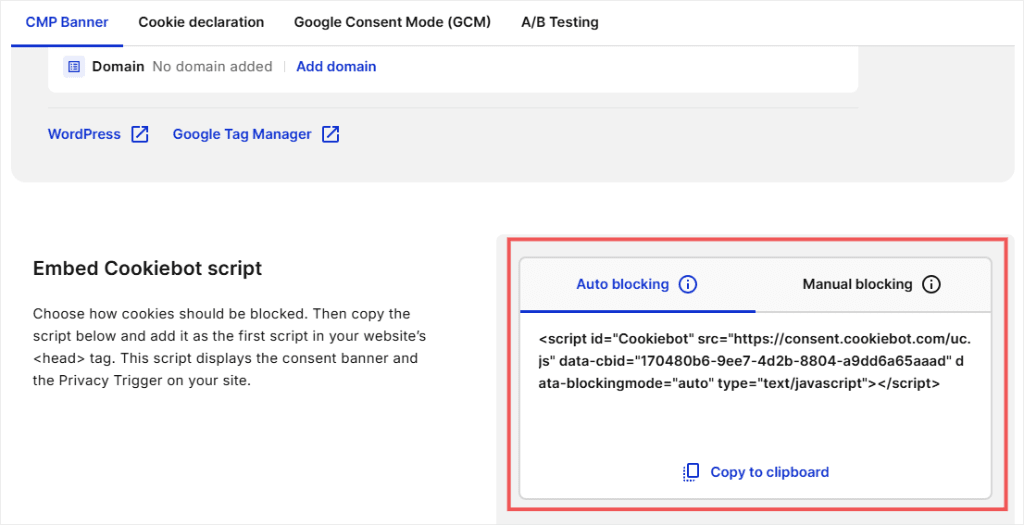
At this point, Cookiebot is completely removed from your site.
But WPConsent’s banner is configured but not yet turned on. So at this exact moment, your site briefly has no cookie banner at all. That’s expected, and it’s only for a few minutes before you complete the next step.
Step 6: Activate the WPConsent Banner
Now that Cookiebot is fully off, it’s safe to turn WPConsent’s banner on. Go to WPConsent » Settings » Cookies Configuration and enable the “Consent Banner” with the toggle button.
While on this page, you can also enable “Script Blocking” to prevent known scripts from adding cookies before consent is given.
There are more settings you can set up on this page, as the screenshot below shows. Go through them to see what applies to you before activating them.
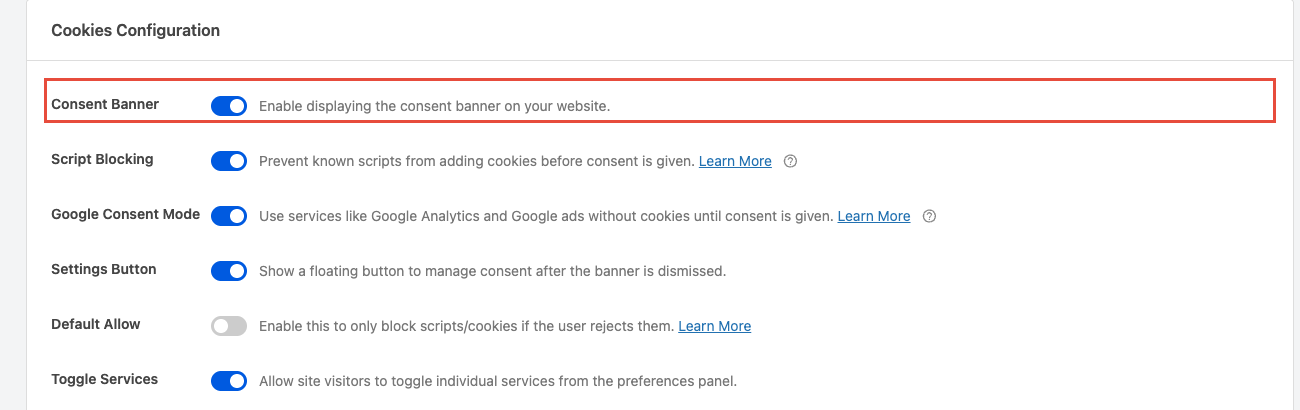
Once it’s on, open your site in a private or incognito browser window, not a regular tab where you might already have a cookie preference cached, and confirm exactly one banner appears.
Click through Accept and Reject to make sure both work.
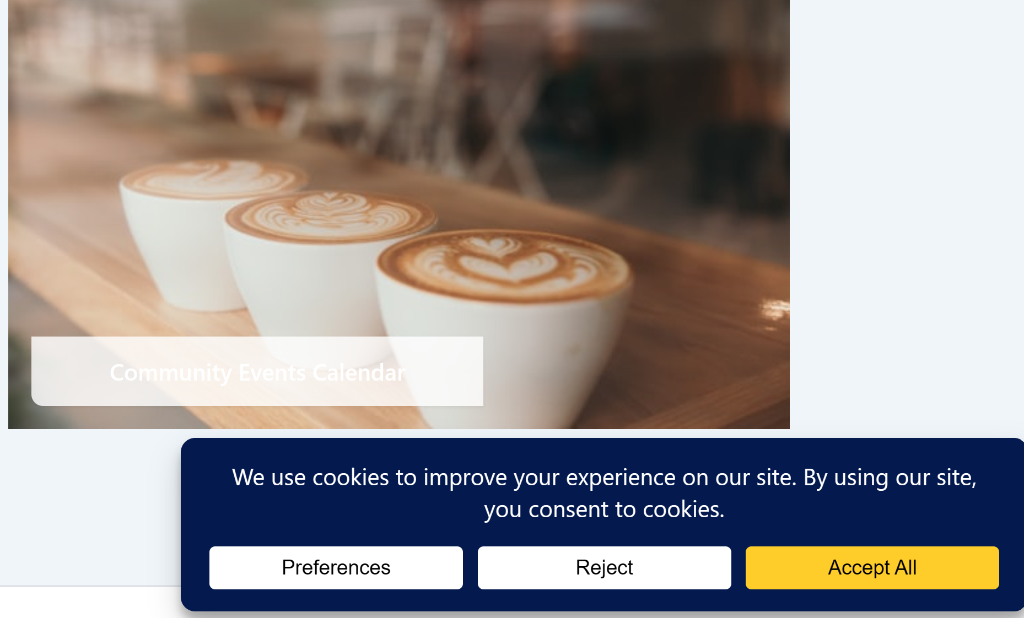
Your migration is complete. Cookiebot is off, WPConsent is live, and there was never a moment with two banners stacked or a long stretch with none at all.
What Happens to Your Old Cookiebot Consent Records
They stay exactly where they were: in Cookiebot’s own cloud dashboard, tied to your Cookiebot account.
WPConsent doesn’t read them, delete them, or import them. It starts a new, independent consent log in your own WordPress database from the moment its banner goes live.
If you need the historical records for a compliance audit, log in to your Cookiebot account and export them before you cancel the subscription.
Once the account is closed, that data isn’t accessible from WordPress no matter which plugin you’re running.
FAQs: Moving from Cookiebot to WPConsent
Will I lose my existing consent data when I switch from Cookiebot to WPConsent?
No. Your Cookiebot consent records stay in your Cookiebot account, and WPConsent doesn’t import them. It also doesn’t import your banner settings or cookie categories. Instead, it performs a fresh scan of your site and starts a new consent log in your WordPress database.
Will my visitors need to consent again?
Yes. WPConsent uses its own consent cookies, so visitors who previously accepted or rejected Cookiebot’s banner will be asked to make a new choice the first time they see your WPConsent banner. After that, their preference is stored by WPConsent, and they won’t see the consent banner on the next visit.
My site will have no banner for a few minutes. Is that a compliance risk?
Not if you complete the migration in one session. Your site only has no active banner for the short time between deactivating Cookiebot and enabling the WPConsent banner, which typically takes just a few minutes.
Do I need to cancel my Cookiebot subscription, or does deactivating the plugin stop billing?
Yes. Deactivating the Cookiebot plugin only removes it from your site. If you no longer need the service, log in to your Cookiebot account and cancel your subscription separately to stop future billing.
Does WPConsent support cookie banners in multiple languages?
Yes. WPConsent’s automatic translation feature uses AI to translate your banner text and cookie details into 70+ languages with one click, so visitors see the banner in their own language. This is a WPConsent Plus feature, so it’s not part of the free version, but worth knowing about if you serve visitors in more than one language.
Do I need to reconfigure Google Consent Mode after switching?
Yes. WPConsent has its own Google Consent Mode v2 toggle under WPConsent » Settings, separate from whatever Cookiebot had configured. It’s a one-time setup, not an automatic carryover.
Can I run Cookiebot and WPConsent at the same time during the switch?
No. Install WPConsent, run the scanner, and build your banner first. Then deactivate Cookiebot before enabling the WPConsent banner to avoid showing visitors two consent banners at the same time.
Can I show a different banner to visitors in different countries?
Yes. WPConsent’s geolocation rules let you show a GDPR banner to European visitors, a CCPA notice to Californians, and nothing to everyone else. You start from a GDPR or CCPA template, or build your own, then attach it to the regions you choose.
Can WPConsent create a new cookie policy page for me?
Yes. WPConsent can generate a cookie policy page from your latest scan results, so it reflects the cookies currently running on your site instead of relying on an outdated or manually created policy.
Migrate from Cookiebot to WPConsent, Free in Under 15 Minutes
You now have a site with one consent banner, one script-blocking system, and a fresh compliance record that’s stored in your own database instead of someone else’s cloud.
No pageview caps, per-domain billing, or surprise renewal.
And you’ve barely scratched what WPConsent can do.
A banner you can shape per region, a policy page that rebuilds itself from a real scan, consent records in your own database: all of that was sitting a click away while you switched.
The scanner did the hard part of the migration. The rest of the plugin is yours to explore whenever you need it.
Get WPConsent for free →
See WPConsent pricing →
Additional Resources
Still deciding, or want to see how WPConsent stacks up against other tools first? These cover the decision from a few different angles.
- 7 Best Cookiebot Alternatives for WordPress (2026 Compared): see how WPConsent compares to every other Cookiebot alternative, not just this one migration path
- 6 Best WordPress Cookie Consent Plugins (2026 Compared): a wider view of the category if you’re still comparing options
- CookieYes vs. WPConsent: Which is Best for WordPress in 2026?: useful if you’re weighing more than one alternative before committing
- The Ultimate Guide to WordPress and CCPA Compliance for Beginners: See how to set up CCPA in WordPress in simple steps.