Need to control how your consent banner, script blocking, and cookie preferences work together? The WPConsent general settings page is where you enable the banner, choose a consent model, manage cookie categories, and set up content blocking. This guide walks you through every option on the general settings page.
Table of contents
- Prerequisites
- Opening the settings page
- Enabling the consent banner
- Enabling script blocking
- Enabling Google Consent Mode
- Enabling the settings button
- Choosing a consent model
- Enabling service-level toggles
- Managing cookie categories
- Selecting a cookie policy page
- Setting up content blocking
- Setting the consent duration
- Enabling consent logs
- Enabling auto scanning
- Saving your changes
- Verifying your setup
- FAQ
- Conclusion
Prerequisites
Before you begin, make sure you have:
- WPConsent installed and activated on your site. If you haven’t done this yet, check out our installation guide.
- Administrator access to your WordPress dashboard.
- At least 1 completed scan so that cookie categories and services are populated. See our guide on scanning your website.
Opening the settings page
To get started, navigate to WPConsent >> Settings in your WordPress admin menu. The Settings tab is selected by default. All of the options described below appear on this tab inside the Cookies Configuration section.
Enabling the consent banner
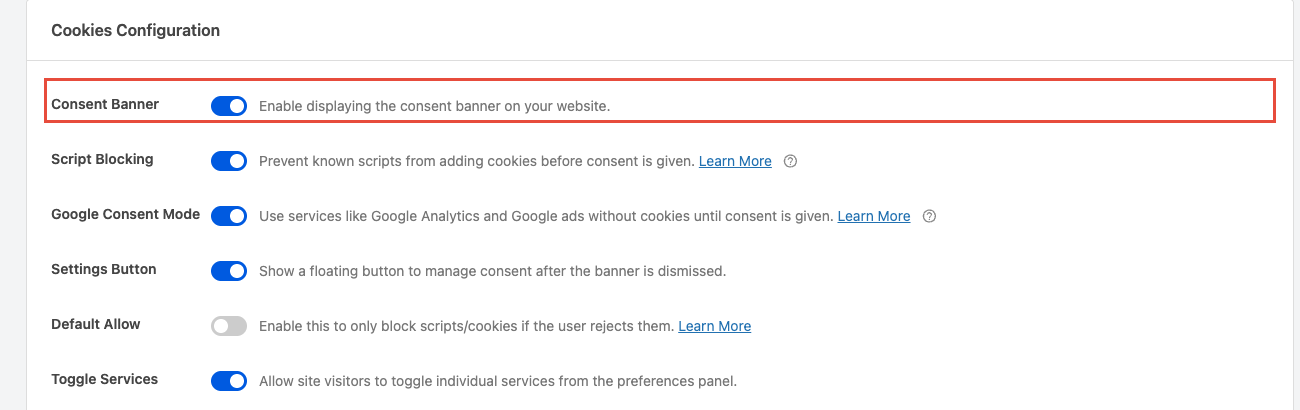
The Consent Banner toggle is the master switch for the entire plugin. When you turn it on, WPConsent displays your configured banner to visitors. When it’s off, no banner appears and script blocking is automatically disabled.
To enable it, flip the Consent Banner toggle to the on position.
Note: You can design and preview your banner under the banner design page before turning this on.
Enabling script blocking
The Script Blocking toggle prevents known third-party scripts from running before a visitor gives consent.
To enable it, flip the Script Blocking toggle to the on position.
Note: Script blocking requires the Consent Banner toggle to be enabled first.
For more details on how blocking works, see our guide on automatic script blocking.
Enabling Google Consent Mode
The Google Consent Mode toggle activates Google Consent Mode v2 integration. When it’s on, Google services like Analytics and Ads run in a cookieless mode until the visitor gives consent. After consent is granted, full tracking activates.
This toggle is enabled by default. Like script blocking, it requires the Consent Banner toggle to be active.
Enabling the settings button
The Settings Button toggle displays a small floating button on your site. This button lets visitors reopen the consent preferences panel after they dismiss the banner. It gives visitors a way to change their consent choices at any time.
To enable it, flip the Settings Button toggle to the on position.
You can customize the icon and appearance of this button on the Style tab of the banner design page.
Choosing a consent model
The Default Allow toggle controls whether your site uses an opt-in or opt-out consent model:
- Off (default): Opt-in mode. All non-essential scripts and cookies are blocked until the visitor explicitly accepts them. This is the standard approach for GDPR compliance.
- On: Opt-out mode. Scripts and cookies are allowed by default and only blocked if the visitor actively rejects them. This model may be suitable for certain US privacy regulations but is generally not GDPR-compliant.
Pick the mode that matches the privacy regulations applicable to your audience.
Enabling service-level toggles
The Toggle Services toggle controls how much granularity visitors get in the preferences panel:
- Off (default): The preferences panel shows toggles only at the cookie category level (for example, Analytics, Marketing).
- On: Visitors see individual toggles for each service within a cookie category. A visitor can accept analytics cookies overall but disable a specific analytics service.
To enable it, flip the Toggle Services toggle to the on position.
Managing cookie categories
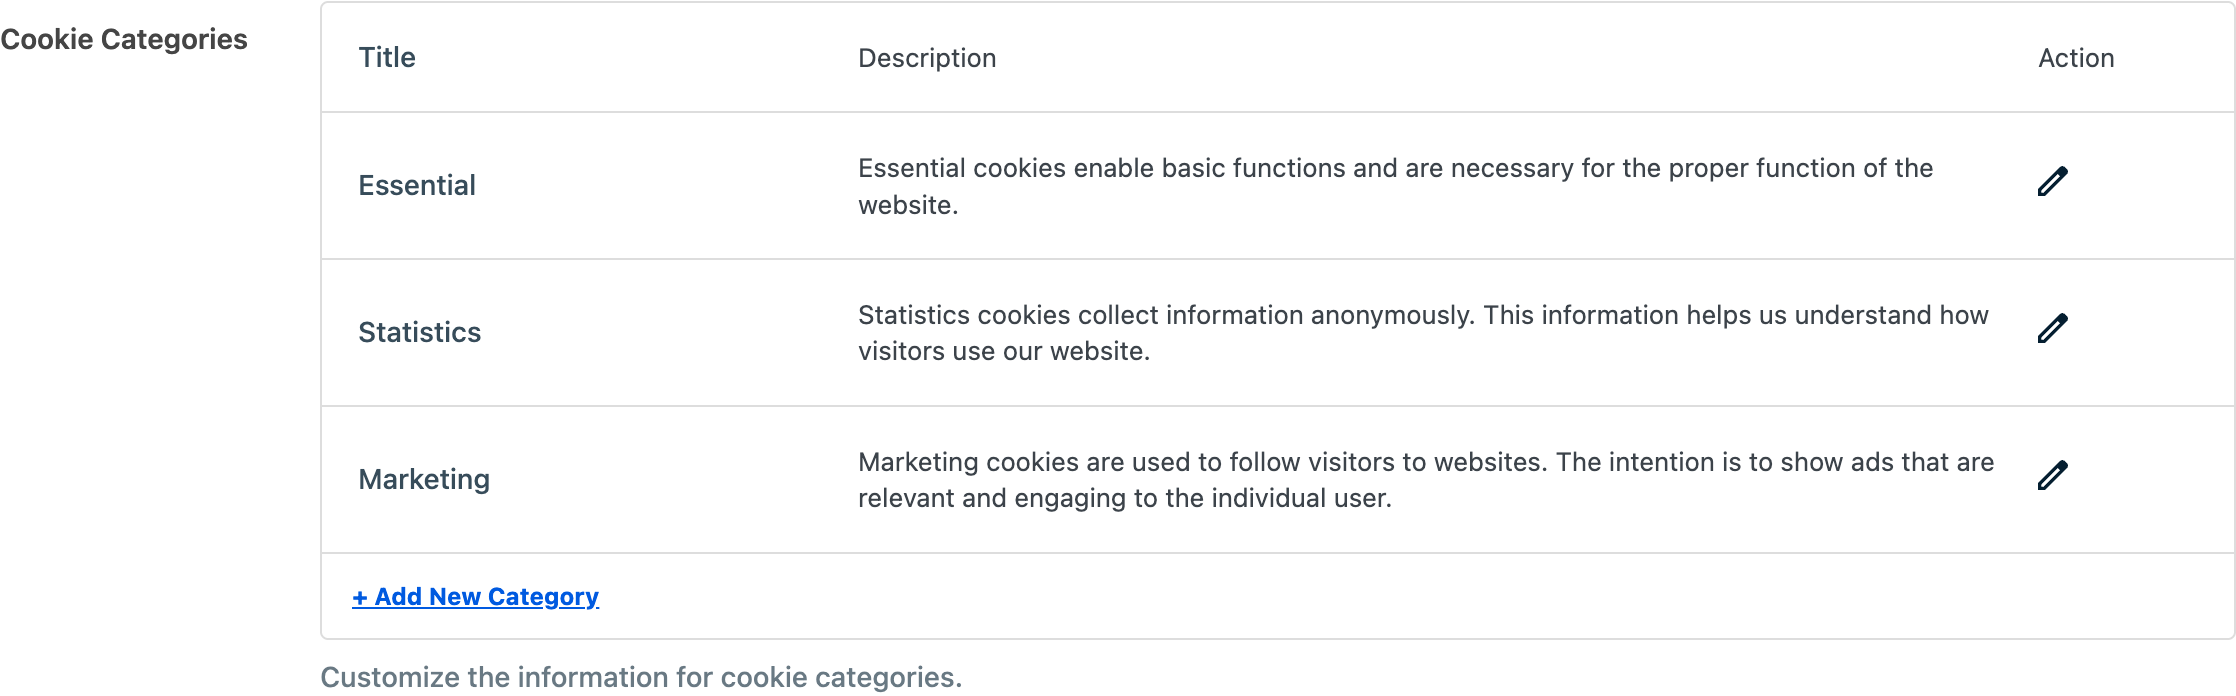
The Cookie Categories section displays all cookie categories configured on your site. Each category shows its name and description.
You can perform 3 actions here:
- Edit a category: Click the edit icon to update the category name or description.
- Delete a category: Click the delete icon to remove a custom category. Default categories (such as Functional, Analytics, and Marketing) can’t be deleted.
- Add a new category: Click + Add New Category to create a custom cookie category.
Categories appear as toggleable sections in the preferences panel on the frontend.
Selecting a cookie policy page
The Cookie Policy dropdown lets you search for and select a WordPress page to serve as your cookie policy. The selected page is linked from the {cookie_policy} placeholder in the banner content preferences panel text.
If no page is selected, a Generate Cookie Policy Page button appears. Click it to create a new page with the shortcode automatically inserted.
Setting up content blocking
The Content Blocking toggle blocks third-party services that use iframes (such as YouTube embeds, Google Maps, or social media widgets) from loading before the visitor gives consent. A placeholder replaces the blocked content.
To enable it, flip the Content Blocking toggle to the on position. 2 additional options appear:
Content to block
A multi-select dropdown where you choose which content providers to automatically block. Only services that use iframes are listed.
Placeholder button text
The text shown on the placeholder button that replaces blocked content. Use the {category} placeholder to dynamically insert the name of the relevant cookie category (for example, “Click here to accept Marketing cookies and load this content”).
Setting the consent duration
The Consent Duration field sets how many days a visitor’s consent choice is remembered. After this period, the banner reappears and the visitor must provide consent again. The default value is 30 days.
Enter a number in the Consent Duration field to change it.

Enabling consent logs
Pro Feature: This feature requires the paid version.
The Consent Logs toggle tells WPConsent to keep records of consent for all visitors. Logs are stored entirely on your WordPress site (self-hosted). This is useful for demonstrating compliance during audits.
Enabling auto scanning
Pro Feature: This feature requires the paid version.
The Auto Scanning toggle enables automatic background scanning of your website on a set interval. When you turn it on, a Scan Interval dropdown appears with 3 options: Daily, Weekly, or Monthly. WPConsent automatically detects new cookies and services without requiring manual scans.
Saving your changes
After configuring your settings, click the Save Changes button at the bottom of the page to apply your configuration.
Verifying your setup
Follow these steps to confirm everything works:
- Open your site in a new incognito or private browser window.
- Confirm the consent banner appears if you enabled it.
- Open browser developer tools and go to Application >> Cookies. Verify that third-party scripts don’t set cookies before you click Accept All.
- If content blocking is enabled, confirm that iframes show a placeholder until consent is given.
- If the settings button is enabled, click the floating button and verify it reopens the preferences panel.
FAQ
Why doesn’t my banner appear on the site?
First, confirm the Consent Banner toggle is enabled and that you clicked Save Changes. Then clear any page cache or CDN cache. If you use a caching plugin, exclude WPConsent scripts from minification or deferral.
Why can’t I enable script blocking?
Script blocking requires the Consent Banner toggle to be enabled first. Turn on the banner, then enable script blocking.
Why doesn’t the content blocking placeholder appear?
Make sure the Content Blocking toggle is enabled and at least 1 service is selected in the Content to Block dropdown. The blocked service must use an iframe for the placeholder to appear.
Why does the consent banner keep reappearing for my visitors?
Check the Consent Duration value. The default is 30 days. If visitors report seeing the banner repeatedly, increase this value. Also investigate whether your caching setup is clearing WPConsent cookies.
What’s the difference between opt-in and opt-out mode?
Opt-in mode (the default) blocks all non-essential cookies until the visitor accepts them. Opt-out mode allows cookies by default and only blocks them if the visitor actively rejects. Most GDPR-covered sites need opt-in mode. Some US privacy regulations permit opt-out mode.
Conclusion
You now have a complete understanding of every option on the WPConsent general settings page. The most important step is enabling the Consent Banner toggle, which activates all other consent features on your site. From there, enable script blocking, choose your consent model, and customize cookie categories to match your needs.
To customize how your banner looks and what text it displays, head over to our guide on banner layout options.