Short Answer
WPConsent tells Google Tag Manager what each visitor chose, using a dataLayer event called wpconsent_consent_processed. First, check that WPConsent’s Default Allow setting is off and Script Blocking is on. In Google Tag Manager (GTM), create a Data Layer Variable for wpconsentPreferences.marketing. Then create a Custom Event trigger that fires only when it equals true. Swap your tag’s All Pages trigger for that one, and test it in Preview.
Key Takeaways
- Consent Mode only changes how Google’s own tags behave. TikTok, Meta, Hotjar, and most other non-Google tags ignore it.
- WPConsent sends each visitor’s choice to GTM on the free plan, every time they choose and on every page after.
- The event fires on Reject too, so your trigger needs the condition “marketing equals true”.
- GTM’s Preview mode shows the proof: the tag stays under Tags Not Fired until the visitor accepts.
Your cookie banner tells visitors you’ll wait for their choice before tracking them.
WPConsent keeps that promise for the scripts it can see on your WordPress site. But tags you load through Google Tag Manager (GTM) work differently.
GTM’s All Pages trigger fires as soon as a page loads, before the visitor has touched your banner.
So your TikTok Pixel, for example, can fire before anyone clicks Accept.
You don’t need a developer to ensure your Google Tag Manager tags fire only after consent. WPConsent already tells GTM what each visitor chose, so all you have to do is give GTM a way to listen for it.
In this guide, we’ll show you how to make any non-Google tag wait for consent, using one variable and one trigger. Then we’ll prove it works in GTM’s Preview mode.
Use the table of contents below to navigate the article.
Why Consent Mode Doesn’t Hold Your Non-Google Tags
If you set up Google Consent Mode v2 in GTM, your Google tags already respond to your banner. It’s easy to read that as “all my tags wait,” but only Google’s own tags do.
Consent Mode is a set of signals that Google’s own tags read.
When a visitor hasn’t agreed yet, a Google Analytics or Google Ads tag either waits or limits what it sends, depending on the mode.
Google has two versions of this.
In Advanced consent mode, your Google tags load straight away and send cookieless pings whenever consent is denied, including after a Reject. In Basic consent mode, they don’t load at all until the visitor agrees.
Most tags from other companies ignore consent mode.
As of October 2026, Google’s own help page on consent mode puts it plainly: “Non-Google tags will not change their behavior based on consent mode.”
That covers most of the other tags people add to GTM:
- TikTok Pixel
- Meta Pixel
- LinkedIn Insight Tag
- Pinterest Tag
- Hotjar
Leave your Google Analytics 4 (GA4) and Google Ads tags on Consent Mode. They don’t need the trigger we’re about to build.
With that sorted, here’s how to make your non-Google tags wait.
How to Fire GTM Tags Only After Consent
The setup takes five steps. The first happens in WordPress, and the other four happen in Google Tag Manager.
Before you start, you’ll need:
- Google Tag Manager installed on your WordPress site.
- Access to edit your GTM container.
- The free WPConsent plugin, with its cookie banner set up.
We’ll use a TikTok Pixel as the example. Every step works the same way for any non-Google tag.
Step 1: Check Three WPConsent Settings (Free)
Before you build anything in GTM, make sure WPConsent is sending a signal you can trust.
The next four steps all read that signal. If WPConsent says “everything allowed” before anyone has clicked, your tag fires on the first page no matter which trigger you build.
To check, go to WPConsent » Settings in your WordPress dashboard.
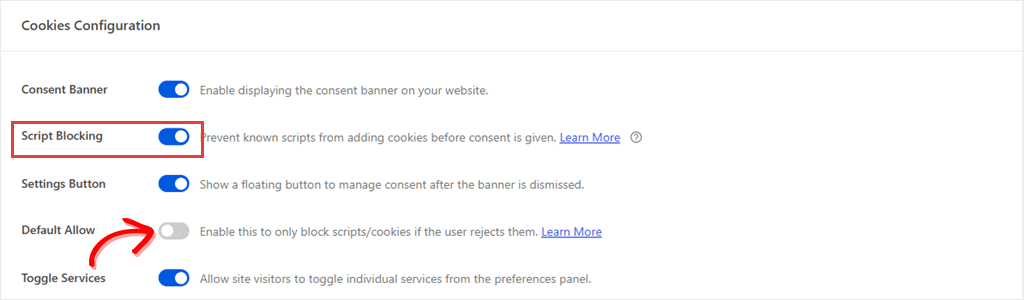
If your site asks visitors before tracking them (opt-in), look for these three settings on that page:
- Consent Banner is on.
- Script Blocking is on.
- Default Allow is off.
Not sure which kind of site you run?
With Default Allow off and Script Blocking on, WPConsent waits for each visitor to choose. That’s called opt-in. If you use location rules, some regions may work differently (see the note below).
Here’s why these settings matter.
With Default Allow on, WPConsent treats every new visitor as if they agreed. With Script Blocking off, it isn’t holding anything back.
Either way, WPConsent tells GTM “yes to everything” on the first page, before the visitor clicks anything. Your Step 3 trigger then can’t tell a real Accept from an automatic one.
Wondering if Script Blocking will block GTM itself?
Not while Google Consent Mode is on, which is the default. In our test, GTM loaded before any choice was made. It’s the tags inside GTM that need the trigger.
⚖️ Running opt-out on purpose?
Some sites track visitors by default and stop only when they say no. That’s called opt-out. On these sites, your tags fire on the first page, and that’s expected. They stop once the visitor opts out.
Using location rules (paid plans)? Each region follows its own rule. For example, the CCPA preset is opt-out, so visitors it covers see tags fire from the first page.
If you changed anything, save your settings and clear your site’s page cache, so visitors get the new version. Then you’re ready to move over to GTM.
Step 2: Create a Variable That Reads the Visitor’s Choice
GTM needs one simple question answered here: did this visitor allow marketing?
Every time a visitor makes a choice, WPConsent sends a short message to GTM. It sends the same message again on every page they visit after that.
There’s nothing to switch on. WPConsent does this on its own, on the free plan.
The message looks like this:
{
  event: 'wpconsent_consent_processed',
  wpconsentPreferences: {
    essential: true,
    statistics: true,
    marketing: true
    // ...plus one entry per service if Toggle Services is on, like 'facebook-pixel': true
  }
}
You don’t need to paste this anywhere. We added it in the article so you can see what GTM will read.
Each category is a plain true or false.
To read the marketing answer, open your container in Google Tag Manager and click Variables in the left menu.
Scroll down to User-Defined Variables and click New.
Click Untitled Variable at the top of the panel and rename it DLV - Marketing Consent.
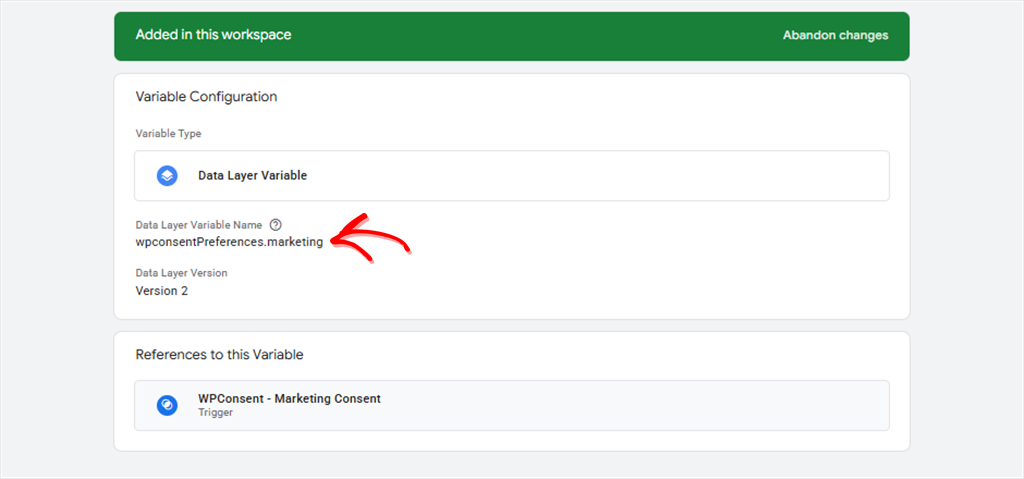
Next, click Variable Configuration and choose Data Layer Variable.
In Data Layer Variable Name, type this exactly:
wpconsentPreferences.marketingWatch the capital P. GTM matches the name letter for letter.
Leave Data Layer Version on Version 2, then click Save.
This is what the finished variable looks like once it is saved.
Not sure which category your tag belongs to?
Ad pixels like TikTok, Meta, and LinkedIn usually sit under marketing. Analytics and behavior tools like Hotjar often sit under statistics.
If you’ve also listed the service in WPConsent’s cookie settings, match the category you picked there. If you haven’t, use marketing for anything that tracks visitors for ads.
If you need statistics, build a second variable the same way, using wpconsentPreferences.statistics. You’ll also need a second trigger for it in Step 3.
Step 3: Create the WPConsent Consent Trigger
This is the easiest step to get wrong.
WPConsent sends wpconsent_consent_processed whether visitors accept or reject. The difference is the value: marketing: true or marketing: false.
That’s why your trigger needs a condition. Otherwise, it would fire even when someone rejects cookies.
To build it, click Triggers in the left menu, then New.
Name it WPConsent - Marketing Consent.
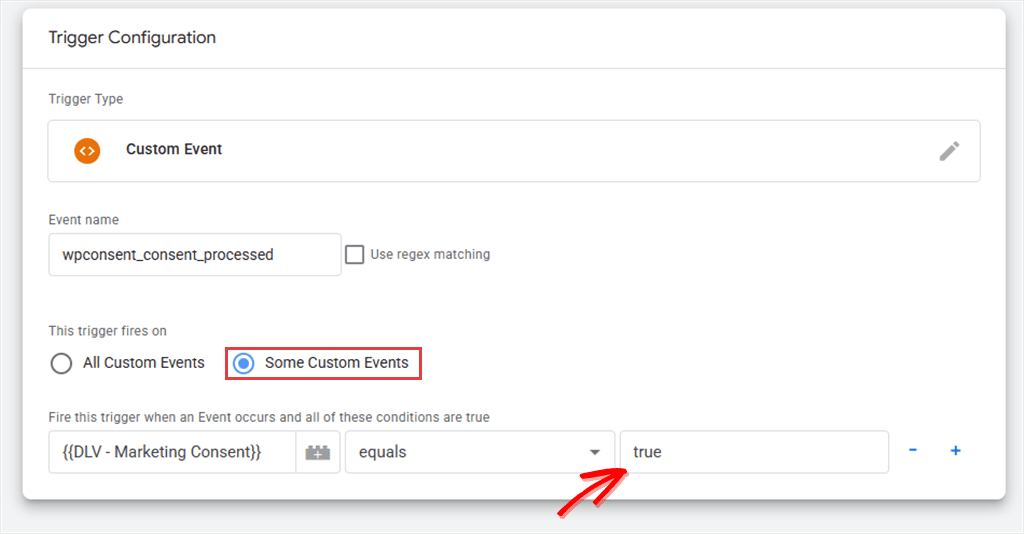
Click Trigger Configuration and choose Custom Event. It sits under “Other”.
In Event name, type:
wpconsent_consent_processedLeave Use regex matching unticked.
Under This trigger fires on, select Some Custom Events.
Now fill in the condition row. Pick DLV – Marketing Consent in the first box and equals in the second. Then type true in the third.
Take a look at the screenshot below to see the finished trigger.
Click Save. Your trigger is ready for any tag that should wait for marketing consent. Our docs on triggering GTM tags based on consent cover the same setup for other categories.
Step 4: Swap Your Tag’s All Pages Trigger for the Consent Trigger
Your tag still fires on page load until you point it at the new trigger.
Click Tags and open your TikTok Pixel tag.
It doesn’t matter if you used TikTok’s template from the gallery or a Custom HTML tag. Every GTM tag has the same Triggering box.
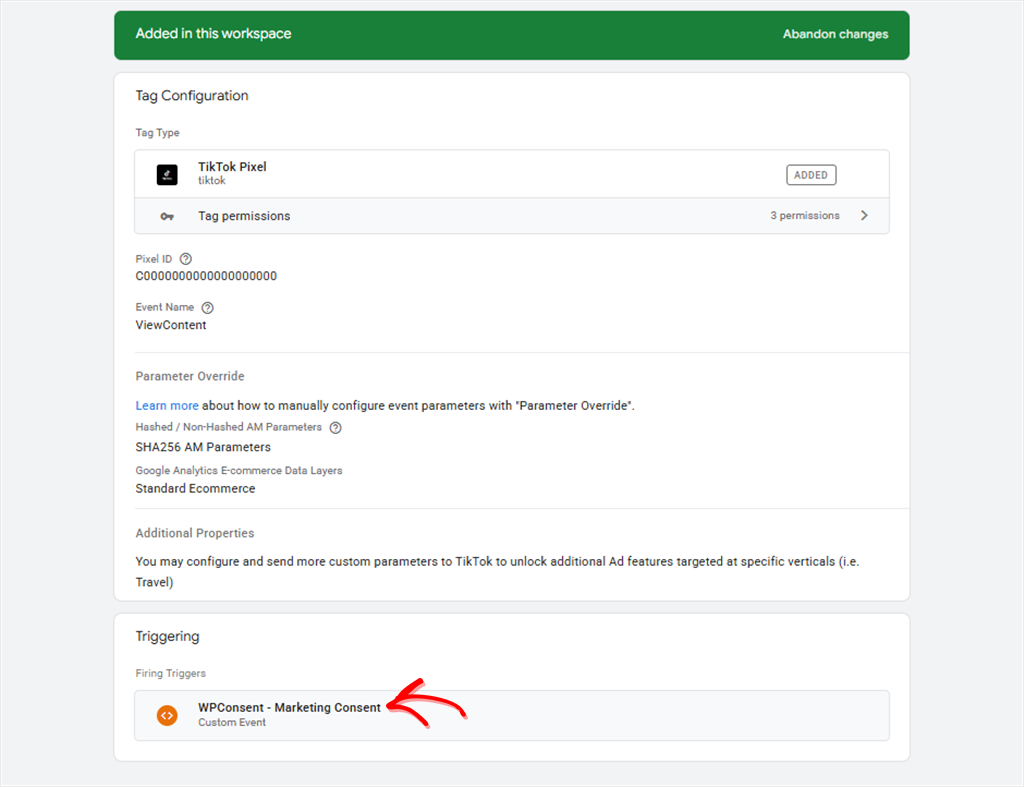
Click the Triggering box and pick WPConsent – Marketing Consent.
If All Pages is still listed there, click the minus icon next to it to remove it. Do the same for any other trigger in that box. The consent trigger should be the only one, or the tag can still fire before the visitor accepts.
The screenshot below shows the TikTok tag with only the consent trigger attached.
⚠️ One catch
If you save a tag with no trigger, GTM shows a “No Triggers Selected” box. Clicking Save Tag there saves a tag with no trigger, so it won’t fire. Click Add Trigger instead.
Click Save.
You don’t need a separate Page View trigger.
When a visitor clicks Accept All, WPConsent sends the event with marketing: true. GTM sees the event, checks your variable, and fires the tag on that same page.
After that, WPConsent sends the event again on every page they visit, so the tag fires on each one.
Repeat this swap for each marketing tag, like a Meta Pixel, and they can all share this trigger. For a statistics tool like Hotjar, build a second trigger the same way, with DLV - Statistics Consent equals true, and use that one instead.
Step 5: Test It in GTM Preview
GTM’s Preview mode shows you exactly when each tag fires, so you can see the trigger working instead of hoping it does.
First, delete your site’s cookies in your browser, so you arrive as a brand new visitor. Otherwise, WPConsent remembers your last choice.
In Chrome, open your site, click the icon to the left of the address bar, and choose Cookies and site data » Manage on-device site data. Then delete the entries for your site.
Next, go back to GTM and click Preview at the top right. Tag Assistant opens in a new tab, so enter your site’s address there and click Connect.
Your site opens in a new window with the banner showing. Don’t click it yet.
Switch back to the Tag Assistant tab.
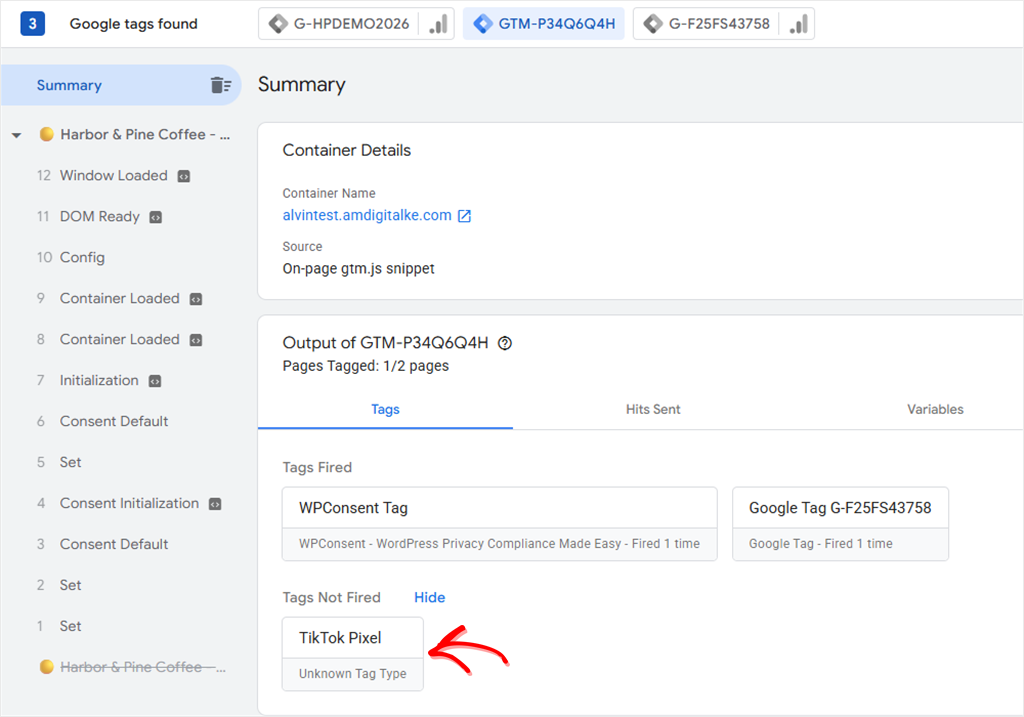
Before a choice: on a fresh visit, you shouldn’t see wpconsent_consent_processed anywhere in the event list. Your TikTok Pixel should sit under Tags Not Fired. If the event shows up anyway, check the two notes below the screenshots.
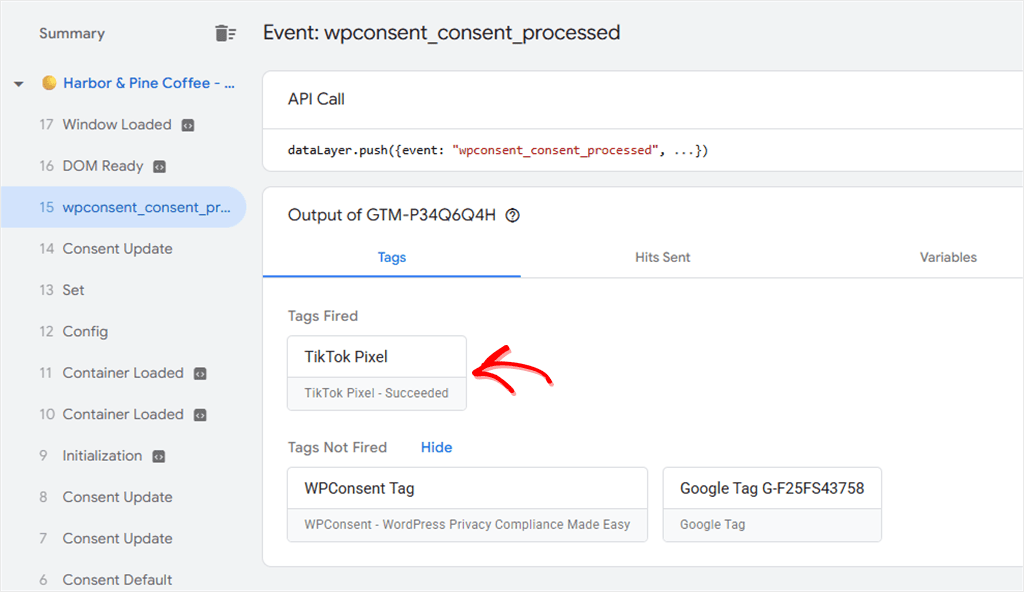
After Accept: go back to your site and click Accept All. In Tag Assistant, a wpconsent_consent_processed event appears in the list.
Click it, and your TikTok Pixel shows up under Tags Fired.
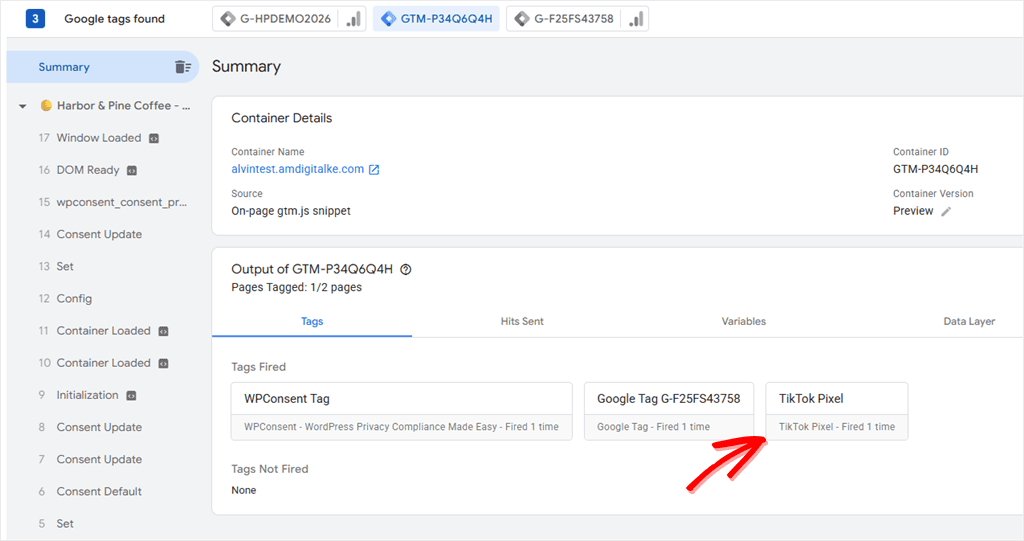
On the next page: in the site window, click through to any other page. wpconsent_consent_processed appears again, and your TikTok Pixel fires again. That’s WPConsent sending the saved choice on every page.
After Reject: close the site window that Preview opened. Delete your site’s cookies again, the same way as before. Then click Preview in GTM, Connect again, and this time click Reject on the banner.
The event still appears. But your TikTok Pixel stays under Tags Not Fired.
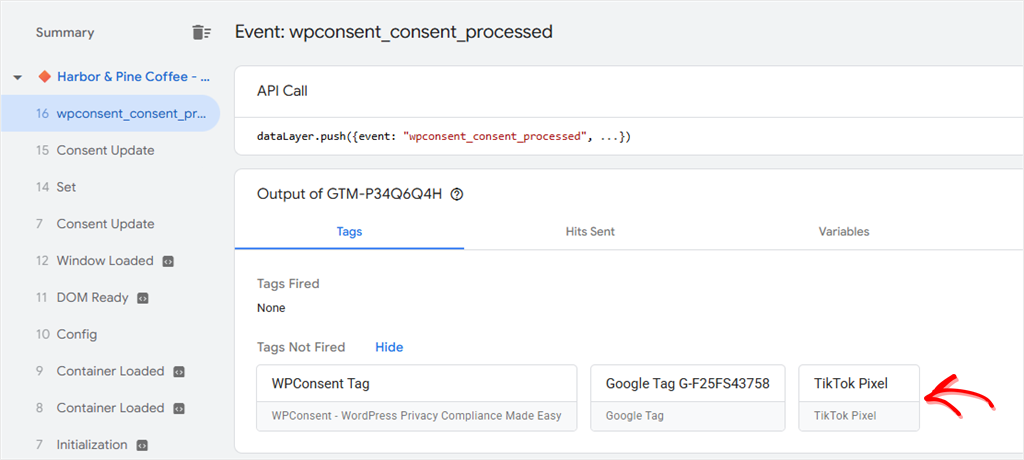
Two results can look wrong but are expected:
- The event shows up before you click. If you’ve turned on Respect Global Privacy Controls in WPConsent’s advanced settings (how GPC support works), browsers that send a GPC signal, like Brave, get a saved “no” before any click. The event fires on the first load with
marketing: false, and your tag still doesn’t fire. - Tags fire straight away in some regions. Visitors covered by an opt-out location rule get everything allowed from the first page. Test from the region you’re checking.
Once all four results match, click Submit in GTM, then Publish. Preview only tests your changes, so your visitors won’t get the new trigger until you publish.
Troubleshooting & Quick Fixes: My Tag Still Fires Before Consent
Most failed tests come down to a handful of causes. Find the line that matches what you’re seeing.
“It fires on page load, before I click anything.”
All Pages is probably still attached, or another trigger is.
Open the tag and check that WPConsent – Marketing Consent is the only trigger in the Triggering box.
“It fires for everyone, even people who reject.”
Your trigger is probably set to All Custom Events, or the condition is missing.
Open the trigger and check that it reads Some Custom Events with DLV - Marketing Consent equals true.
“Everything shows true on the very first page.”
Go back to Step 1.
Default Allow on, Script Blocking off, or an opt-out location rule will each make WPConsent say yes before anyone clicks.
“GTM says Not Fired, but TikTok still gets my visits.”
The pixel is probably also added somewhere in WordPress, outside GTM. Look for it in a WPCode snippet, WPCode’s Conversion Pixels addon, or your theme’s header settings.
GTM’s trigger can’t hold back a copy that loads from somewhere else.
Keep one copy, in GTM, so the trigger controls it.
“Preview shows my tag as Failed.”
Failed means the tag fired but reported an error. Often its script couldn’t load, so check your own connection first.
When we tested this, a tracker blocker on our router stopped TikTok’s script, and the tag showed Failed. On mobile data, the same tag showed Succeeded.
Ad blockers and privacy browsers can do the same thing.
“I changed something, and nothing’s different.”
Click Preview again. Tag Assistant tests your container as it was when you clicked Preview, so any change you make afterwards won’t show up until you reconnect.
On your live site, nothing changes until you submit and publish. If you changed WPConsent’s settings, clear your site’s page cache too.
FAQs: Fire GTM Tags Only After Consent
Why not use GTM’s “Require additional consent for tag to fire” setting instead?
That setting can control tags that don’t have built-in consent checks. The problem is pairing it with an All Pages trigger. GTM checks consent at the moment the trigger fires, and All Pages fires when the page loads, before the visitor has clicked. If they accept a few seconds later, that moment has already passed. Granting consent doesn’t make the trigger fire again on that page. The WPConsent trigger gives GTM a new moment to fire the tag: the click itself. So the tag fires on the same page where they accept.
Can I fire a tag for one service instead of a whole category?
Yes. With WPConsent’s Toggle Services option turned on, visitors can allow single services, and each service gets its own entry. Turn it on in WPConsent » Settings: it’s the Toggle Services row, just below Default Allow. It’s on the free plan.
For example, wpconsentPreferences.facebook-pixel reads true or false for the Facebook Pixel alone. Names with a hyphen work fine in GTM.
Each service’s exact name shows in Tag Assistant’s Data Layer tab. Build a Data Layer Variable with that name and use it in your trigger’s condition.
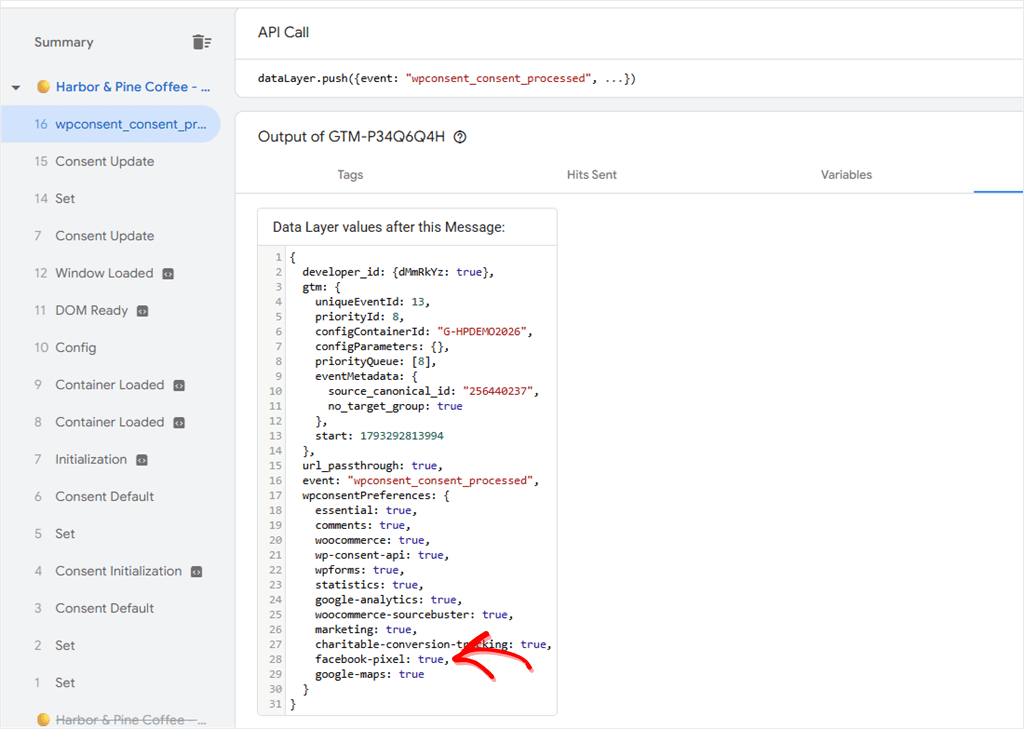
Do GA4 and Google Ads need this trigger?
No. Leave them on Google Consent Mode, which WPConsent supports on the free plan. Google’s tags already adjust to the visitor’s choice. This trigger is for the tags that don’t.
Does this work with the WPConsent Google Tag Manager template?
Yes, and they work best together. The template is how WPConsent passes Google Consent Mode to your Google tags in GTM. If you followed our Consent Mode v2 and GTM guide, you already have it. The trigger holds back everything else.
Set Up and Test Consent-Gated Tags in Google Tag Manager
You now have GTM tags that wait for each visitor’s choice, on every page, with proof in Preview.
Adding a new tag to GTM? Give it the consent trigger. Then rerun the four Preview checks, and do the same whenever you change your consent categories.
One caveat: this controls when your tags fire. It doesn’t make your site compliant on its own.
Your banner text, your cookie policy, and how you’ve categorized each service still matter.
It also only controls tags inside GTM. A pixel added through a plugin or your theme needs its own fix.
Not using WPConsent yet? Get the free plugin and send visitor consent choices to Google Tag Manager without writing custom code.
Get WPConsent for free →
Want location rules, so visitors in each region get the right banner automatically?
See WPConsent plans →
Additional Resources
These guides help with the next things you’ll likely want to check on your site.
- GDPR vs CCPA: The Key Differences WordPress Site Owners Need to Know: when to run opt-in and when opt-out
- WPConsent Free vs Pro: What You Actually Get With Each Plan: which features sit on which plan
- How to Audit Your WordPress Site for Cookie Compliance: a full check of what your site loads