Short Answer
Before your Google, Facebook, Instagram, or TikTok ads go live, check that your cookie banner shows in every region you target and holds ad pixels until visitors agree. For Google Ads, also check your banner wording and confirm Consent Mode v2 is sending its signals. Most checks take a few minutes, and most work in the free version of WPConsent.
Key Takeaways
- Your banner can be switched on and still miss ad visitors, let Meta or TikTok pixels through, or send Google no consent signal.
- If Google’s consent audit flags your site and it isn’t fixed, Google can limit remarketing and conversion measurement.
- With Consent Mode on, Google tags load and wait for the consent signal. Social ad pixels like Meta and TikTok should stay blocked until someone accepts, including any inside Tag Manager.
- One test visit, Reject then Accept, shows whether your banner, pixels and Consent Mode work together.
Holiday sales are one of the biggest ad pushes of the year for most online stores.
Last year, US shoppers spent $11.8 billion online on Black Friday alone, according to Adobe’s 2025 holiday data.
So you set the budgets for Google Shopping, Facebook and Instagram, maybe TikTok. You build the landing pages and add a new pixel or two.
Your cookie banner probably wasn’t on that list. It went up months ago, and it hasn’t caused any trouble since.
But your banner decides what Google, Meta, and TikTok can count.
When a visitor accepts, your ad platforms can measure the sale and add that shopper to your remarketing lists.
When they decline, or the banner isn’t passing their choice along properly, your ads get far less data about that visit.
So consent decides what your ad budget can measure.
In this article, we’ll walk you through 10 checks to run on your WordPress site before your holiday campaigns start.
Use the table of contents below to navigate this article.
- Why Run These Checks Before Black Friday
- Check 1: Your Banner Shows Everywhere Your Ads Run
- Check 2: Your Banner Says What Google Checks For
- Check 3: Your Ad Pixels Wait for Consent
- Check 4: You've Rescanned After Adding Campaign Tags
- Check 5: Google Consent Mode v2 Is On and Sending Every Signal
- Check 6: Declined Google Ads Clicks Still Keep Their Campaign ID
- Check 7: US Visitors Can Opt Out
- Check 8: You Keep Proof of Consent
- Check 9: You Know Your Acceptance Rate Before Setting Budgets
- Check 10: Run One Test Visit Before Launch
- FAQs: Black Friday Cookie Consent
- Get Your Store Ready Before Black Friday
Why Run These Checks Before Black Friday
Consent affects every ad platform. For Google Ads, there’s a timing issue too, if your store is big enough.
As of October 2026, Google can only start modeling missing conversions once Consent Mode is set up correctly and you have 700 ad clicks over 7 days for each country and domain grouping.
Even then, the models go through a training period first, and reaching the threshold doesn’t guarantee modeled results.
Smaller stores may never reach that threshold. For them, Google Consent Mode still decides what your remarketing lists get and what conversion data Google receives.
Either way, the week of Black Friday is too late to find out something is off.
What to Expect from the 10 Checks
Most checks apply to every ad platform you use.
Three of them (Checks 2, 5, and 6) apply only to Google Ads, because Google has its own consent rules and tools. If you only run social ads, you can skip those three.
We’ll show where each setting lives in WPConsent. If you use a different consent plugin, most checks still apply. Look for the same setting under its own name.
We’ll end with a test visit that checks the most important ones work together.
The 10 Checks at a Glance
Here’s the full list, with the WPConsent plan each check needs.
Most of them work in the free plugin.
| Check | What you’re confirming | WPConsent plan |
|---|---|---|
| 1. Banner regions | The banner shows wherever your ads run | Free (shows everywhere) · region rules on all paid plans |
| 2. Banner wording (Google Ads) | It says what Google’s audit looks for | Free |
| 3. Ad pixels | Meta, TikTok and other pixels wait for consent | Free |
| 4. Rescan | New campaign tags are on your cookie list | Free scan · scheduled scans on all paid plans |
| 5. Consent Mode v2 (Google Ads) | Google gets every consent signal | Free |
| 6. URL Passthrough (Google Ads) | Declined clicks keep their campaign ID | Free |
| 7. US opt-outs | GPC and Do Not Sell are honored | GPC free · Do Not Sell on Plus and up |
| 8. Consent records | You can show proof of consent | All paid plans |
| 9. Acceptance rate | You know how many visitors say yes | Rate on all paid plans · full reports on Pro and up |
| 10. Test visit | Your banner, pixels and Consent Mode work together | Free · consent log step on paid plans |
Let’s start with where your banner shows up.
Check 1: Your Banner Shows Everywhere Your Ads Run
A banner that only appears in some of the countries you advertise in leaves the rest uncovered.
Google’s EU user consent policy covers visitors from the European Economic Area, the UK, and Switzerland.
Switzerland was added in July 2024, so region rules set up before then may not include it.
So if your holiday campaigns target the UK or Switzerland, your banner needs to show there too, not just in the EU.
US campaigns bring in a different set of rules, which we’ll cover in Check 7.
How to Check Your Region Rules in WPConsent
On the free plan, WPConsent shows your banner to every visitor once you switch it on, so no region is left out.
On a paid plan, you can set region rules under WPConsent » Geolocation.
That lets you show a strict opt-in banner in Europe and a lighter notice elsewhere, using WPConsent’s smart geolocation.
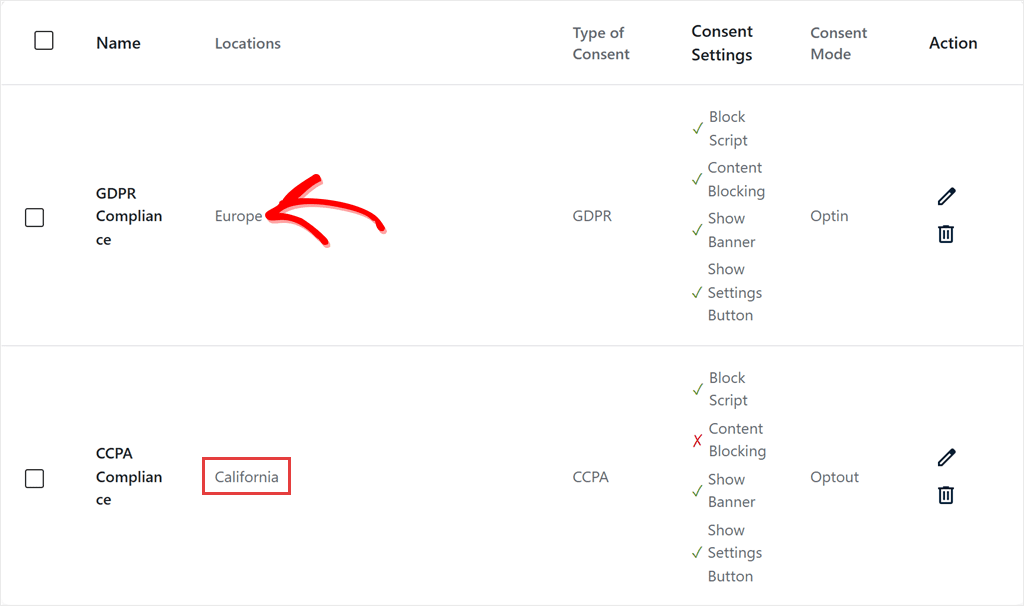
If you’ve set up region rules, open WPConsent » Geolocation and check each one.
A rule that uses the Europe region needs Cyprus added as a single country, because that region doesn’t include it yet.
Then compare your rules with the countries in your Google Ads and Meta campaign settings. A rule should cover every country you run ads to reach.
Check 2: Your Banner Says What Google Checks For
You do not have to guess what a good banner looks like for Google Ads.
Google publishes the list.
Its consent audit help page (checked October 2026) names the problems it looks for when it reviews a site.
Here’s what it expects your banner to do:
- Mention “ads personalization” on the first screen, not only inside the preferences panel.
- Name Google as a company that receives visitor data on the banner or in your cookie or privacy policy.
- Link to Google’s own page on how it uses that data: business.safety.google/privacy. The link can sit on the banner itself, behind a “More info” link, or in a privacy policy that the banner links to.
- Show in every EEA country, plus the UK and Switzerland (Check 1).
- Ask for a clear action, like clicking Accept, before ad cookies are set.
The first three on the list above are the easiest to miss, because they are about what the text says, not how the banner works.
How to Update Your Banner Text in WPConsent
Open your banner text under WPConsent » Banner Design » Content and compare the text in the “Message” box with the list above.
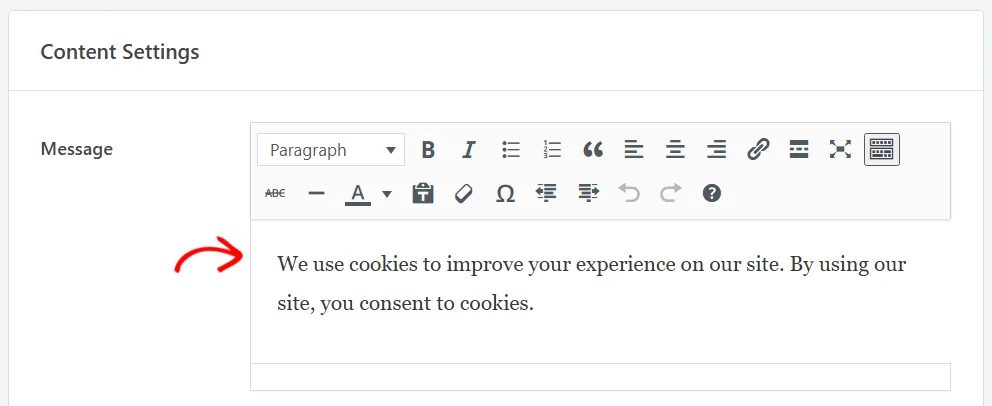
You don’t need to rewrite your whole message. Google doesn’t ask for exact wording, and a sentence or two can cover the first three points in the list.
Here’s one way to say it: “We and our partners, including Google, use cookies for ads personalization and measurement. Learn how Google uses this data.”
Then highlight “Learn how Google uses this data,” click the link icon in the message box toolbar, paste in Google’s page, and press Enter: https://business.safety.google/privacy/
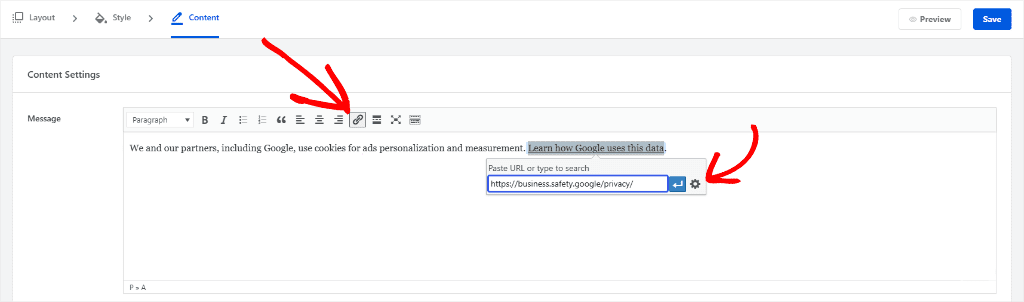
Check the screenshot below to see how it would appear on the front end of your site.

If you’d rather keep the banner short, Google also accepts both the disclosure and the link on your cookie policy page or privacy policy. The link to that page just needs to be visible on the banner’s first screen.
Check 3: Your Ad Pixels Wait for Consent
How you make a pixel wait for consent depends on how it got onto your site. There are three ways, so find yours first.
Pixels added to your site directly
This covers a Meta pixel pasted into your header, or one added by a plugin’s tracking add-on. If you use PixelYourSite, WPConsent’s built-in integration for it is on paid plans.
WPConsent’s script blocking recognizes common ad pixels and holds them until a visitor accepts marketing cookies.
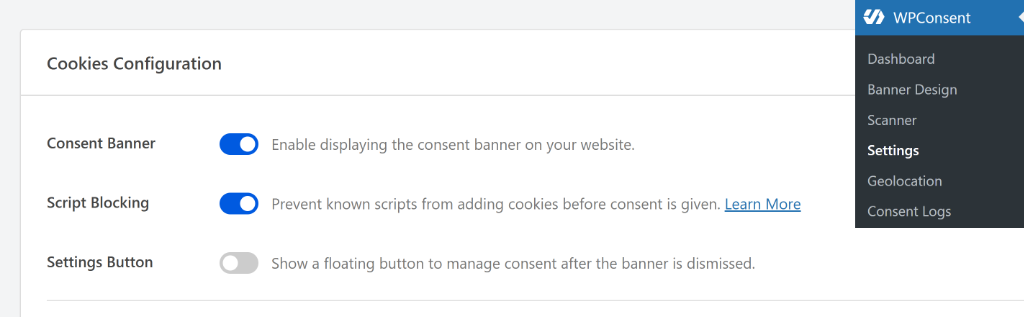
You’ll find it under WPConsent » Settings, as the Script Blocking option. It’s off until you turn it on, and it only works while your consent banner is switched on too.
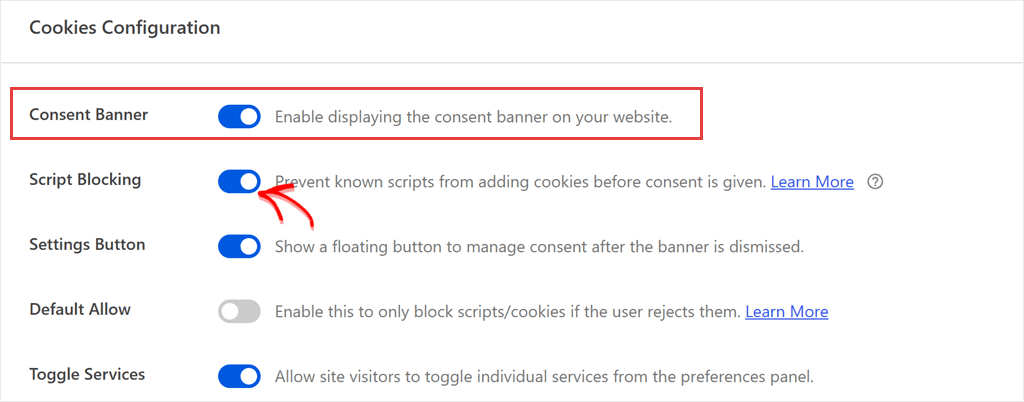
We checked this on our demo coffee store.
After clicking Reject, the Meta pixel stayed switched off. No Meta cookie was set, and the browser sent nothing to Meta.
After clicking Accept All, the pixel loaded and recorded the page view.

In November 2025, France’s privacy regulator fined American Express €1.5 million, in part because ad cookies were placed even after visitors refused them.
If your pixel is a less common one, open the free Cookie Inspector (Check 4) and browse a page or two before you answer the banner. It flags any cookie that loads before consent.
If it flags a pixel, script blocking doesn’t recognize that one yet, so it isn’t being held. On a paid plan, you can add it as a custom script under WPConsent » Settings, on the Advanced tab. Our docs show how to block custom scripts.
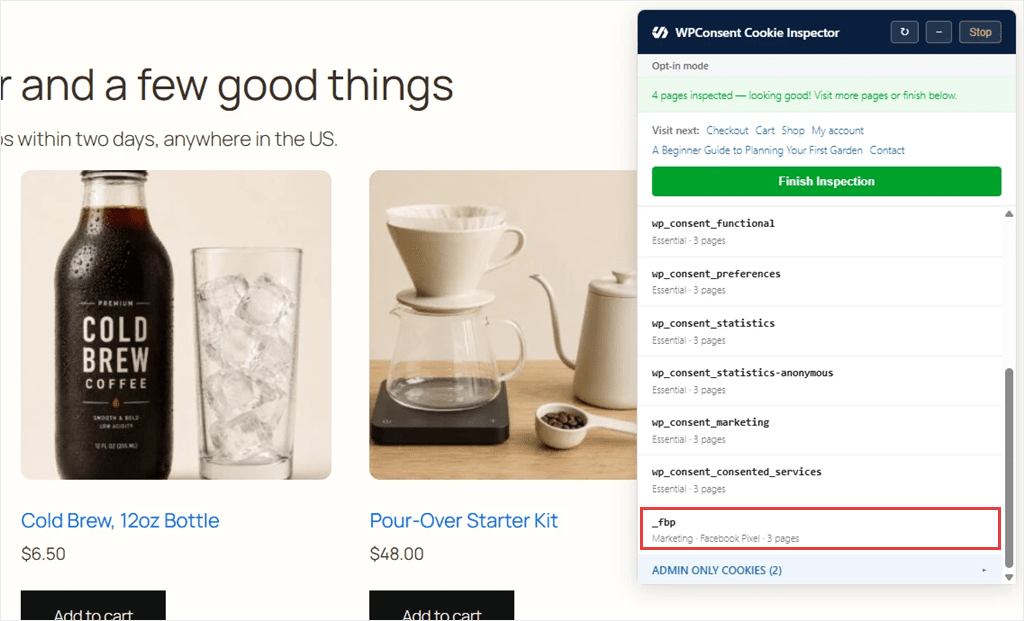
Running WooCommerce? Our WooCommerce cookie consent guide covers store-specific pixels.
Our Facebook pixel consent guide walks through the Meta setup in more detail.
Pixels inside Google Tag Manager
Tag Manager works differently.
When Consent Mode is on, WPConsent lets Tag Manager load, so it can receive the consent signal.
That means anything you’ve added inside Tag Manager only waits if Tag Manager’s own consent settings tell it to.
Say you’ve added a TikTok pixel in Tag Manager for your holiday campaign: it fires whenever its trigger does, whatever the visitor chose, unless you set it to wait for consent.
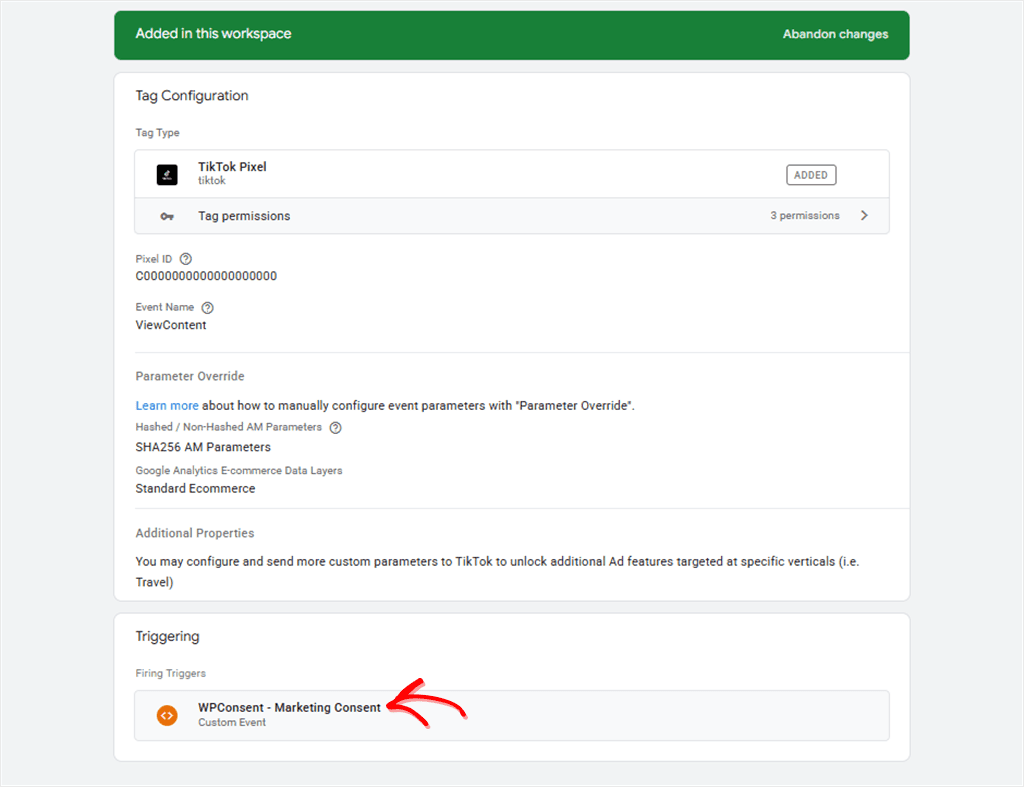
To make that easier, WPConsent sends Tag Manager an event called wpconsent_consent_processed every time a visitor makes a choice.
That event fires on Reject too, so it can’t be the whole rule on its own.
Instead, use it as the trigger, then add a condition that checks whether the visitor accepted marketing cookies (wpconsentPreferences.marketing is true). Our docs show how to fire your tags only after consent.
Server-side events
Some setups also send sales to Meta from your server, through Meta’s Conversions API.
If your pixel plugin has a “Conversions API” or “access token” setting filled in, yours does.
These events go from your server straight to Meta, so they never load on your pages. That means WPConsent’s script blocking can’t hold them.
The plugin sending them has to handle consent.
Meta’s server events don’t carry a consent setting for European visitors. So the usual way to respect a decline is not to send that visitor’s event at all.
Before Black Friday, open that plugin’s settings and look for a consent option. If there isn’t one, ask its support team how it handles visitors who decline.
What about your Google tags?
With Consent Mode on, WPConsent runs it in Advanced mode, so your Google Ads, Google Analytics, and Tag Manager tags are not blocked.
That’s on purpose.
Google recommends letting its tags load and wait for the consent signal.
Its help page says that if you block them until a visitor chooses, Google won’t be able to verify the visitor’s choice, which may lead to loss in data.
Check 5 shows how to set that up. If you don’t use Consent Mode, our guide to blocking Google Ads scripts until consent covers that setup instead.
Microsoft Clarity gets the same treatment while Clarity Consent Mode is on, which it is by default.
Check 4: You’ve Rescanned After Adding Campaign Tags
Your banner only knows about the services it found the last time your site was scanned.
Set it up in spring, and it has never seen the pixel, popup tool, or landing page builder you added for the holidays.
So rescan before your campaigns start.
How to Rescan Your Site With WPConsent
Head to WPConsent » Scanner and run a new scan.
WPConsent checks the pages you choose and lists the services it finds. Click Automatically Configure Cookies to add them to your cookie list, sorted into categories.
If you made your cookie policy page with WPConsent, it pulls from that same list, so it stays up to date with your new holiday tags too.
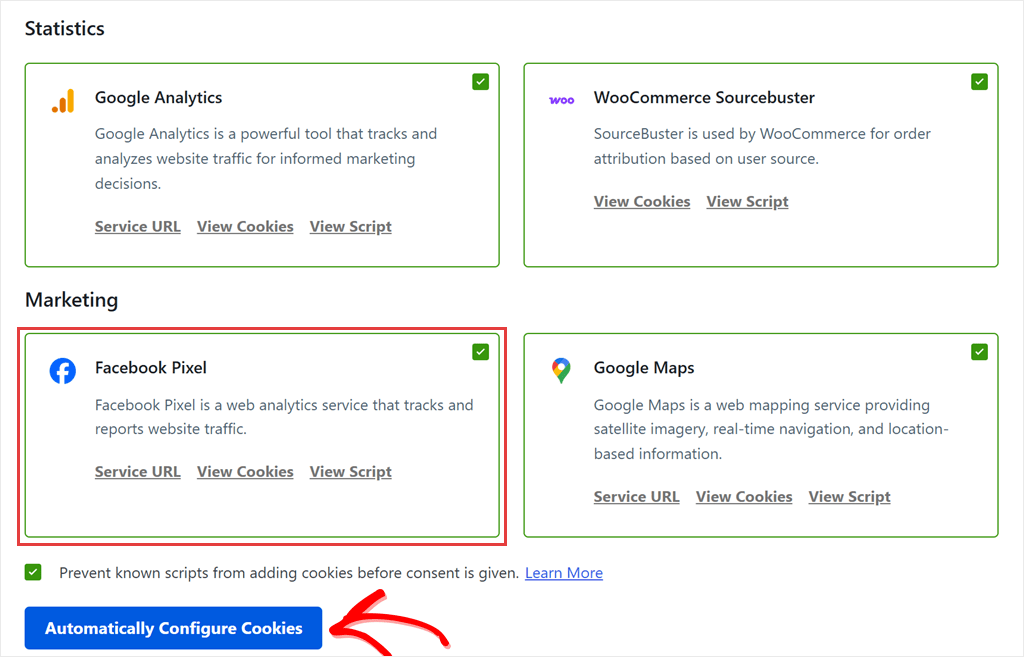
A scan can only report what loads on the pages it visits, so include your new holiday landing pages in the scan, not just your homepage.
The free Cookie Inspector helps too. It clears your cookies so you see the site as a new visitor, then shows each cookie the moment it’s set while you browse.
On a paid plan, you can also turn on scheduled scans with Email Notifications.
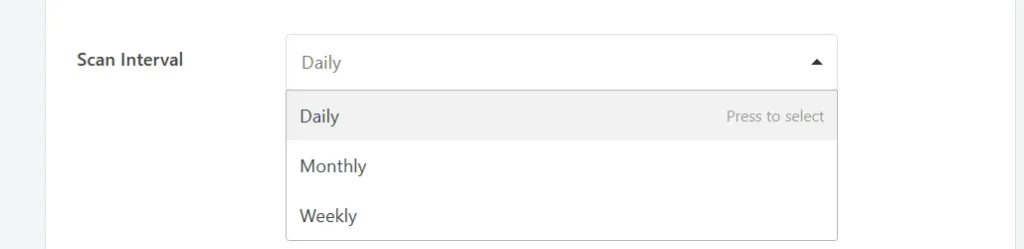
You’ll get an email when a scan finds a new service. Turn on Auto-Update Services too, so new services go straight onto your cookie list.
It won’t email you when a service disappears, though. So still look at the list after big changes.
Make Sure a Google Service Is on Your Cookie List
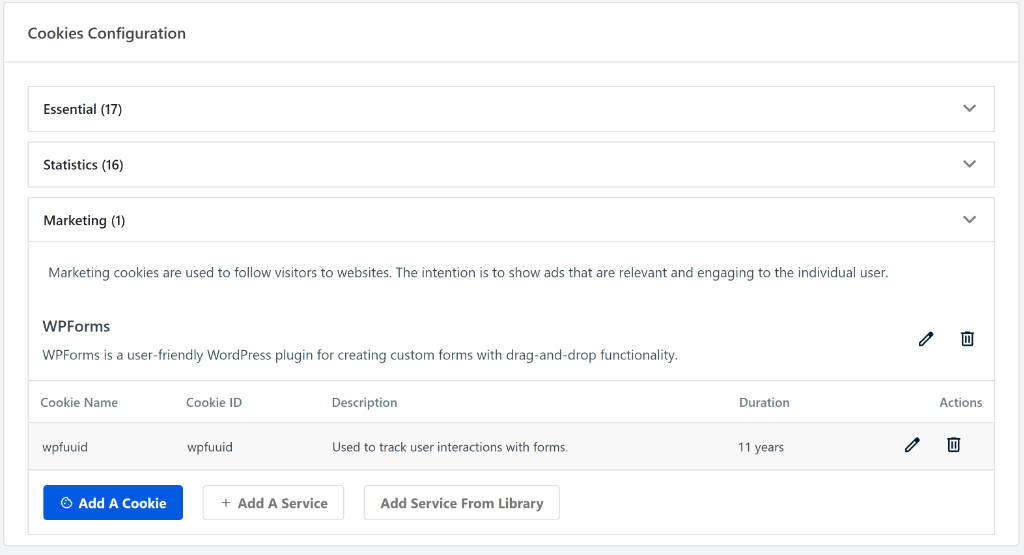
WPConsent only sends Google its default consent signal once a Google service, like Google Analytics or Google Ads, is on your cookie list.
If none is listed, your Google tags still load, but Google gets no default consent signal at all.
If your Google tag doesn’t show up after a scan, check that the scan included a page where the tag loads. You can also add Google Analytics or Google Ads to your cookie list by hand under WPConsent » Settings » Cookies, with Add A Service.
Check 5: Google Consent Mode v2 Is On and Sending Every Signal
Consent Mode is how Google learns what each visitor agreed to.
Four of its signals matter for your ads. Here’s what happens when each one is denied, according to Google’s Consent Mode reference:
- ad_storage: no ad cookies are set or read.
- ad_user_data: Google won’t receive the visitor’s data for advertising.
- ad_personalization: your remarketing lists get no data from that visitor.
- analytics_storage: no Google Analytics cookies are set.
How to Turn On Consent Mode in WPConsent
WPConsent only sends these signals when three things are all true.
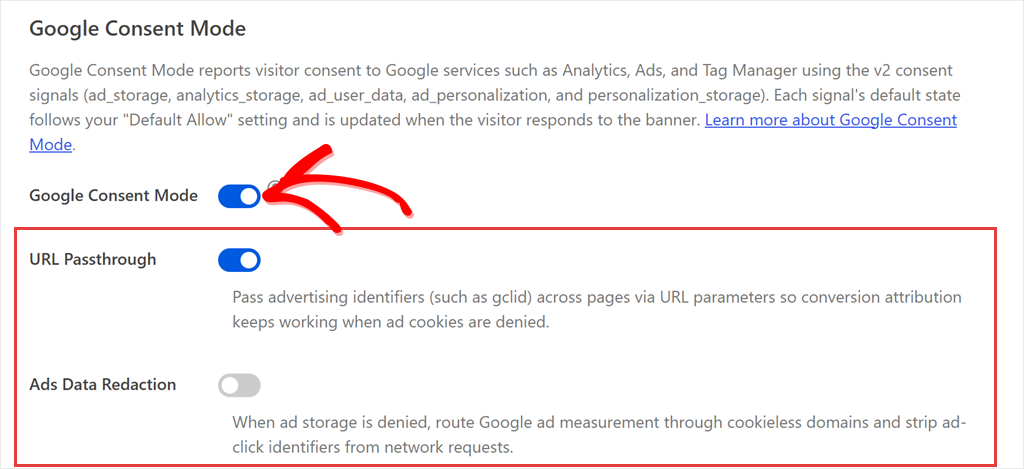
First, the Google Consent Mode setting is on. It’s on by default, under WPConsent » Settings.
Second, your Consent Banner is on. Google Consent Mode won’t load while the banner is off. It’s switched on by default when you set WPConsent with the wizard.
If you skip the wizard, you can turn it on under WPConsent » Settings.
Third, a Google service, like Google Analytics or Google Ads, is on your cookie list. The rescan in Check 4 takes care of that.
You’ll see the signals going out in the test visit in Check 10.
One exception is if you use Google’s Site Kit plugin with its own consent mode setting turned on; Site Kit sends the default signal instead of WPConsent.
Difference Between Google Consent Mode Basic and Google Consent Mode Advanced
You might also see “Basic” and “Advanced” consent mode in Google’s help pages.
In Basic mode, Google tags don’t load at all until a visitor accepts. In Advanced mode, they load right away with default consent signals, usually denied, then update once the visitor chooses.
WPConsent uses Advanced mode, and there’s no setting to pick.
That matters for stores that qualify for conversion modeling.
In Advanced mode, visitors who decline still send Google cookieless pings. Once your store qualifies, Google can use them to estimate the conversions it can’t see directly.
For the full setup, see our Google Consent Mode v2 docs, or the Tag Manager version if your Google tags live there.
Check 6: Declined Google Ads Clicks Still Keep Their Campaign ID
When someone clicks your ad, Google adds a click ID to the address of the page they land on.
That ID is how Google connects a sale back to the ad.
Normally, Google saves the ID in a cookie, so it’s still there when the shopper reaches checkout.
But if the visitor declines ad cookies, Google can’t save it. The ID only lives in the address of that first page.
So as soon as the shopper clicks to a second page, the ID is gone, and Google can’t tie the sale to your ad.
How to Turn On URL Passthrough in WPConsent
URL Passthrough solves this. It carries the click ID along in the page address from one page to the next, so the sale can still be tied to the ad.
It’s free, and it’s off by default.
Turn it on under WPConsent » Settings, in the Google Consent Mode section.
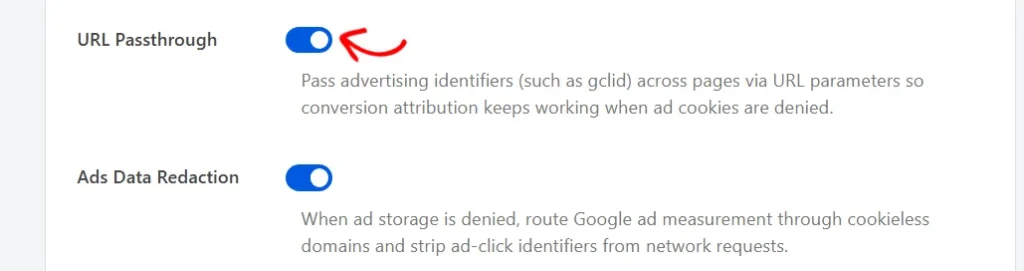
Right below it, you’ll see Ads Data Redaction.
This setting does the opposite of URL Passthrough. When a visitor declines ad cookies, it removes the click ID from what your Google Ads tags send, according to Google’s documentation.
These two settings pull in opposite directions for visitors who decline, so decide which matters more:
- Leave it off (the default) if tying sales back to your ads matters most.
- Turn it on if you’d rather send Google less about visitors who said no.
Our Google Consent Mode v2 docs show both settings step by step.
Check 7: US Visitors Can Opt Out
If your holiday ads only target the US, Google’s EU policy doesn’t cover those visitors. US privacy laws do, and they work differently.
Europe asks visitors to opt in before ad cookies are set. California’s privacy law (CCPA) generally works on an opt-out model: businesses it covers must let visitors say no.
Not every small store is covered. CCPA has revenue and data thresholds, so ask your lawyer whether it applies to you.
In February 2026, California’s Attorney General announced a $2.75 million settlement with Disney over claims that its opt-out tools didn’t fully stop the sale or sharing of data.
To keep your own opt-out working, check two things.
Turn On Global Privacy Control
The first is Global Privacy Control, or GPC. It’s a browser or extension setting that asks the sites you visit not to sell or share your data.
California’s privacy agency says businesses must honor it as an opt-out request.
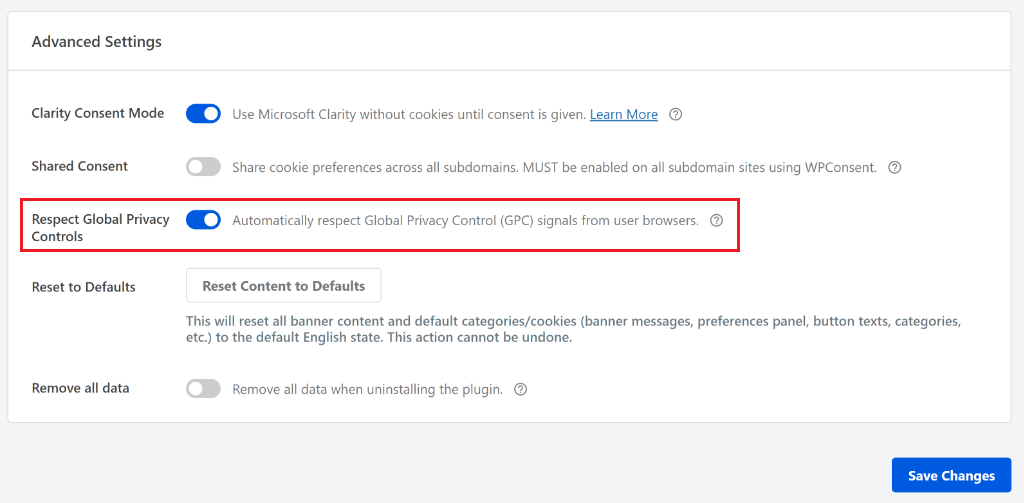
WPConsent honors GPC with the Respect Global Privacy Controls setting under WPConsent » Settings, on the Advanced tab. It’s free, but it is off by default, so turn it on.
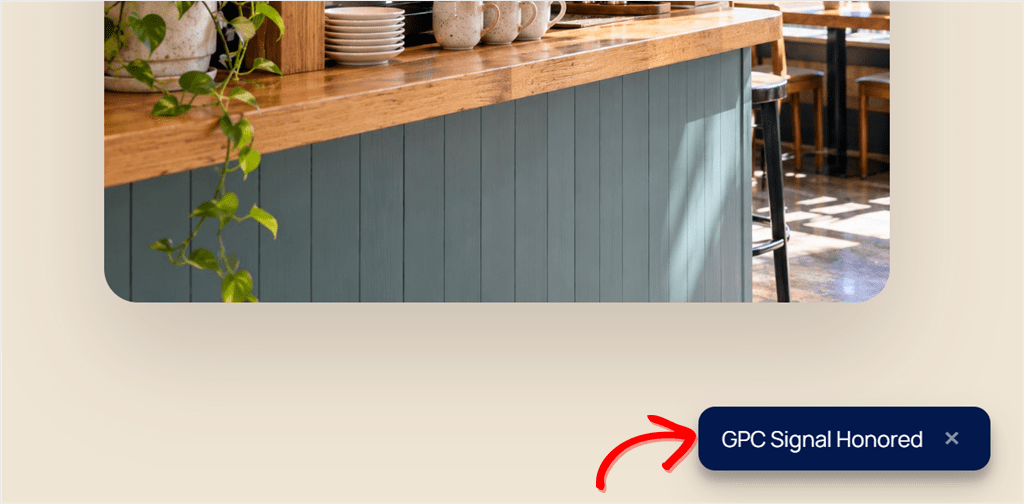
Since January 1, 2026, California’s rules also say a business must display whether it processed that signal.
With GPC turned on, WPConsent shows visitors a short “GPC Signal Honored” message, and you can edit the wording under WPConsent » Banner Design.
Ask your lawyer whether that message is enough for your store.
💡 WPConsent Tip
Make sure you’re on WPConsent 1.2.0 or later. That version makes sure visitors who send a GPC signal are counted as declined in Google Analytics, even on slower sites that use opt-out mode.
Add a “Do Not Sell or Share” Link
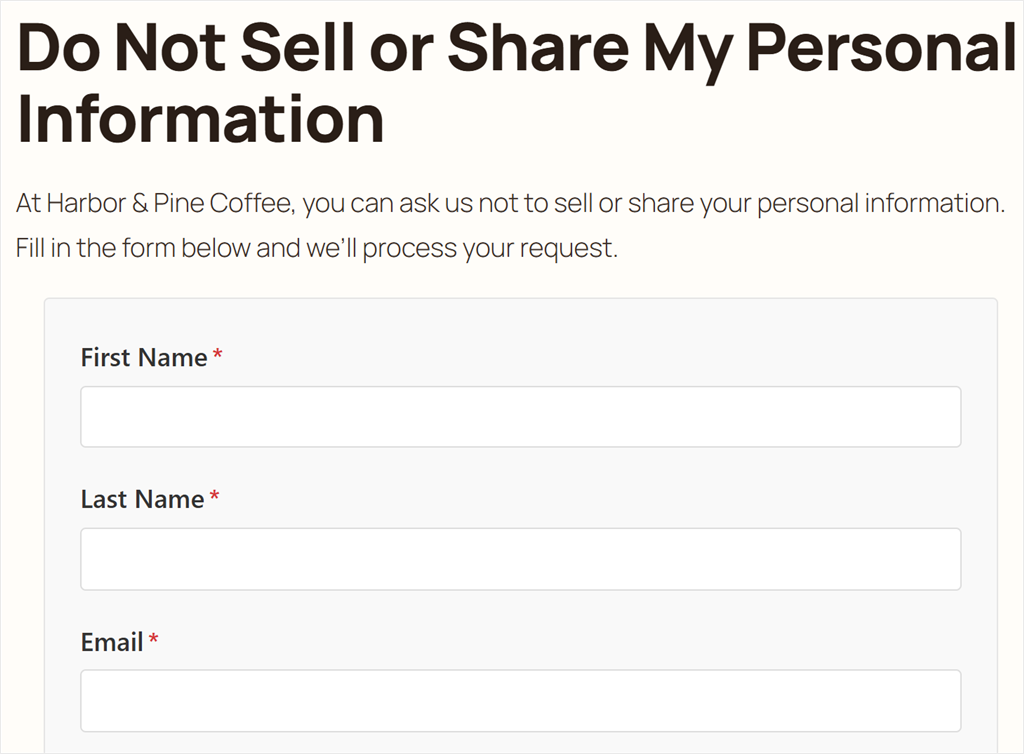
You also need a “Do Not Sell or Share My Personal Information” link. WPConsent’s Do Not Sell add-on, on Plus and up, adds that request page and form for you.
Under the CCPA, sending visitor data to Meta, Google, or TikTok for ad targeting can count as “sharing.” So every new pixel you add for Black Friday is another reason to have the link in place.
Our GPC setup guide and our WordPress CCPA guide cover both pieces in more depth.
Check 8: You Keep Proof of Consent
Google’s policy doesn’t stop at asking for consent.
It says you must “retain records of consent given by end users.”
So if Google, a regulator, or a customer ever asks what a visitor agreed to, you may need a record to show them.
How to Turn On Consent Logs in WPConsent
WPConsent’s Consent Logs keep one entry for each choice: when it was made, and what the visitor accepted or declined.
The records are stored on your own WordPress site, not on someone else’s servers.
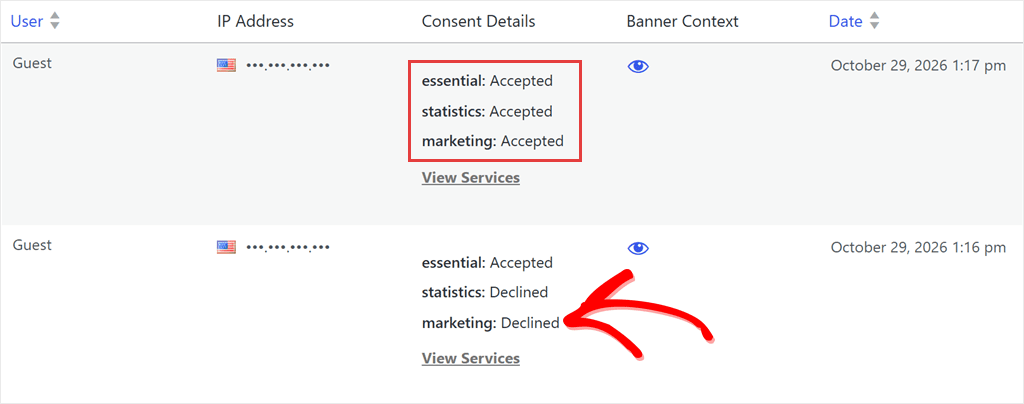
Consent Logs are on every paid plan, but they’re off until you switch on the Consent Logs toggle under WPConsent » Settings.
To keep your database tidy, you can also turn on automatic cleanup and set how long logs are kept, so older entries clean themselves up.

One limit to know: a log shows what each visitor chose, not which scripts actually ran. The test visit in Check 10 is how you confirm the scripts followed that choice.
Check 9: You Know Your Acceptance Rate Before Setting Budgets
Not everyone who sees your banner says yes.
Some click Reject. Others close the tab or keep scrolling without choosing.
With an opt-in banner, like the ones used in Europe, if someone ignores the banner, your ads treat them as if they’d said no.
That share can be large.
Didomi’s January 2026 consent benchmark found that 21.7% to 27.4% of visitors left the banner unanswered, depending on the European region.
Say 60% of your European visitors accept. Then roughly 60% of that traffic gives your ad platforms full, cookie-based data.
The other 40% don’t disappear. Your ad platforms still see some of their activity, just with far less detail.
How much each platform actually gets also depends on how your tags are set up.
Knowing your rate helps you set Black Friday budgets and conversion targets based on the data you’ll really have.
How to See Your Acceptance Rate in WPConsent
On every paid plan, WPConsent’s Banner Analytics is on by default.
It shows how many visitors accept, decline, or ignore your banner under WPConsent » Analytics.
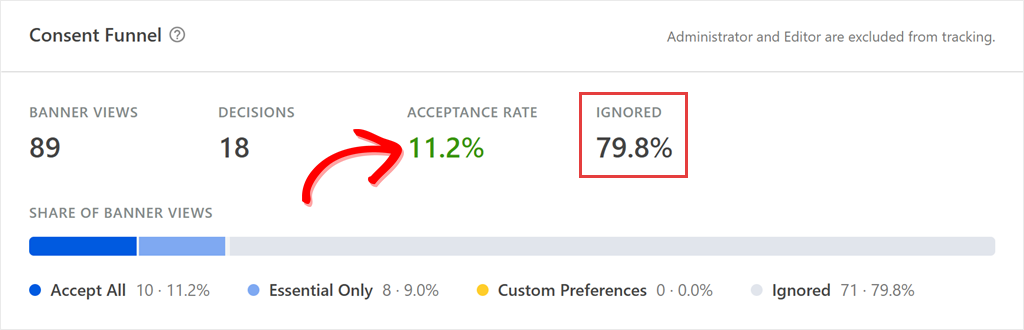
Pro and up adds the breakdown by region and the trend over time. That’s where the gap between Europe and the US shows up.
Our guide to tracking your cookie banner acceptance rate shows how to read it.
Check 10: Run One Test Visit Before Launch
So far, you’ve looked at your settings. Now it’s time to see them in action.
In this test, you visit your store like a shopper would, then check that your banner, pixels, and Consent Mode do what they should. It takes about 10 minutes.
You’ll need a private browser window, your browser’s developer tools, and Google Tag Assistant.
The test has three stages. The first two are the ones that matter. The third is optional.
Stage 1: Reject
Open your store in a private window, so you arrive with no saved cookies. Your banner should appear right away.
If you use region rules and you’re outside Europe, your banner may not show you the European version. Test from a European location (a VPN works), or check each region your ads target.
Click Reject.
Then open your developer tools and look at the cookies your site has set. In Chrome, press F12, open the Application tab, and click your site under Cookies.
What you should see: no Meta _fbp cookie, and no Google ad cookies (they start with _gcl).
Running TikTok or other pixels too? Their cookies shouldn’t appear after Reject either.
You may still see requests going out to Google.
That’s expected in Advanced mode: those are cookieless pings carrying the “denied” signal. So check the cookies, not the network requests.
If you run Google Ads, open Tag Assistant, click Add domain, enter your store’s address, and click Connect.
Your store opens in a new tab. Back in Tag Assistant, you should see a consent “default” event, then an “update” with ad signals set to denied.
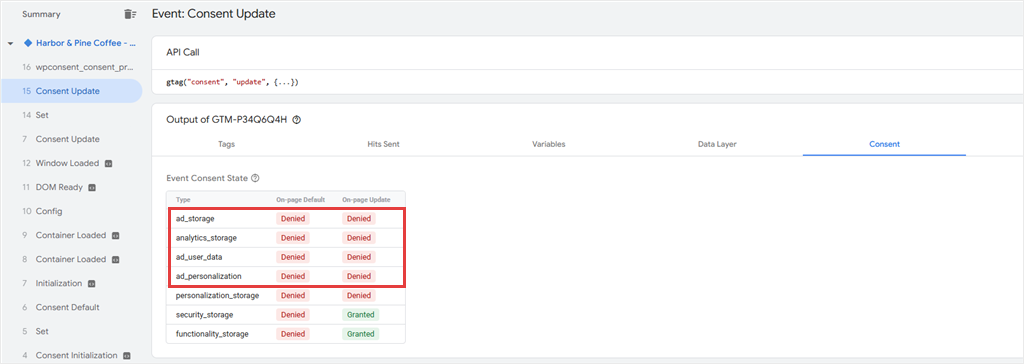
If it fails: an _fbp cookie after Reject usually means script blocking or the banner is off (Check 3). No consent events in Tag Assistant usually means no Google service is on your cookie list (Check 4).
Stage 2: Accept
Close the private window, open a new one, visit your store again, and click Accept All.
What you should see: the _fbp cookie appears, and Tag Assistant shows an update with the ad signals set to granted.

If it fails: no pixels after Accept usually means the pixel isn’t on your cookie list (Check 4), or a Tag Manager tag has no consent trigger (Check 3).
Stage 3 (optional): Purchase
Skip this one if you can’t safely place a test order.
Otherwise, place an order after accepting. Use a low-priced product or a payment method that doesn’t charge a card, then cancel the order in WooCommerce afterward.
What you should see: if your purchase conversions are set up, the order in Google Ads and in Meta’s Events Manager. Conversions don’t always appear right away, so check again later if they’re not there yet.
If you’re on a paid plan with Consent Logs turned on, open your consent log too. Both of your choices should be there.
Our Google Ads blocking guide has a fuller version of this test.
A passing test shows your consent setup works. It doesn’t check that every conversion event in your ad accounts is set up right, so keep an eye on your reports in the first days of your campaigns.
FAQs: Black Friday Cookie Consent
Do Facebook, Instagram and TikTok ads need cookie consent too?
Yes, in most cases. In the EU and UK, the cookie rules ask for consent before trackers like ad pixels run, whoever makes them. The exceptions are narrow, and the UK’s regulator, the ICO, says no advertising purpose counts as strictly necessary. Meta’s own developer documentation suggests asking for consent before its pixel runs for European visitors, and it leaves compliance to each business. That’s why Check 3 matters as much for social ads as for Google.
Do I need Consent Mode if I don’t run remarketing?
Yes, if you advertise to visitors in the EEA, the UK, or Switzerland. If Google’s consent audit flags your site and you don’t fix it, Google can limit conversion measurement as well as remarketing. So the signals matter even if you never build a remarketing list.
Does Google’s consent policy apply to US-only ads?
Google’s EU user consent policy covers the EEA, the UK, and Switzerland. US visitors fall under state privacy laws instead, which mostly work on an opt-out model. Check 7 covers what to set up for them.
Will setting up consent properly cost me conversions?
You’ll lose some detail on visitors who decline, but those sales still happen. For stores that meet Google’s thresholds, conversion modeling estimates part of what it cannot see. Smaller stores get less help from modeling, so knowing your acceptance rate (Check 9) matters more.
Does Google Consent Mode make my site compliant?
No. Consent Mode passes each visitor’s choice to Google. Your banner, script blocking, and records do the consent work. Remember, no plugin makes your site compliant on its own.
Get Your Store Ready Before Black Friday
You now have 10 things to check before your holiday ads go live, and a test visit that confirms them.
Start with the free checks this week. Rescan your site, make sure your banner, script blocking and Consent Mode are all on, decide on URL Passthrough, and run the Reject and Accept test.
Black Friday is November 27. There is still time.
Want to see where your site stands before you change anything?
Get WPConsent for free → Then run the scanner and open the Dashboard to see what’s set up and what to turn on next.
Need region rules, consent records, and your acceptance rate before launch?
See WPConsent plans, starting at $49.50 →
Additional Resources
These guides help you go further with the setup you just checked.
- How to Set Up Google Consent Mode V2 in WordPress: the full Consent Mode setup, step by step
- Why Your GA4 Numbers Dropped After Adding a Cookie Banner: what changes in your reports once consent is in place
- GDPR vs CCPA for WordPress: how European and US rules differ for your visitors
This article is for general information and does not constitute legal advice. For advice about your own site, consult a licensed attorney. No tool, WPConsent included, can by itself guarantee compliance.