
Would you like to decide exactly what your visitors see and which scripts run before they give consent?
In this guide, we’ll walk you through every option on the WPConsent Settings page. That runs from the consent banner itself down to how long a visitor’s choice is remembered. All you need is WPConsent on your WordPress site.
Requirements: Consent Logs and Automatic Cleanup require a paid version of WPConsent.
Table of contents
- Turning On the Consent Banner and Script Blocking
- Adding the Floating Settings Button
- Choosing Between Opt-In and Opt-Out Consent
- Letting Visitors Toggle Individual Services
- Configuring Google Consent Mode
- Reviewing Your Cookie Categories
- Linking Your Cookie Policy Page
- Blocking Embedded Content
- Setting the Consent Duration
- Keeping Records of Consent
- Saving Your Settings
- Frequently Asked Questions
Before you get started, make sure WPConsent is installed and activated on your WordPress site.
Turning On the Consent Banner and Script Blocking
From your WordPress admin sidebar, go to WPConsent » Settings.
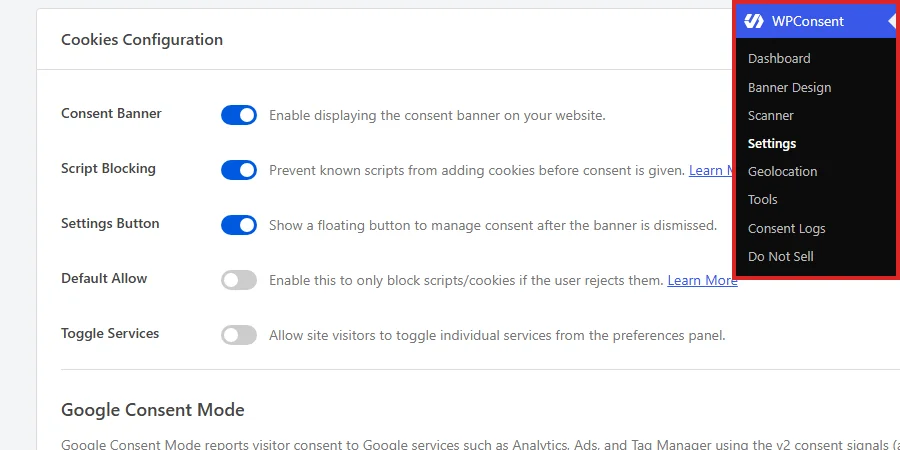
The page opens on the Settings tab. A License panel sits at the top for your license key, and everything covered in this guide lives in the Cookies Configuration panel below it.
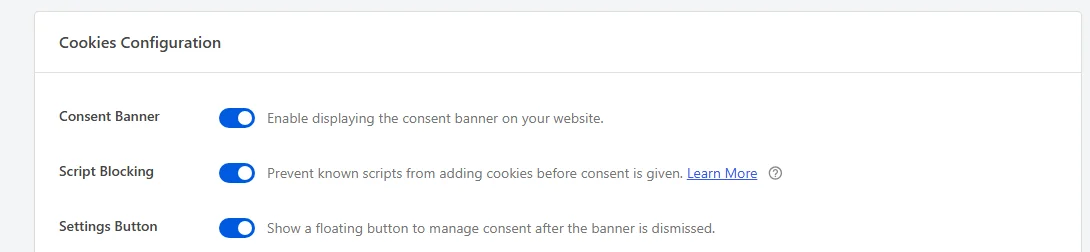
The first row is the master switch for the whole banner. Turn on Consent Banner to show your banner to visitors.

With the banner off, nothing is displayed on your site and no consent is collected, so leave this on while you set the rest up.
Next in the list, turn on Script Blocking so known third-party scripts wait for consent instead of setting cookies as soon as the page loads.

This setting works together with the one above it: WPConsent stores Script Blocking as on only when the Consent Banner is also on.
For more on which scripts WPConsent recognizes, see our guide on automatic script blocking.
Adding the Floating Settings Button
Once a visitor dismisses the banner, it stays out of the way. Turn on Settings Button to give them a small floating button that reopens the preferences panel whenever they want to change their mind.

The button’s position and appearance are set separately.
For those options, see our guide on the floating consent button.
Choosing Between Opt-In and Opt-Out Consent
Default Allow decides which way round consent works on your site, and it is off by default.

With it off, WPConsent blocks non-essential scripts and cookies until a visitor accepts them. That is the opt-in model the GDPR is built around, so most sites serving visitors in the EU leave this setting alone.
Turning it on switches your site to an opt-out model. Scripts load right away and are blocked only for visitors who reject them. Which model applies to you depends on the regulations you’re subject to, so check that before changing it.
Letting Visitors Toggle Individual Services
By default, your preferences panel groups everything into categories, and visitors accept or reject a whole category at a time. Turn on Toggle Services to add a switch for each individual service inside those categories.

This gives visitors finer control, for example accepting one analytics service while rejecting another in the same category.
To see how both versions look, see our guide on the preferences panel.
Configuring Google Consent Mode
Below the banner toggles sits a Google Consent Mode section. It reports each visitor’s choice to Google services such as Analytics, Ads, and Tag Manager, using the Consent Mode v2 signals. Turn on Google Consent Mode to send those signals.

Each signal starts in the state your Default Allow setting implies, then updates as soon as the visitor responds to the banner. Because the signals travel with the banner, WPConsent only loads Consent Mode when the Consent Banner is on.
For a breakdown of the signals themselves, see our guide on Google Consent Mode v2.
Two related options sit directly below, both off by default. Turn on URL Passthrough to carry advertising identifiers such as gclid between pages in the URL. That keeps conversion attribution working for visitors who deny ad cookies.
The row beneath it, Ads Data Redaction, routes Google ad measurement through cookieless domains. It also strips ad-click identifiers from network requests while ad storage is denied.
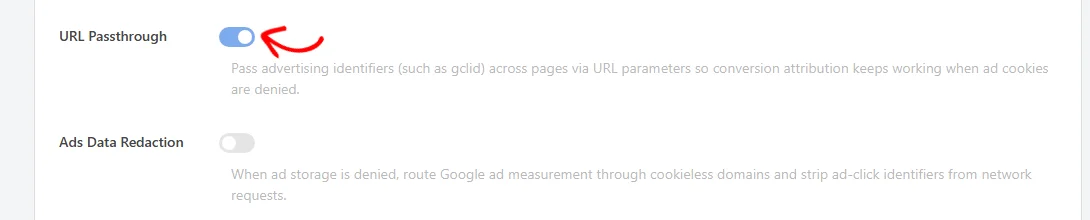
Both options exist for advertising measurement, so they matter to sites running Google Ads and can stay off everywhere else.
Reviewing Your Cookie Categories
The Cookie Categories row lists the groups your visitors choose between, along with the description each one shows in the preferences panel.
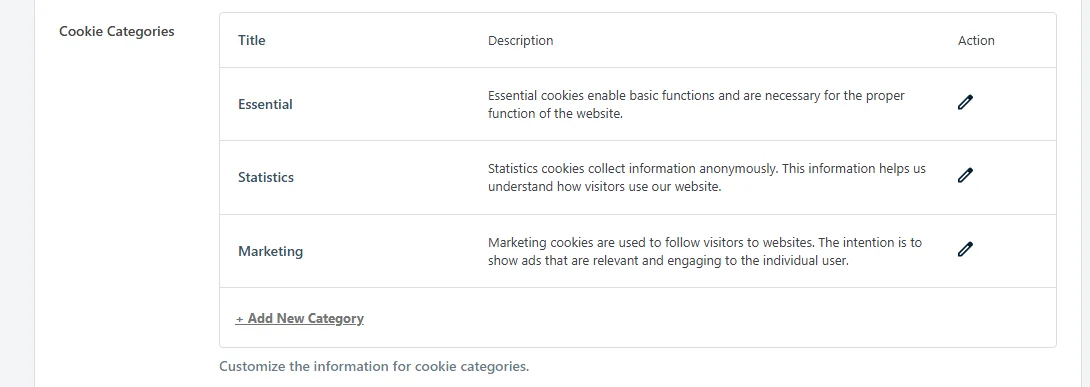
WPConsent starts you with three categories: Essential, Statistics, and Marketing. Each row has an edit icon for changing its title and description. The Add New Category button at the bottom adds one of your own.
The three built-in categories have no delete icon, because WPConsent’s automatic script blocking sorts services into them. Categories you add yourself get a delete icon as well.
For editing and adding them, see our guide on managing cookie categories.
Linking Your Cookie Policy Page
In the Cookie Policy row, choose the page on your site that serves as your cookie policy. The selector searches your pages as you type, which helps when the page you want isn’t in the initial list.

Once a page is selected, a View Page link appears beside the selector, and it opens that page in a new tab.
That page needs to contain the [wpconsent_cookie_policy] shortcode, which is what lists every cookie you have configured in WPConsent. If you haven’t created the page yet, WPConsent offers a Generate Cookie Policy Page button in this row until you select one.
For generating and editing that page, see our guide on the cookie policy page.
Blocking Embedded Content
Script blocking handles tracking scripts, and embedded content is separate. Turn on Content Blocking to hold back third-party services that load through an iframe, such as a video player or an embedded map. Those embeds then wait for consent.
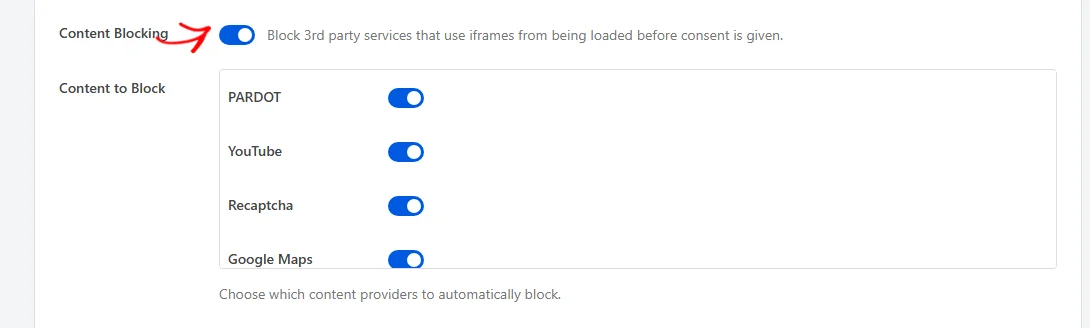
Turning it on reveals the Content to Block list underneath, where every provider is enabled to begin with. The list has its own scrollbar, so scroll inside it to see every provider. Then clear the switch beside any you’d rather load straight away.
In place of a blocked embed, your visitors see a placeholder with a button that loads the content. To change what that button says, use the Placeholder Button field.

Include {category} anywhere in the text and WPConsent replaces it with the name of the cookie category the embed belongs to.
Setting the Consent Duration
In the Consent Duration field, set how many days WPConsent remembers a visitor’s choice before asking again. It starts at 30 days.

A shorter duration asks visitors again sooner, and a longer one leaves their choice in place for longer. Once the period is up, the banner appears again for that visitor. Saving a new value also updates the duration WPConsent lists for its own preferences cookie, so your cookie policy page stays accurate.
Keeping Records of Consent
Further down the panel, turn on Consent Logs to store a record every time a visitor gives consent. Those records stay entirely on your own WordPress site.

Those records are what you show a regulator asking for evidence of consent, and WPConsent collects them on its own Consent Logs page.
For reading and exporting them there, see our guide on consent logs.
Turning on Consent Logs reveals Automatic Cleanup below it. Turn that on to have WPConsent remove older records on a weekly schedule. That keeps the log table from growing without limit on a busy site.
Then pick how far back to keep them in the Delete logs older than dropdown.

The choices are 3 months, 6 months, 1 year, and 2 years, with 1 year selected to begin with. A shorter period keeps the log table smaller, and a longer one keeps more evidence on hand. Once the schedule is running, this row also tells you when the next cleanup is due.
That weekly run uses your site’s WordPress schedule, so the exact time it fires depends on when your site next gets traffic.
Note: WPConsent recommends exporting the logs you want to keep before you turn on Automatic Cleanup, because each run removes those records permanently.
Saving Your Settings
At the bottom of the panel, click Save Changes.
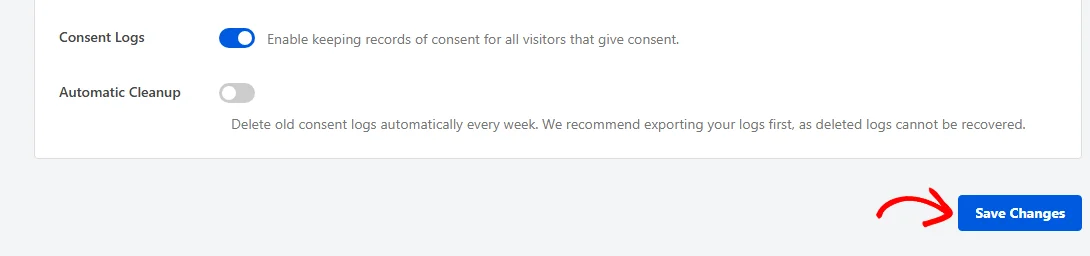
Everything on this tab saves together, so one click stores every change you made above.
That’s it! Your consent banner, script blocking, and consent records are now configured the way you want them.
Next, run a scan so WPConsent knows which cookies and services your site actually uses. Our guide on scanning your website shows how.
Frequently Asked Questions
Below, we’ve answered some of the most common questions about WPConsent’s general settings.
Why can’t I turn on Script Blocking by itself?
Script Blocking depends on the Consent Banner. WPConsent saves it as on only when the Consent Banner is on at the same time. Turn on Script Blocking while the banner is off and the setting reverts when you save. To keep it, turn the Consent Banner on first and save both together.
Where do I find the Auto Scanning setting?
Auto Scanning lives on the Scanner page, not on this one. To turn it on and choose how often it runs, go to WPConsent » Scanner.
What happens to Google Consent Mode if I turn the banner off?
WPConsent stops loading it. The consent signals are sent as part of the banner. With the Consent Banner off, Google Consent Mode is not loaded on your site even while its own switch is on.
Can I delete the Essential, Statistics, or Marketing categories?
No, and that is why those three rows show only an edit icon. WPConsent sorts the services it recognizes into these categories automatically, so they stay in place. You can rename them and rewrite their descriptions, and any category you add yourself can be deleted.
Which services can I block in the Content to Block list?
WPConsent builds the list from the services in its own library that load content through an iframe or a similar embedded element. Services that only add tracking scripts are handled by Script Blocking instead, so they don’t appear here. The list grows as WPConsent’s library does, which is why it scrolls.
How often does Automatic Cleanup run on my site?
Once a week, on a schedule WPConsent sets when you save the setting. Each run removes consent logs older than the retention period you picked. The row also shows the date of the next run along with the result of the last one.