TL;DR:
To set up Google Consent Mode V2 on WooCommerce, turn on WPConsent’s banner and Consent Mode. Add WP Consent API so your store plugins can read each shopper’s choice. Switch on URL Passthrough if you run Google Ads. Then test two orders: one declined, one accepted. Declined orders still count. Their source may just show as unknown.
You add a cookie banner. A week later, you pull your campaign report, and something looks off. Orders are still coming in, roughly the same as before. But a growing share of them now shows up as Unassigned, or just Direct.
That’s not a broken banner.
It’s Google Consent Mode doing exactly what it’s built to do. When a shopper declines cookies, WooCommerce still records the sale. It may no longer have enough information to tie it back to the ad or email that brought them there.
Here’s the short version: consent doesn’t cost you the sale. It can cost you the source of that sale. The right settings can preserve some of that attribution, but some orders will still have no source in your analytics.
New to Consent Mode itself? Start with our Google Consent Mode V2 setup guide, then come back here for the WooCommerce-specific part.
Key Takeaways
- Compare your WooCommerce orders with GA4 purchases first. If the numbers don’t match, there may be a tracking issue to fix before looking at consent.
- Test logged out, in a private window. MonsterInsights and GA for WooCommerce both skip admins by default, so testing while logged in shows nothing.
- URL Passthrough carries ad-click and session details forward between your pages when a shopper declines. It improves attribution, it doesn’t restore it.
- Many small stores don’t hit Google’s volume threshold for modeled estimates, so expect to see Unassigned orders, not filled-in numbers.
Read the article below first. Or, skip to the quiz and test yourself first ›
Before You Start
Before you continue, find the setup that matches your site:
- Already using WPConsent? Start with Check Your Order Tracking below. We’ll show you what to check before changing your consent settings.
- Using another consent plugin? While we use WPConsent for the setup steps, you can still follow the tracking and testing steps. If you want to follow this guide exactly, switch to WPConsent first. Don’t run two consent plugins at the same time.
- Don’t have a consent plugin yet? WPConsent is the best WordPress consent plugin. The free version includes Google Consent Mode V2. Follow our installation guide, then come back here.
How to Set Up Google Consent Mode V2 for WooCommerce
To help you navigate this article, use the links below to skip to any section.
- Step 1: Check Your Order Tracking
- Step 2: Compare WooCommerce Orders With GA4
- Step 3: Turn On WPConsent's Banner and Consent Mode
- Step 4: Keep Ad-Click Details When Shoppers Decline
- Test Two Orders: One Declined, One Accepted
- How Much Attribution Can Google Recover?
- Test What You've Learned
- FAQs: How to Set Up Google Consent Mode V2 for WooCommerce
- Set Up and Test Google Consent Mode V2 for WooCommerce
- Additional Resources
Step 1: Check Your Order Tracking
First, find out which tool reports your WooCommerce sales to Google.
Common setups include MonsterInsights, Google Analytics for WooCommerce, Google for WooCommerce, or Google Tag Manager.
These tools handle Google Consent Mode V2 for WooCommerce slightly differently.
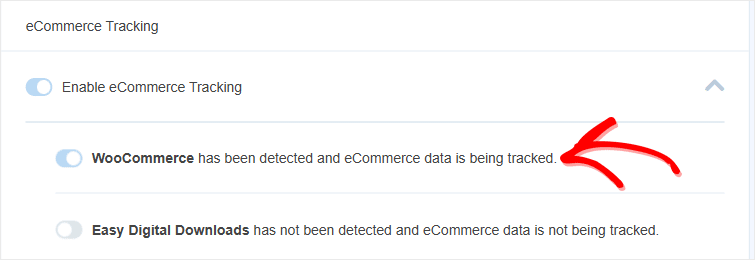
For example, if you’re using MonsterInsights, make sure the eCommerce add-on is enabled. With the add-on active, it detects WooCommerce automatically.
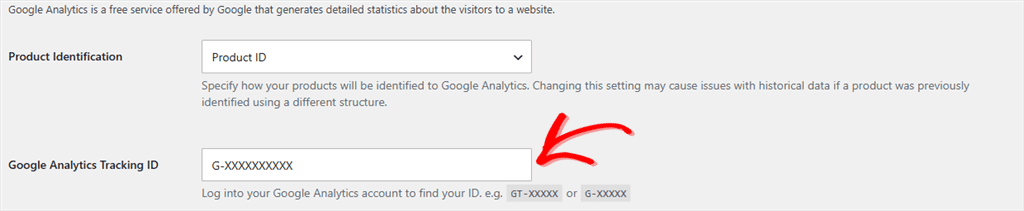
Using GA for WooCommerce instead? Go to WooCommerce » Settings » Integration » Google Analytics and look for your Measurement ID.
If you haven’t connected Google Analytics yet, our Consent Mode V2 setup guide covers that first.
Once you’ve confirmed it’s connected, you can continue with the order tracking check below.
Step 2: Compare WooCommerce Orders With GA4
Now that you know your tool, check two numbers before you touch any consent setting:
Compare the number of orders in WooCommerce with the number of purchases Google Analytics 4 reports for the same period.
If the numbers are close, your order tracking is likely working as expected. The gap you’re seeing is more likely an attribution issue.
If they’re far apart, there’s likely a tracking issue to fix before looking at consent settings. That’s because different tools report WooCommerce orders in different ways, as mentioned.
The table below shows how each setup records a purchase and what can happen to its source when a shopper declines.
| Tracking setup | How the purchase is recorded | If the shopper declines |
|---|---|---|
| MonsterInsights | Records the order from your server once it reaches Processing or Completed. | The order is counted, but its source may be unknown. |
| GA for WooCommerce | Sends the purchase from the shopper’s browser on the thank-you page. | The purchase is sent as a cookieless signal, without the analytics cookie. |
| Google for WooCommerce | Sends the purchase from the browser as a Google Ads conversion. | Same as GA for WooCommerce: a cookieless signal. |
| Google Tag Manager | Depends on how your tags and consent settings are configured. | See our GTM Consent Mode guide. |
| WooCommerce | Saves the order directly, independently of Google. | The order is still saved, but Origin can show as “Unknown.” |
A declined shopper’s source can go missing because, without consent, analytics cookies aren’t stored.
You’ll see this in the test below: a shopper who clicks Reject has no _ga cookie during checkout, so there’s nothing to connect the completed order back to the original visit.
That’s why a server-side tool like MonsterInsights can still count the sale.
It records the completed order from your server, but without a visitor ID from the _ga cookie, it may not have enough information to connect that order to its original source.
If your gap is bigger than consent alone explains, confirm you’re testing logged out (more on that in a moment) and that your Measurement ID from the previous section is saved correctly.
Check out the full walkthrough in our WooCommerce cookie consent guide.
Step 3: Turn On WPConsent’s Banner and Consent Mode
WPConsent’s Google Consent Mode is on by default.
It only starts working once a Google service is set up on your site and your consent banner is live.
So let’s get the banner live first.
Once you install and activate WPConsent, the setup wizard runs automatically. Finish it, and your consent banner goes live with no extra steps.
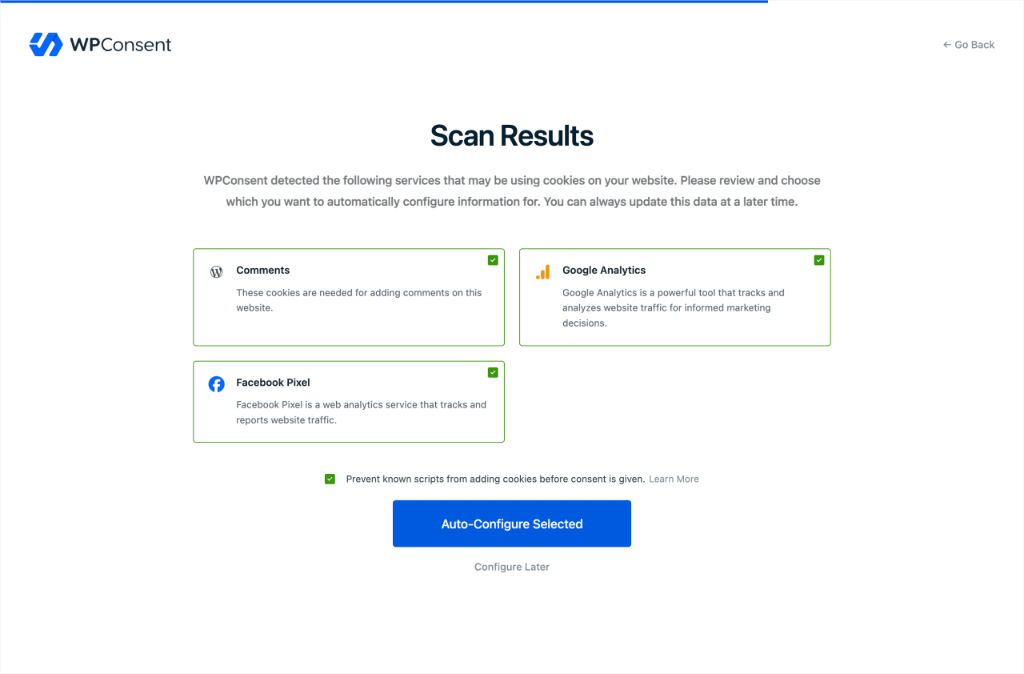
Skipped the wizard? You can set up the banner manually.
Go to WPConsent » Banner Design.
Choose a layout on the first screen. Then, use the Style screen to adjust colors and button styling. On the Content screen, customize the banner message, button text, and Preferences Panel settings.
You can also leave it as it is, with what WPConsent has by default.
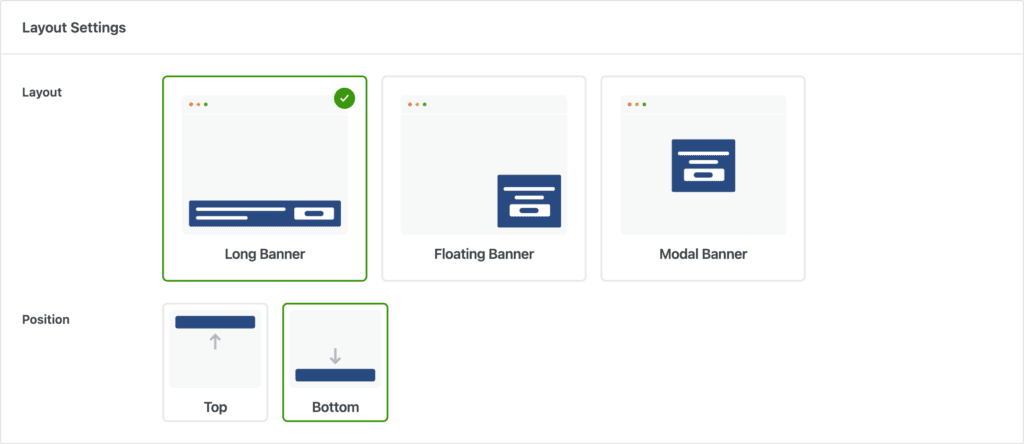
Check out this tutorial on how to add a cookie consent banner with WPConsent.
If you set the banner up manually, make it live: go to WPConsent » Settings, find Consent Banner, and switch it on.
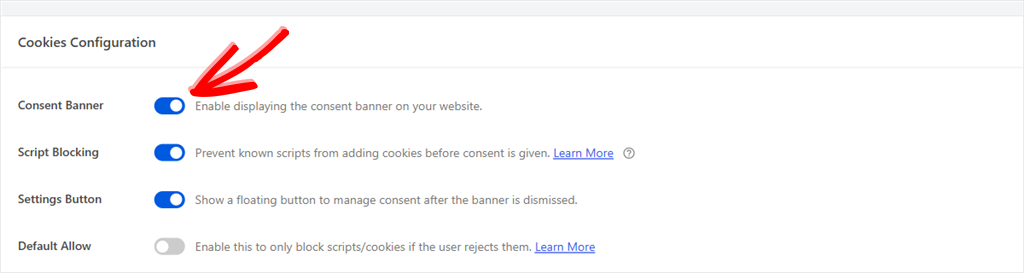
Next, on the same screen, scroll to the Google Consent Mode section.
As mentioned, it should already be enabled. You don’t need to change anything else on this screen to get a working setup.
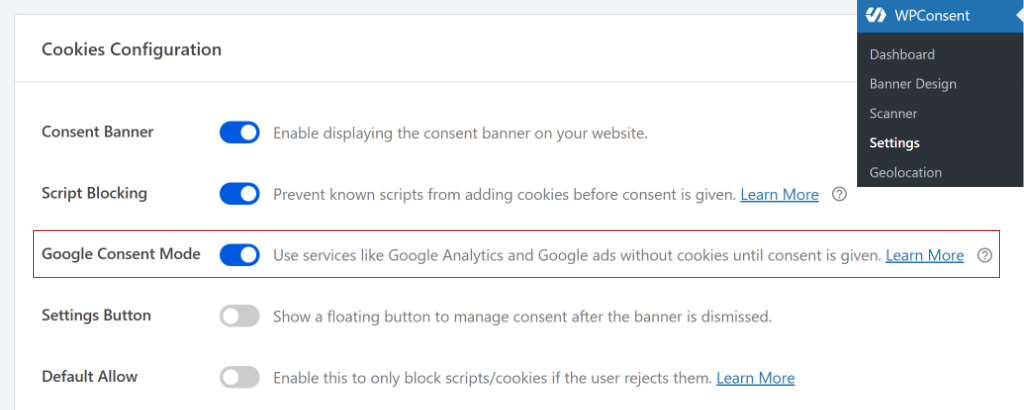
WPConsent’s settings reach Google’s tag before it loads, so if you’re using MonsterInsights, the Google tag itself needs nothing extra.
Next, install WP Consent API for free.
WP Consent API is a free WordPress plugin that gives consent plugins and other plugins a shared way to pass along a visitor’s choice.
It doesn’t show a banner or block anything itself. It only carries the answer.
WPConsent tells it what each shopper chose. WooCommerce’s own order attribution, GA for WooCommerce, and Google for WooCommerce check it before they track.
That’s why we recommend it for every WooCommerce store, whichever analytics tool you use.
Go to Plugins » Add New, and search “WP Consent API”. Then install it like any other plugin.

Check out this guide on how to set up the WP Consent API integration if you need help.
GA for WooCommerce also sets its own starting “denied” state for shoppers in Europe. In a normal setup, that matches WPConsent’s default, so the two work together.
Step 4: Keep Ad-Click Details When Shoppers Decline
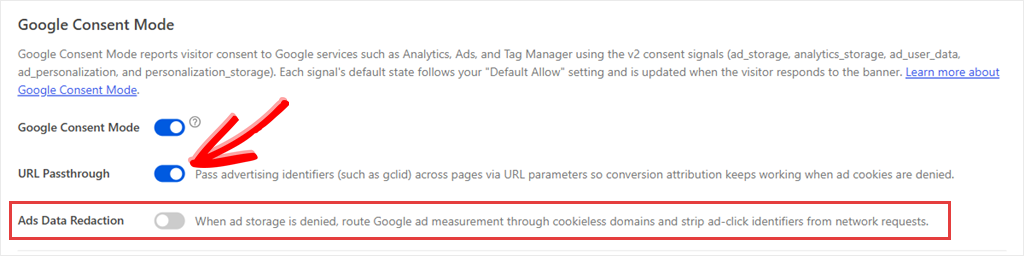
If you run Google Ads, configure URL Passthrough next. It’s on the same screen as Consent Mode.
Go to the Google Consent Mode section and switch on URL Passthrough.
According to Google’s documentation, URL Passthrough carries ad-click details across the pages a shopper visits. Google adds that it can also carry session analytics without cookies.
This improves ad click measurement when cookies are denied. It can improve attribution, but it can’t restore all of the information lost when a shopper declines cookies.
Test URL Passthrough
You can test URL Passthrough on your own store. Open a private browser window and visit a page using a Google Ads test link with a click ID in the URL.
Reject the cookie banner, then click an internal link to another page on your site. Check the URL of the next page. You should see the click ID and session details carried forward automatically:
https://example.com/another-page/?_gl=1*abc123*_ga*XXXXXXX*_ga_XXXXXXXXXX*XXXXXXX&gclid=TESTGCLID123No _ga analytics cookie should be stored. The details travel in the link instead.
This is how it works:
The click ID arrives in the landing URL, URL Passthrough carries those details into links to other pages on your domain, and Consent Mode allows this to happen when the shopper has declined cookies.
All three pieces need to be in place for URL Passthrough to have something to carry.
Ads Data Redaction works in the opposite direction. When enabled, Google strips ad-click identifiers for shoppers who decline cookies instead of preserving them for measurement.
If you’re trying to preserve as much ad-click information as possible, leave Ads Data Redaction off when you enable URL Passthrough. Turning both on doesn’t give you more attribution data.
For deeper Google Ads setup, see blocking Google Ads scripts until consent.
At this point, your Google Consent Mode setup for WooCommerce is complete. Next, let’s test two orders to see how the setup handles a shopper who declines cookies compared with one who accepts.
Test Two Orders: One Declined, One Accepted
This test compares two otherwise identical orders: one from a shopper who declines the banner and one from a shopper who accepts it. You’ll check both orders in WooCommerce and GA4 to see how consent affects their source.
Run this in a private browser window, not while logged into WordPress.
MonsterInsights and GA for WooCommerce both skip administrators by default, and WPConsent’s Banner Analytics excludes them too.
If you test while logged in as an administrator, you may not see the expected analytics cookies in your browser’s DevTools, and nothing from either order will reach GA4, which makes the comparison meaningless.
This can be mistaken for a broken setup when it’s simply the admin exclusion at work.
To get started with the test, open a product page from a tagged link, something like ?utm_source=newsletter.

Then, click Reject and complete a checkout.
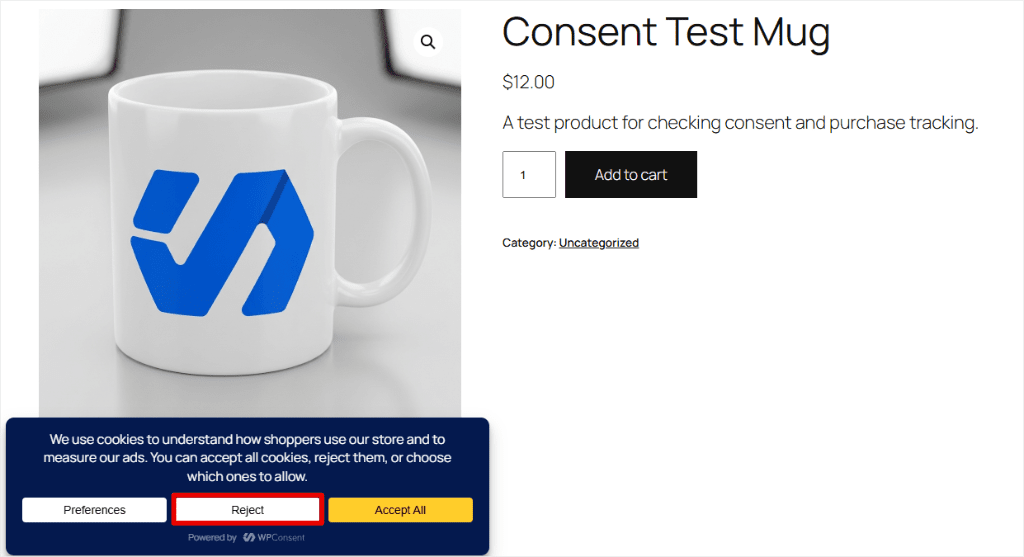
💡Tip: Cash on Delivery works for this test since you don’t need to make a real purchase. One thing to watch: your analytics plugin usually only reports the sale once the order reaches Processing or Completed.
If the test order sits on Pending payment or On hold, update its status in WooCommerce » Orders before checking your reports.
Repeat the same purchase in a fresh private window, this time clicking Accept All.
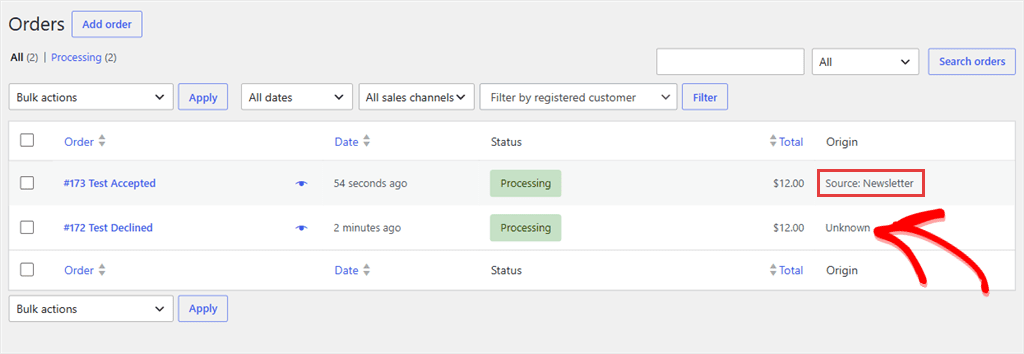
Now check WooCommerce » Orders and look at the Origin column. The accepted order shows its real source. The declined one shows “Unknown.” Both sales are sitting right there in your order list, counted either way.
That difference is WooCommerce’s own order attribution respecting each shopper’s choice, which WPConsent passes along through WP Consent API.
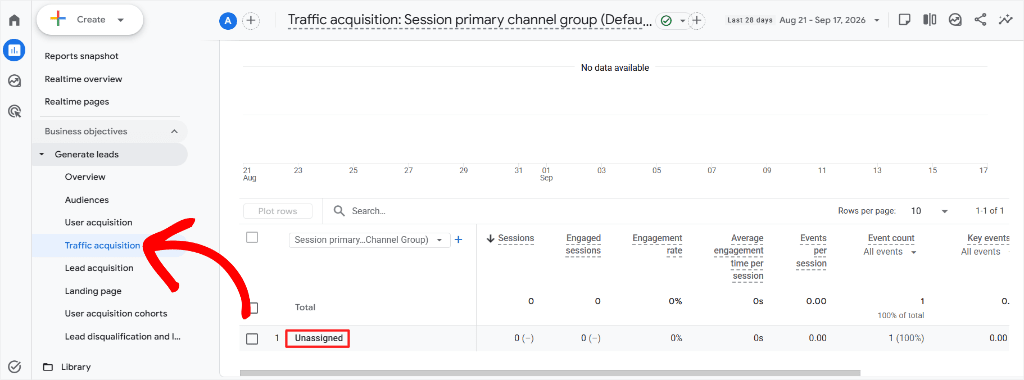
In GA4, that same declined order lands as Unassigned or Direct, the browser-side counterpart to what you just saw in WooCommerce.
To see what happened directly, open your browser’s developer tools after declining and check the cookies for your site: no _ga cookie appears.
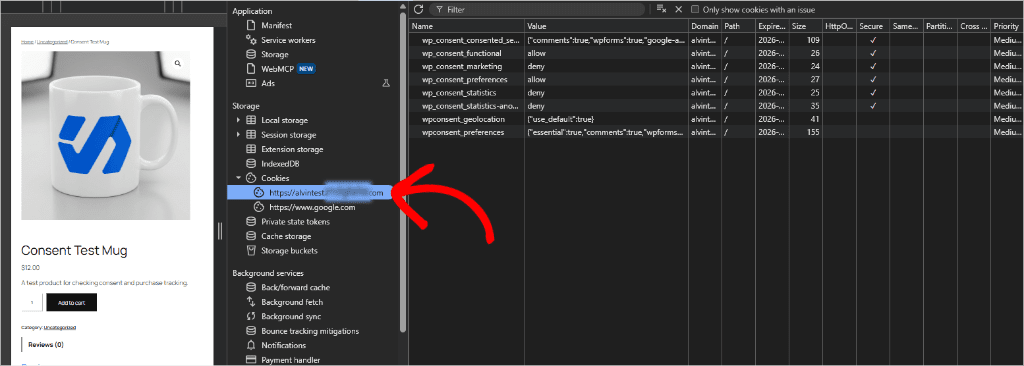
_ga or _ga_* cookie is present.Google’s own Tag Assistant shows analytics_storage as denied for the same session.
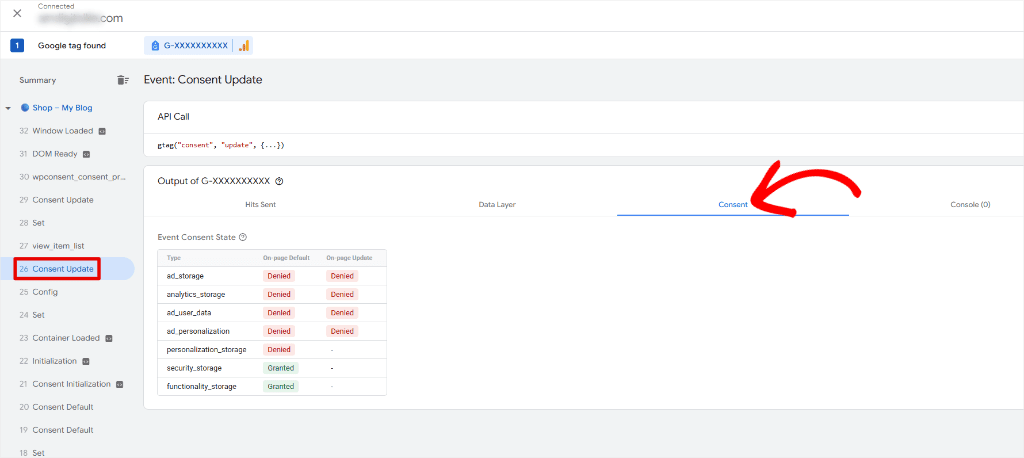
You don’t need either check to finish this guide, but both point at the same cause you already saw in the Orders screen: no cookie, no link back to the visit.
For a broader look at what’s running on your site, our cookie compliance audit guide walks through a fuller check.
When you’re done testing, cancel or delete the two test orders.
How Much Attribution Can Google Recover?
By this point, you’ve seen what happens to an individual order when a shopper declines the banner. The next question is whether Google can make up for the missing data in your reports.
Google can estimate the gap, but it can’t restore it. When enough shoppers accept cookies, Google uses their behavior to estimate what the shoppers who declined did.
Those estimates are added to your report totals, like users, sessions, and conversions. They don’t put a source back on an individual order.
Two things have to be true for Google to provide this estimate.
First, Google’s tags must load before the shopper responds, which Google calls an advanced implementation.
Second, your site needs enough traffic.
For GA4, Google requires at least 1,000 events per day from shoppers who declined, for at least 7 days.
It also needs at least 1,000 daily users who accepted, on at least 7 of the previous 28 days. For Google Ads, the requirement is at least 700 ad clicks over 7 days for each country and domain.
Smaller WooCommerce stores often won’t reach these thresholds.
If yours doesn’t, expect to see Unassigned or Direct orders in your reports, with no estimates filling the gap. Our guide to GA4 traffic drops with Consent Mode explains more.
How WPConsent Helps You Measure the Gap
WPConsent takes care of the first condition. It runs Google Consent Mode in Advanced Mode by default, so Google’s tags load before the shopper responds.
The second condition depends on your traffic, so a consent plugin can’t change it. But WPConsent can show you how much of your traffic your analytics can measure.
Banner Analytics, available on all paid plans, shows how many visitors saw your cookie banner, how many made a choice, and how many ignored it.
On Pro and higher plans, it also adds a Measurement Coverage card.
This shows how many visitors your analytics tools are allowed to measure, and how many they can’t. The visitors they can’t measure, because they declined or ignored the banner, are your blind spot.
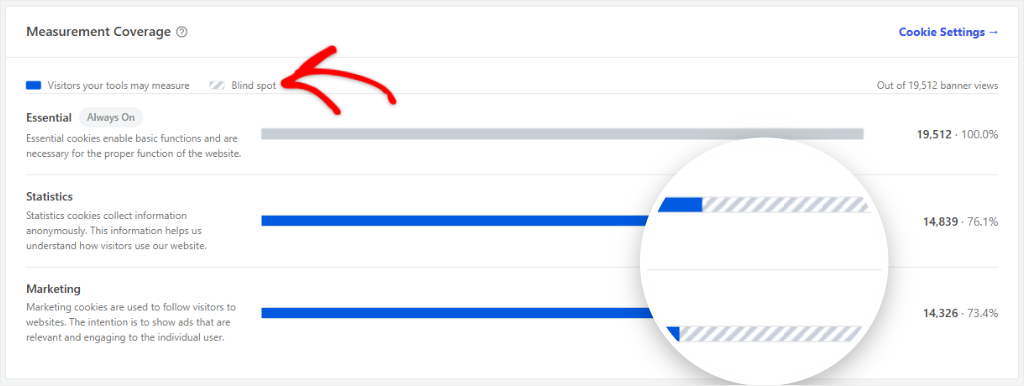
This gives you a practical ceiling for how many sales can carry a source. If a visitor can’t be measured, your analytics may not have enough information to connect their sale back to where they came from.
Everything else in this guide, the banner, Consent Mode, URL Passthrough, and WP Consent API, works on the free plugin.
Well done. You’ve set up Google Consent Mode for WooCommerce and seen how it handles a declined order.
If anything is unclear, test yourself with the short quiz below, then check the commonly asked questions.
Test What You’ve Learned
Three questions, pulled straight from the sections above. Pick an answer to see how you did.
Why does a WooCommerce order sometimes show no source in your reports, even though the sale went through?
Correct.Not Quite. The right answer is B.
No cookie was set after the shopper declined, so nothing links the sale back to their visit.
That’s why WooCommerce’s Origin column can show “Unknown” for a declined order, even though the sale itself still counted.
Which WPConsent setting starts sending consent signals to Google?
Correct.Not Quite. The right answer is C.
Turning on the Consent Banner.
Consent Mode is already on by default, but it only starts working once a Google service is set up and your banner is live. The setup wizard turns the banner on for you.
What does URL Passthrough do?
Correct.Not Quite. The right answer is A.
Carries ad-click details through your page links, which improves (not restores) measurement.
Google’s documentation says it improves ad click measurement when cookies are denied. Nothing restores a cookie that was never set.
Quiz complete.
Started with the quiz and ready to read the article? Begin with Step 1: Check Your Order Tracking.
WPConsent Pro
Want to see how much of your traffic you can measure?
Measurement Coverage is available on Pro and higher plans.
FAQs: How to Set Up Google Consent Mode V2 for WooCommerce
Does Google Consent Mode V2 work with WooCommerce?
Yes. WooCommerce itself needs no special Consent Mode handling. But any plugin reporting your sales to Google (MonsterInsights, GA for WooCommerce, Google for WooCommerce) needs to hear the shopper’s consent choice. WPConsent and WP Consent API handle that.
Do I need the WP Consent API plugin?
Yes, we recommend it for every WooCommerce store using WPConsent, whichever analytics tool you use. WPConsent passes each shopper’s choice to WP Consent API. WooCommerce’s own order attribution, the feature behind the Origin column, reads it from there, and so do GA for WooCommerce and Google for WooCommerce.
Why are my WooCommerce orders showing as Unassigned in GA4?
Because the shopper may have declined cookies before checking out. Without an analytics cookie, GA4 may not have enough information to connect the finished order to the visit that led to it. The order still counts. It just arrives without a source.
Will Google model the sales I lose from shoppers who decline?
Google can estimate the gap in your report totals, but only above a volume threshold. For GA4, that’s 1,000 events a day from shoppers who declined, for 7 or more days. It also needs 1,000 daily users who accepted, on 7 of the last 28 days. For Google Ads, it’s 700 ad clicks over 7 days per country and domain. Many small stores fall short and see Unassigned orders instead of estimates.
Should I turn on URL Passthrough and Ads Data Redaction?
Turn on URL Passthrough if you run Google Ads. It improves how many declined shoppers still carry a click ID forward. Skip Ads Data Redaction unless you have a specific reason to strip ad-click data further. The two work against each other.
Is WPConsent’s Google Consent Mode free?
Yes. The banner, Consent Mode signal, URL Passthrough, Ads Data Redaction, and WP Consent API integration are all in the free plugin. Still comparing options? See our roundup of the best WordPress cookie consent plugins.
What happens to orders from before I set this up?
Nothing changes retroactively. Orders placed before Consent Mode was running keep whatever attribution they already had. Only orders placed after the banner and Consent Mode are live get a shopper’s real consent choice attached.
Set Up and Test Google Consent Mode V2 for WooCommerce
You now know why some WooCommerce orders can look different after adding a consent banner.
Run the two-order test above on your own store and compare the results in WooCommerce and GA4. The right settings can preserve some attribution, but some orders will still have no source.
Install WPConsent and turn on the banner today. The setup only takes a few minutes, and the test gives you a practical way to see how consent affects attribution on your own store.
If you want to set up Google Consent Mode V2 on your WooCommerce store, you can start with the free version of WPConsent.
Get WPConsent for free →
Want the exact number for your own store? Measurement Coverage is available on Pro and higher plans.
See WPConsent pricing →
Additional Resources
Three guides that help you go further once tracking and consent are both sorted:
- Google Consent Mode v2 (Knowledge Base): a deeper look at how the signals, defaults, and updates work
- WPConsent Free vs Pro: what the free plugin covers and what Pro adds
- Smart WooCommerce Cookie Compliance: what WPConsent handles for WooCommerce stores specifically