
Would you like to know exactly what your visitors see when they click Preferences on your cookie banner? The preferences panel is where a visitor accepts some kinds of cookies and turns the rest down, one category at a time.
This guide walks through the panel the way a visitor meets it, from the button that opens it to the button that stores their answer.
Table of contents
- Touring the Preferences Panel
- Reading the Category Rows
- Expanding a Category
- Adding a Switch for Each Service
- Saving a Visitor’s Choices
- Using the Panel With a Keyboard or Screen Reader
- Frequently Asked Questions
Before you get started, make sure WPConsent is installed and activated on your WordPress site.
It also helps to have run a cookie scan already. Your categories then have something in them for visitors to look at.
Touring the Preferences Panel
To get started, we’ll open the panel the way one of your visitors would.
Your consent banner carries up to three buttons. Accept All and Reject each answer for every category at once. The third one opens the panel, where a visitor answers category by category.
On the banner, that button is Preferences.
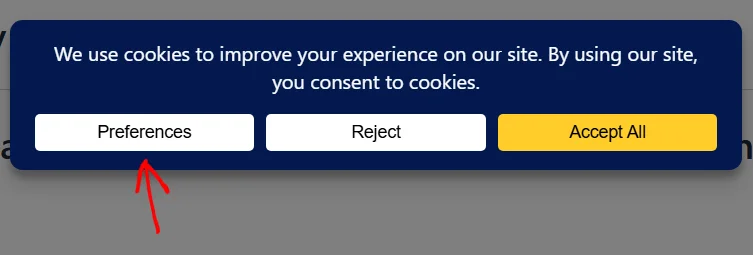
The panel opens on top of the page with the rest of it dimmed. That way a visitor answers before carrying on.
Note: The panel always opens centered on the screen, whichever banner layout your banner uses.
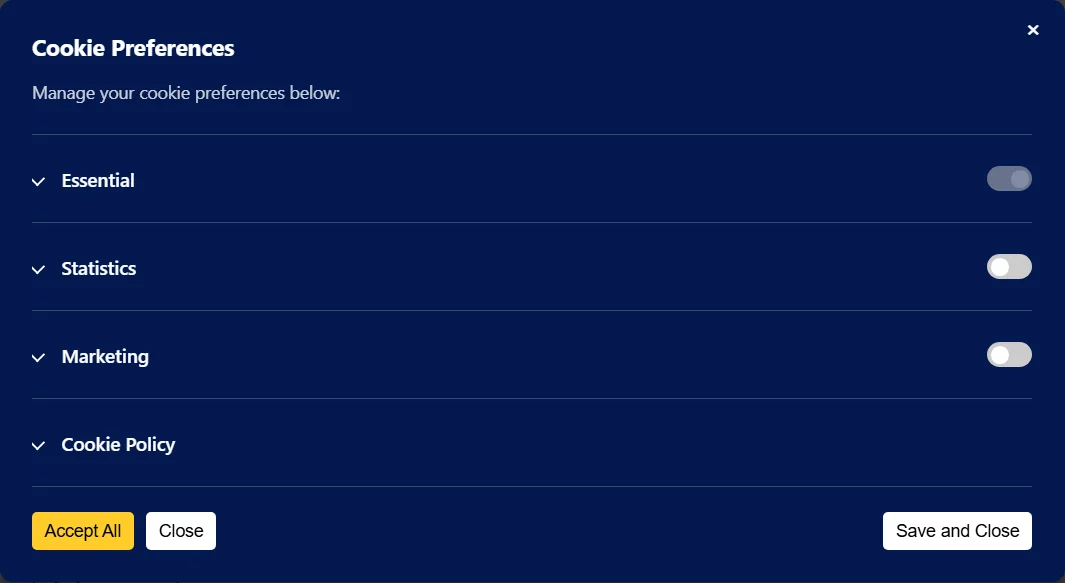
The panel reads from top to bottom like this:
- A heading and a line of introductory text, with a close icon on the right. Your logo sits beside that icon once you have added one.
- One row for each cookie category, each with a switch on the right.
- A Cookie Policy row below the categories.
- Three buttons at the foot.
The logo is the one you upload on that same Content tab, so setting it once puts it on both the banner and the panel.
The heading, the introductory line, and the button labels all come from the Preferences Panel Settings section of the banner designer’s Content tab. The panel also picks up the colors, button shapes, and font size you set for the banner itself.
Our guide on banner content and text covers those fields.
Note: The panel in these screenshots uses WPConsent’s own default colors and wording. Yours shows whatever you have set on the banner designer’s Style and Content tabs.
The category rows are where a visitor actually answers, so those come next.
Reading the Category Rows
Each row is one of your cookie categories. The switch beside it is that category’s answer.
A new install starts with Essential, Statistics, and Marketing. Our guide on managing cookie categories covers renaming those and adding your own.
The first row behaves differently from the rest. Essential is switched on, and its switch is greyed out so a visitor cannot move it.

Cookies in the Essential category are the ones your pages need to work at all. Those include the ones that keep a shopping cart or a logged-in session going.
WPConsent treats them as always allowed. That is why the switch is fixed rather than simply switched on.
Every other category starts switched off. Nothing in it runs until a visitor says yes.
To allow one, a visitor clicks its switch.

A switch fills in once it is on, in whichever colour your banner uses for its accept button. Switching a category on covers everything filed under it, so one click can allow a dozen cookies.
A visitor who wants to see what those cookies are can open the row and look.
Expanding a Category
Every category row opens to reveal what sits inside it. That is how a visitor checks your answer before agreeing to it.
To expand a category, click its name.

The row opens to show the category’s description, followed by a list of the services filed under it.
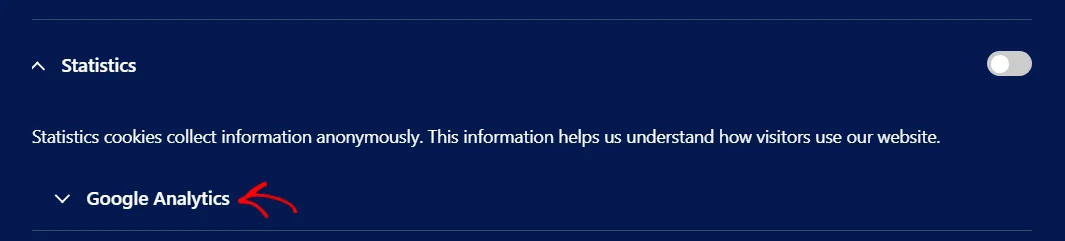
The description is the one you wrote for that category, so it is worth keeping in plain language. This is the sentence a visitor reads while deciding.
Services are the named tools whose cookies WPConsent found. They group a long cookie list into names a visitor recognizes.
Opening one shows its own description, a link to the company behind it, and a table of the cookies it sets. Each cookie in that table carries a duration.
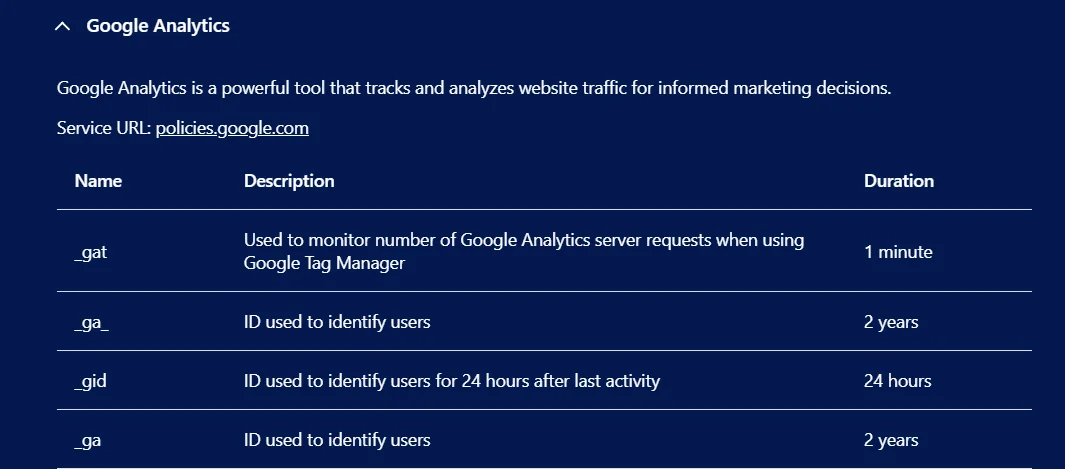
Only one row stays open at a time. Opening a second category closes the first, which keeps the panel short enough to read.
Our guide on managing services covers editing these descriptions and links.
Adding a Switch for Each Service
By default, the switches belong to categories, and the services inside them are there to be read rather than answered.
Turning on the Toggle Services setting under WPConsent » Settings gives each service a switch of its own as well.
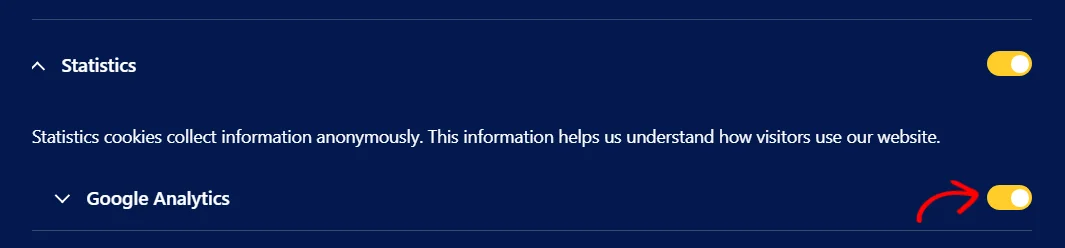
That lets a visitor allow analytics while declining one particular analytics tool. It suits a site running several services under one category.
Switching any service on switches its category on too. Switching the category on carries all of its services with it.
Services in the Essential category get the same treatment their category does. They appear switched on with the switch fixed, because your pages need them.
To turn that setting on, follow our guide on managing services.
Saving a Visitor’s Choices
Three buttons sit at the foot of the panel. Each one does something different:
- Save and Close stores exactly what the switches show.
- Accept All allows every category and service in one go, whatever the switches say.
- Close leaves the panel without storing anything, and the banner comes back.
The small close icon in the top right corner of the panel does the same thing as Close.
Once a visitor has the switches the way they want them, they click Save and Close.

Whichever of the two storing buttons a visitor picks, WPConsent writes their answer to a cookie in their own browser and hides the banner.
That cookie lasts for the number of days set by the Consent Duration field under WPConsent » Settings. Our guide on general settings covers it.
When a visitor comes back and reopens the panel, the switches are already set to the answer they gave last time. Saving a different answer replaces the old one.
If the new answer differs from the stored one, WPConsent clears the cookies already sitting in that visitor’s browser and refreshes the page. The new answer then applies from a clean start.
Using the Panel With a Keyboard or Screen Reader
Not every visitor answers the panel with a mouse, and the panel is built for that. Nothing here needs switching on.
The panel is marked up as a dialog, and its heading is what a screen reader announces as the name of that dialog. A visitor who lands on it therefore hears what they have been given rather than an unlabelled box.
While the panel is open, keyboard focus stays inside it. Tabbing past the last control returns to the first rather than wandering off into the page behind, which is what keeps a keyboard visitor from losing the panel.
Pressing Escape closes the panel, the same as the Close button. Each category row reports whether it is open or closed as a visitor moves through it, and the close icon carries its own label so it does not read as an unnamed button.
Note: The wording a screen reader announces is the wording you set, so the panel’s heading is worth keeping descriptive. A heading such as Cookie Preferences tells a visitor where they are; one such as Settings does not.
That’s it! You now know what your visitors see in the preferences panel and what each part of it does.
Next, take a look at our guide on the floating consent button. It puts a small control on every page so visitors can reopen this panel and change their minds later.
Frequently Asked Questions
Below, we’ve answered some of the most common questions about the preferences panel.
Why is the Essential switch greyed out?
WPConsent renders it switched on and fixed on purpose. Essential cookies are the ones your site needs to function, so consent is not asked for them. The same applies to services inside the Essential category once Toggle Services is on.
Which of my categories appear in the panel?
Any category that holds at least one cookie or at least one service, plus Essential, which always appears. A category you have created but not yet filled waits until it has something in it. Assigning a cookie or a service to it brings it into the panel on the next page load.
Does a service need cookies to show in the panel?
No. A service is listed as soon as it belongs to a category, whether or not any cookies are recorded against it. Its row shows whatever detail it has, and the cookie table appears once cookies are added.
How do my visitors reopen the panel after they’ve chosen?
Turning on the floating consent button puts a small control on every page for exactly that. You can also add the [wpconsent_preferences_button] shortcode anywhere in your content. A third route is to add the wpconsent-open-preferences class to any link or button of your own.
Our guides on the floating consent button and opening the panel with a custom link cover all three.
Where does the Cookie Policy row come from?
It appears once you set a Cookie Policy Page under WPConsent » Settings. The row holds a short line linking to that page and to your privacy policy. Our guide on the cookie policy page covers generating it.
Can I change the wording in the panel?
Yes. The heading, the line under it, and the button labels all live in the Preferences Panel Settings section of the banner designer’s Content tab. So do the Name, Description, and Duration column headings. Category and service descriptions are edited where those items live. Our guide on banner content and text covers the panel’s own fields.
Does the panel look different in other languages?
The layout stays the same, and the wording follows whichever language a visitor is browsing in once you have added that language. Our guide on multilanguage support covers setting the languages up.
What does Reject on the banner store?
It stores a no for every category except Essential. That is the same result as opening the panel, leaving every switch off, and clicking Save and Close. It saves a visitor the extra step when their answer is no to everything.